.png)
Bitbucket is one of the widely known CI/CD tools. In this document, we will show you how to integrate AgileTest with Bitbucket via the REST API.
Prerequisite:
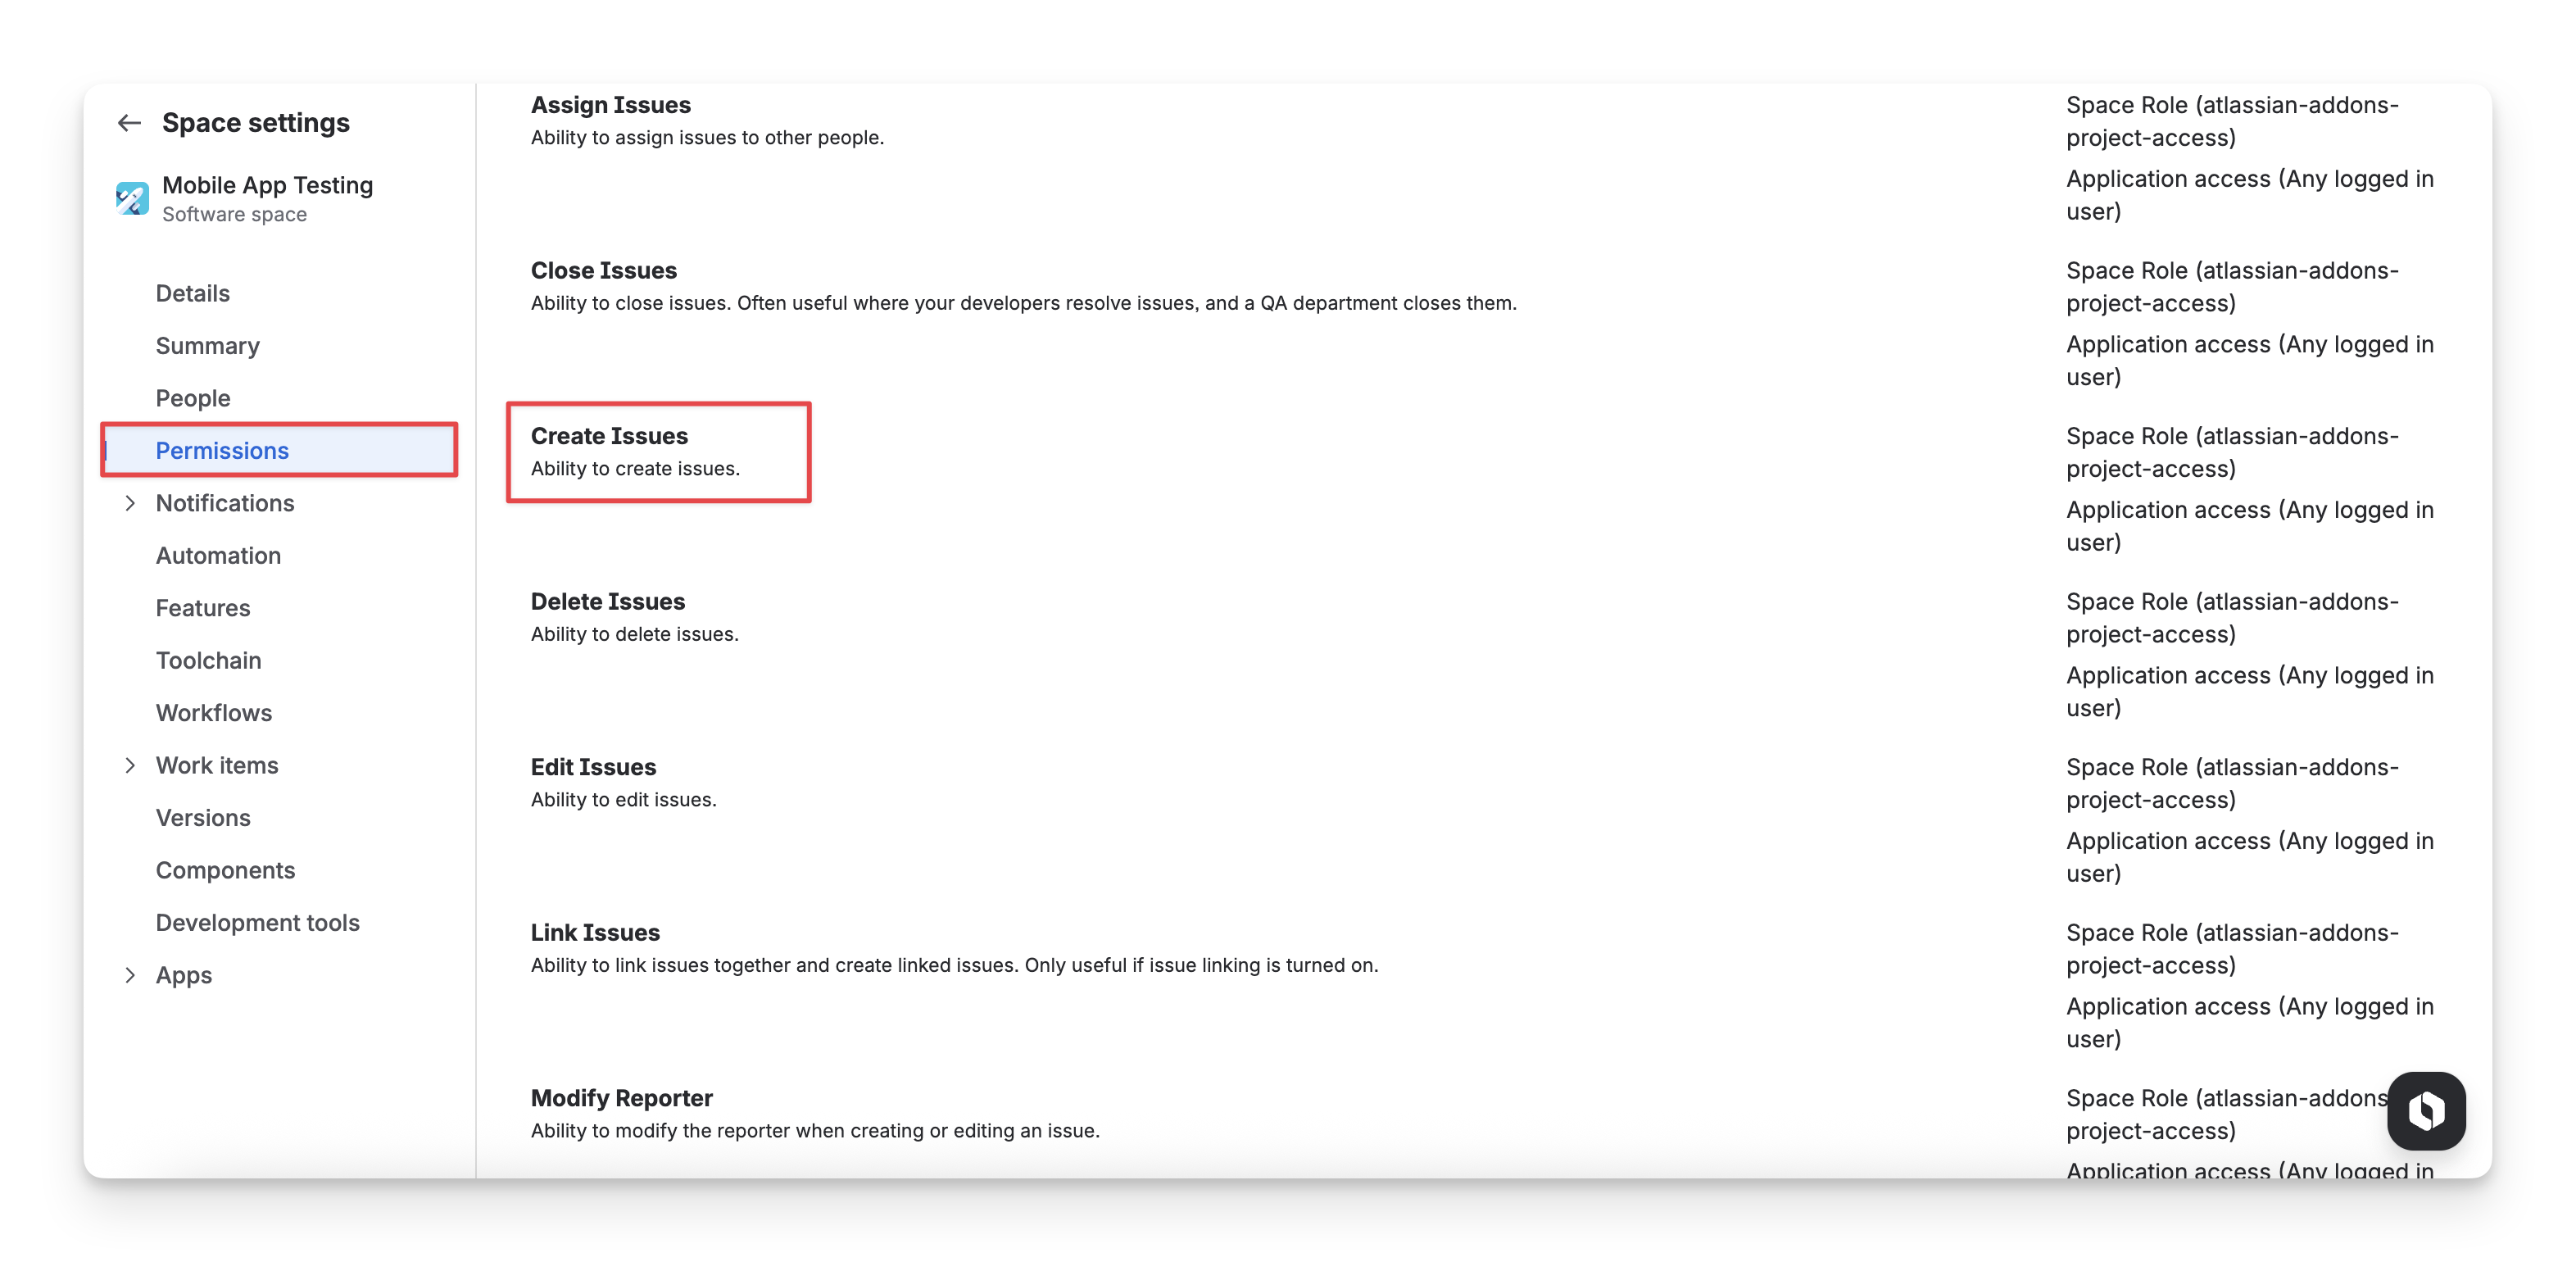
Make sure your account has permission to create TestCase and TestExecution issues; otherwise, the import will fail.
As a Jira admin, you can update this permission in the Space setting → Permission → Create Issues.
-
For the Cloud version, Client id and Client secret are needed. Please refer to this instruction to get them: API integration
-
For Data Center version, you will need a Personal access token (PAT) instead. In Jira, select ⚙️ (top right corner) → System -> Administering personal access tokens, and create yourself a token. Please refer to this article from Jira for more details.
Learn more about how to integrate AgileTest into the Bitbucket CI/CD pipeline.
1. Setup your Bitbucket repository
When you integrate AgileTest with Bitbucket, you need to securely store certain authentication details, such as your Client ID and Client Secret. By doing it, you ensure that sensitive data is kept secure and is not exposed in your code or logs, reuse variables in different places, etc. These credentials are also required for AgileTest to authenticate and communicate with Bitbucket in the pipeline.
1.1 For Cloud version
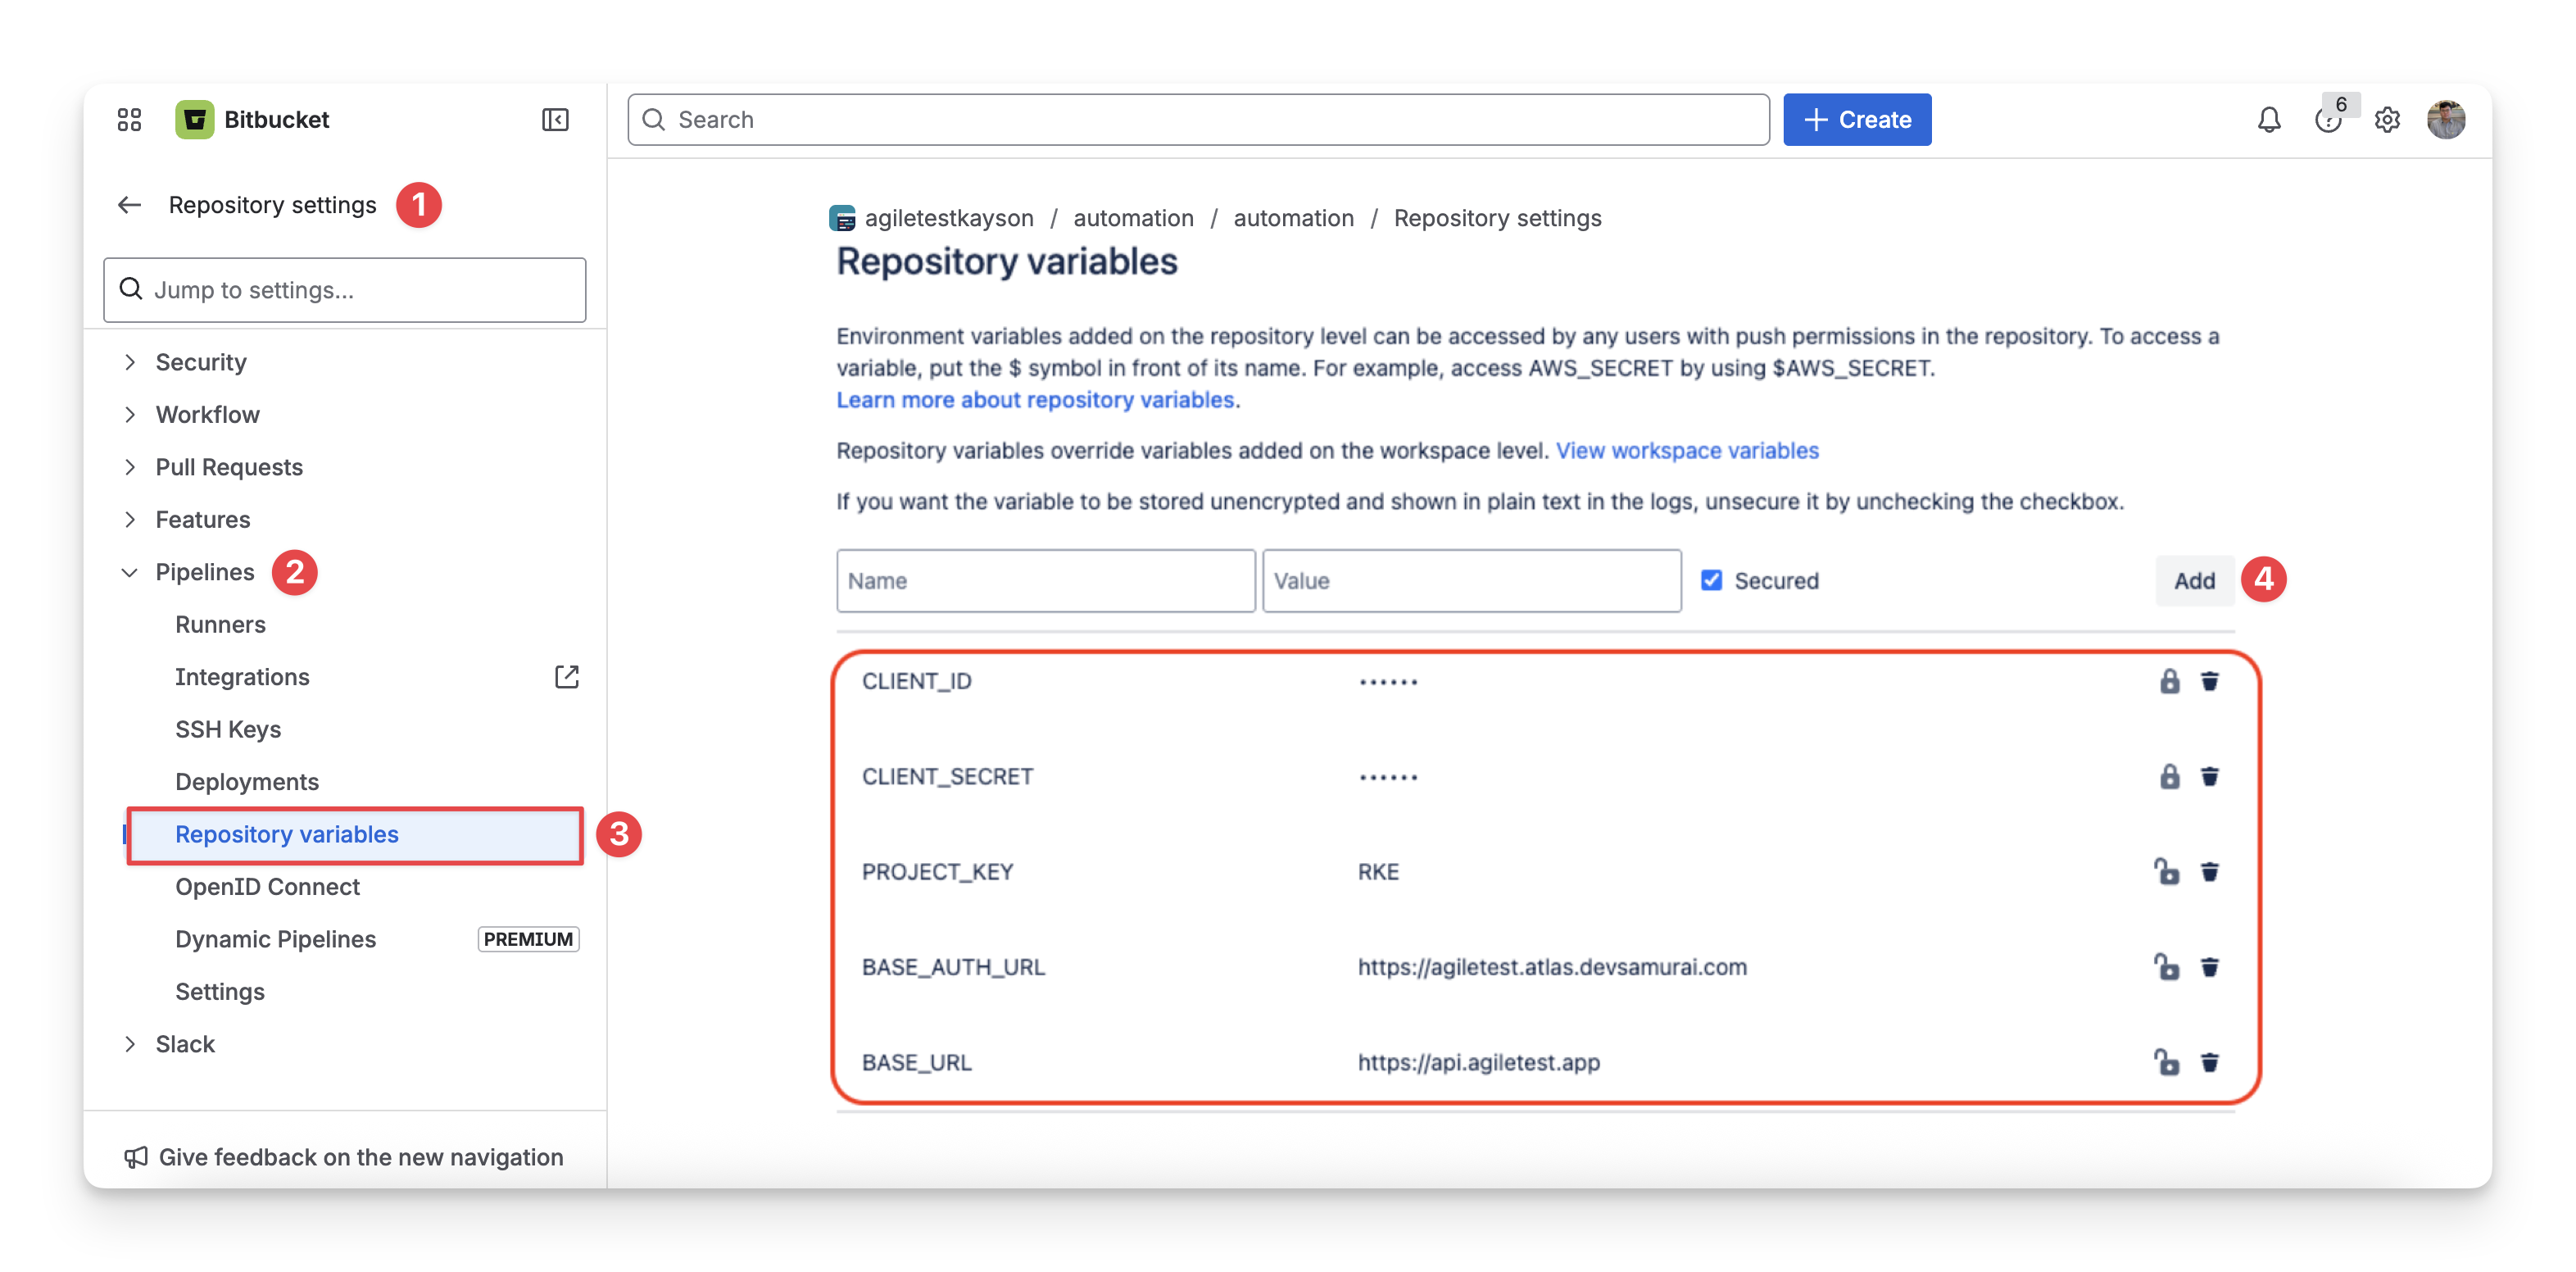
We recommend that you set up 5 repository variables:
|
Variables |
Description |
Is secured |
Example |
|
BASE_AUTH_URL |
Base URL used for requesting authenticating token |
|
|
|
BASE_URL |
Base URL to submit your report to |
|
|
|
CLIENT_ID |
The client id that you have requested earlier |
✅ |
****** |
|
CLIENT_SECRET |
The client secret that you have requested earlier |
✅ |
****** |
|
PROJECT_KEY |
Your project key |
|
RKE |
1.2 For Data Center version
In case you are working with AgileTest Data Center version, you only need 3 variables as follows.
|
Variables |
Description |
Is secured |
Example |
|
DC_TOKEN |
Your Personal access token |
✅ |
|
|
BASE_URL |
Base URL to submit your report to |
|
|
|
PROJECT_KEY |
Your project key |
|
RKE |
1.3 Setup Bitbucket variables
To set up these variables, follow these steps:
-
Click on the Repository settings.
-
Select the Pipelines dropdown on the left-hand side bar.
-
Choose Repository variables.
-
Click the “Add” button and enter details.
2. Upload your test result
After you have set up the Bitbucket repository, you can prepare the YAML file in Bitbucket to connect AgileTest with this tool and upload the test results.
You can have your report in different types of test frameworks. Here is a sample NUnit report to play around with.
If you need more detailed examples, please refer to our public repository on AgileTest GitHub for additional sample projects.
There are 2 main approaches to uploading your test results:
2.1 Use API
2.1.1 For Cloud version
In this file, we use 2 endpoints in the API document
-
post
api/v1/apikeys/authenticateto get a temporary token using the acquired client_id and client_secret. -
post
ds/test-executions/nunitto submit the test report to Agile Test so that the application can create or update Test execution and Test cases accordingly.
2.1.2 For Data Center version
For the Data center version, we only use 1 endpoint post ds/test-executions/nunit with DC_TOKEN variable instead of the token that is requested using the Client Id and Client Secret.
2.2 Use AgileTest CLI
You could find the specs of our CLI here https://agiletestapp.github.io/agiletest-cli/ .
2.2.1 For Cloud version
The file sets up a two-step process: run-test and upload-report. These steps run with different container images – run-test uses a .NET image, and upload-report uses a specialized image for the Agile Test CLI.
In run-test step, we run the automation test scripts and the process yields the report. The report is then pushed to pipeline artifact in order to be used for the later step. Next, in upload-report step, the report is uploaded to AgileTest by using AgileTest CLI. Below is the command used for the task.
 agiletest --base-auth-url $BASE_AUTH_URL \
            --base-url $BASE_URL \
            --client-id $CLIENT_ID \
            --client-secret $CLIENT_SECRET \
            test-execution import --framework-type nunit \
            --project-key $PROJECT_KEY Nunit/PrimeService.Tests/test-result.xml
2.2.2 For Data Center version
Same as Cloud, in this file we also have 2 steps, run-test and upload-report. However, in run-test step, the command will be slightly different.
 agiletest --base-url $BASE_URL \
            --data-center-token $DC_TOKEN \
            test-execution import --framework-type nunit \
            --project-key $PROJECT_KEY Nunit/PrimeService.Tests/test-result.xml
3. View Pipeline Status
AgileTest supports you in tracking the status of your pipeline after it has been triggered. To enable this feature, just add the following directives to your workflow file.
after-script:
            - if [ "$BITBUCKET_EXIT_CODE" -eq 0 ]; then
              RESULT="success";
              else
              RESULT="failed";
              fi
            - export token=$(curl "$BASE_AUTH_URL/api/apikeys/authenticate" -X POST -H 'Content-Type:application/json' --data '{"clientId":"'"$CLIENT_ID"'","clientSecret":"'"$CLIENT_SECRET"'"}' | tr -d '"')
            - |
              curl "$BASE_AUTH_URL/ds/test-executions/$TEST_EXECUTION_KEY/pipeline/history?projectKey=$PROJECT_KEY" -X POST -H "Content-Type: application/json" -H "Authorization: JWT $token" --data '{ "buildNumber": '"$BITBUCKET_BUILD_NUMBER"', "tool": "'"bitbucket"'", "repoSlug": "'"$BITBUCKET_REPO_SLUG"'", "workspace": "'"$BITBUCKET_WORKSPACE"'", "result": "'"$RESULT"'"  }'
-
For the Cloud version, we use the endpoint
testexecutions/{test_execution_id}/pipeline/history -
For the Data center version, please use
rest/agiletest/1.0/test-executions/{test_execution_id}/pipeline/history
Your file should look like this now.
Once you include this part in your YAML file, on pipeline’s completion, a history log with pipeline status will be added on the right panel of the execution issue screen as below.

Should you need any assistance or further AgileTest inquiries, contact our 24/7 Support Desk!