CircleCI is a cloud-based continuous integration and continuous delivery (CI/CD) platform designed to automate software development workflows. It enables developers to ship code faster, more reliably and with confidence. In this document, we will show you how to integrate Agile Test with CircleCI.
Prerequisite:
Make sure your account has permission to create TestCase and TestExecution issues; otherwise, the import will fail.
As a Jira admin , you can update this permission in the Space setting → Permission → Create Issues.
For the Cloud version, Client id and Client secret are needed. Please refer to this instruction to get them: API integration
For Data Center version, you will need a Personal access token (PAT) instead. In Jira, select ⚙️ (top right corner) → System -> Administering personal access tokens, and create yourself a token. Please refer to this article
Unlike GitHub, GitLab, or Bitbucket, CircleCI is solely a CI/CD platform. It doesn’t have source repositories or version control system. That’s why when using CI/CD platform, users need to connect it with other source repositories.
When you integrate AgileTest with CircleCI, you need to securely store certain authentication details, such as your Client ID and Client Secret . By doing it, you ensure that sensitive data is kept secure and is not exposed in your code or logs, reuse variables in different places, etc. These credentials are also required for AgileTest to authenticate and communicate with CircleCI in the pipeline.
We recommend that you set up 5 repository variables:
Variables
Description
Is secured
Example
BASE_AUTH_URL
Base URL used for requesting authenticating token
https://agiletest.atlas.devsamurai.com
BASE_URL
Base URL to submit your report to
https://api.agiletest.app
CLIENT_ID
The client id that you have requested earlier
✅
******
CLIENT_SECRET
The client secret that you have requested earlier
✅
******
PROJECT_KEY
Your project key
RKE
In case you are working with AgileTest Data Center version, you only need 3 variables as follows.
Variables
Description
Is secured
Example
DC_TOKEN
Your Personal access token
✅
BASE_URL
Base URL to submit your report to
PROJECT_KEY
Your project key
RKE
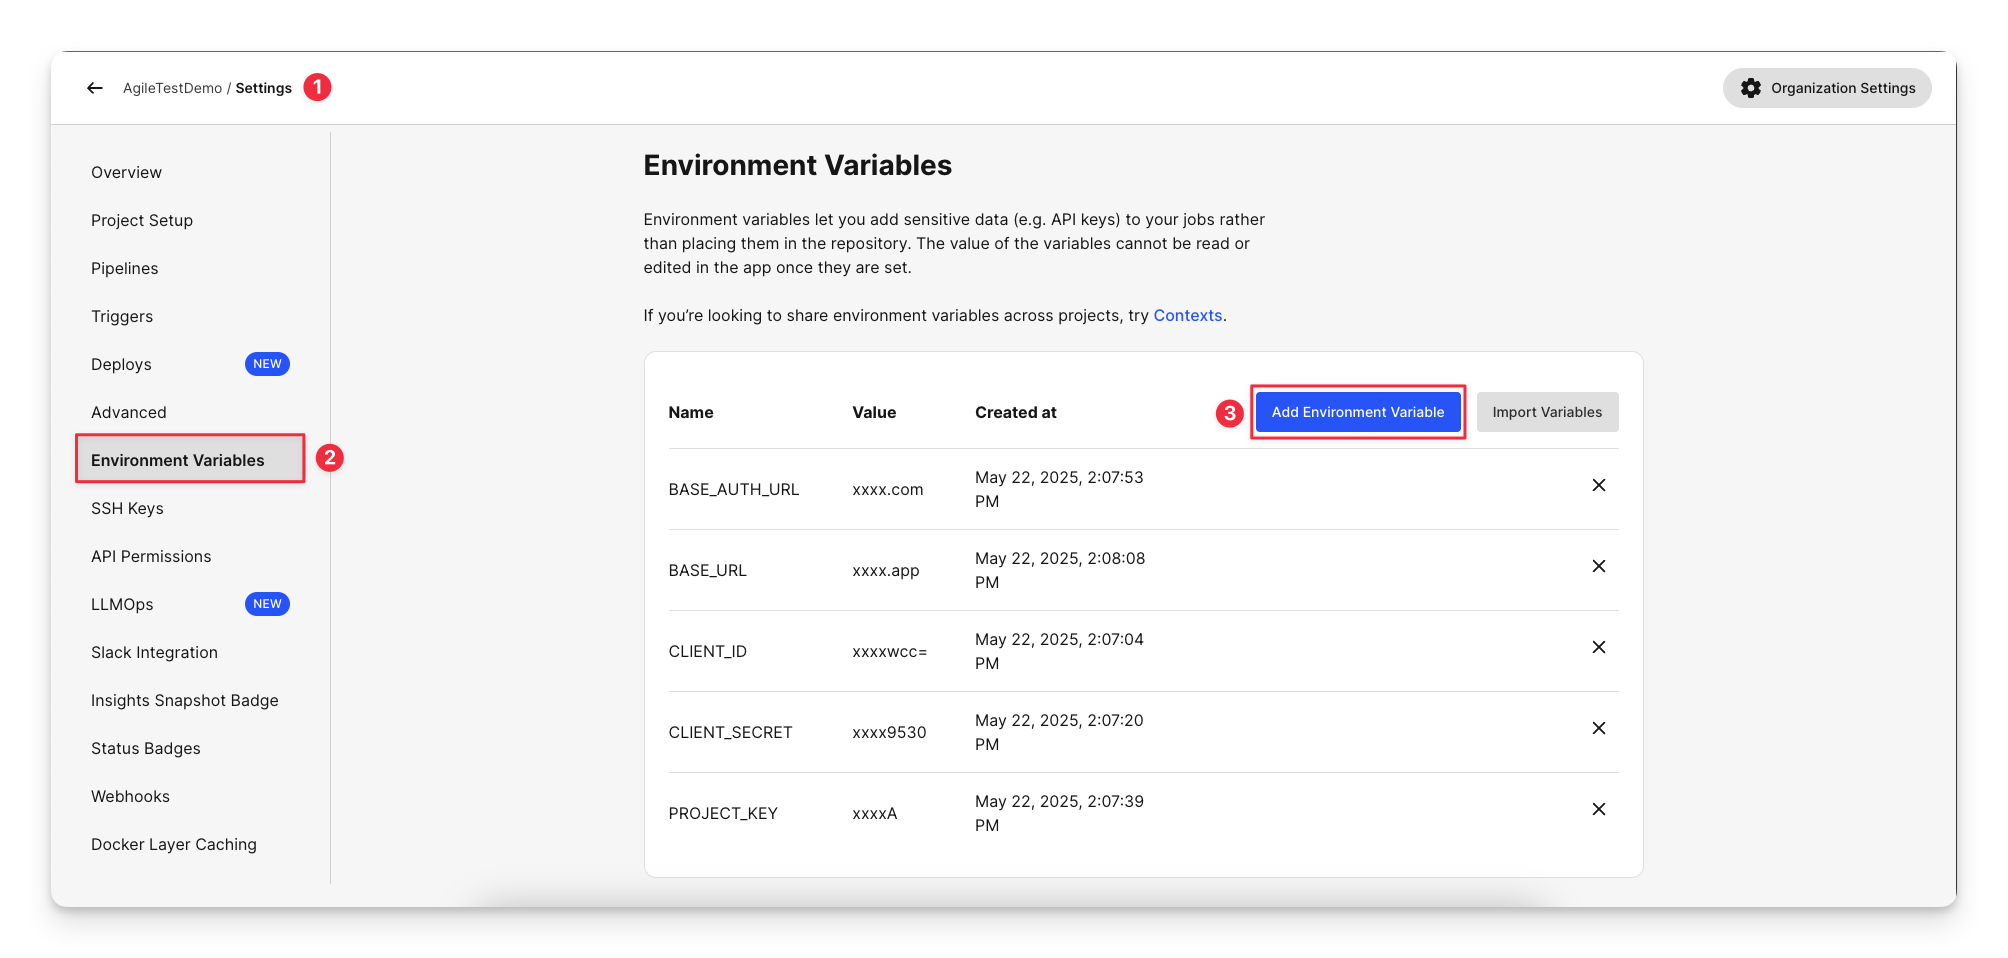
To set up these variables, follow these steps:
Click on the Settings .
Select the Environment variables option on the left-hand side bar.
Choose the “Add Environment variables” button and enter details.
After you have set up the CircleCI project, you can prepare the YAML file in CircleCI to connect AgileTest with this tool and upload the test results.
You can have your report in different types of test frameworks. Here is a sample JUnit report to play around with.
JUnit report example
<?xml version="1.0" encoding="UTF-8"?>
<testsuite xmlns:xsi="http://www.w3.org/2001/XMLSchema-instance" xsi:noNamespaceSchemaLocation="https://maven.apache.org/surefire/maven-surefire-plugin/xsd/surefire-test-report-3.0.xsd" version="3.0" name="calculateTest" time="0.005" tests="2" errors="0" skipped="0" failures="0">
<properties>
<property name="java.specification.version" value="17"/>
<property name="sun.jnu.encoding" value="UTF-8"/>
<property name="java.class.path" value="/Users/thachnguyen/Work/autotest/JunitAgileTestDemo/target/test-classes:/Users/thachnguyen/Work/autotest/JunitAgileTestDemo/target/classes:/Users/thachnguyen/.m2/repository/org/junit/jupiter/junit-jupiter-api/5.8.2/junit-jupiter-api-5.8.2.jar:/Users/thachnguyen/.m2/repository/org/opentest4j/opentest4j/1.2.0/opentest4j-1.2.0.jar:/Users/thachnguyen/.m2/repository/org/junit/platform/junit-platform-commons/1.8.2/junit-platform-commons-1.8.2.jar:/Users/thachnguyen/.m2/repository/org/apiguardian/apiguardian-api/1.1.2/apiguardian-api-1.1.2.jar:/Users/thachnguyen/.m2/repository/org/junit/jupiter/junit-jupiter-engine/5.8.2/junit-jupiter-engine-5.8.2.jar:/Users/thachnguyen/.m2/repository/org/junit/platform/junit-platform-engine/1.8.2/junit-platform-engine-1.8.2.jar:/Users/thachnguyen/.m2/repository/io/rest-assured/rest-assured/5.1.1/rest-assured-5.1.1.jar:/Users/thachnguyen/.m2/repository/org/apache/groovy/groovy/4.0.1/groovy-4.0.1.jar:/Users/thachnguyen/.m2/repository/org/apache/groovy/groovy-xml/4.0.1/groovy-xml-4.0.1.jar:/Users/thachnguyen/.m2/repository/org/apache/httpcomponents/httpclient/4.5.13/httpclient-4.5.13.jar:/Users/thachnguyen/.m2/repository/org/apache/httpcomponents/httpcore/4.4.13/httpcore-4.4.13.jar:/Users/thachnguyen/.m2/repository/commons-logging/commons-logging/1.2/commons-logging-1.2.jar:/Users/thachnguyen/.m2/repository/commons-codec/commons-codec/1.11/commons-codec-1.11.jar:/Users/thachnguyen/.m2/repository/org/apache/httpcomponents/httpmime/4.5.13/httpmime-4.5.13.jar:/Users/thachnguyen/.m2/repository/org/hamcrest/hamcrest/2.1/hamcrest-2.1.jar:/Users/thachnguyen/.m2/repository/org/ccil/cowan/tagsoup/tagsoup/1.2.1/tagsoup-1.2.1.jar:/Users/thachnguyen/.m2/repository/io/rest-assured/json-path/5.1.1/json-path-5.1.1.jar:/Users/thachnguyen/.m2/repository/org/apache/groovy/groovy-json/4.0.1/groovy-json-4.0.1.jar:/Users/thachnguyen/.m2/repository/io/rest-assured/rest-assured-common/5.1.1/rest-assured-common-5.1.1.jar:/Users/thachnguyen/.m2/repository/io/rest-assured/xml-path/5.1.1/xml-path-5.1.1.jar:/Users/thachnguyen/.m2/repository/org/apache/commons/commons-lang3/3.11/commons-lang3-3.11.jar:/Users/thachnguyen/.m2/repository/org/json/json/20210307/json-20210307.jar:/Users/thachnguyen/.m2/repository/org/junit/platform/junit-platform-reporting/1.9.1/junit-platform-reporting-1.9.1.jar:/Users/thachnguyen/.m2/repository/org/junit/platform/junit-platform-launcher/1.9.1/junit-platform-launcher-1.9.1.jar:"/>
<property name="java.vm.vendor" value="Eclipse Adoptium"/>
<property name="sun.arch.data.model" value="64"/>
<property name="java.vendor.url" value="https://adoptium.net/"/>
<property name="os.name" value="Mac OS X"/>
<property name="java.vm.specification.version" value="17"/>
<property name="sun.java.launcher" value="SUN_STANDARD"/>
<property name="user.country" value="VN"/>
<property name="sun.boot.library.path" value="/Library/Java/JavaVirtualMachines/temurin-17.jdk/Contents/Home/lib"/>
<property name="sun.java.command" value="/Users/thachnguyen/Work/autotest/JunitAgileTestDemo/target/surefire/surefirebooter-20250507171755717_3.jar /Users/thachnguyen/Work/autotest/JunitAgileTestDemo/target/surefire 2025-05-07T17-17-55_670-jvmRun1 surefire-20250507171755717_1tmp surefire_0-20250507171755717_2tmp"/>
<property name="http.nonProxyHosts" value="local|*.local|169.254/16|*.169.254/16"/>
<property name="jdk.debug" value="release"/>
<property name="surefire.test.class.path" value="/Users/thachnguyen/Work/autotest/JunitAgileTestDemo/target/test-classes:/Users/thachnguyen/Work/autotest/JunitAgileTestDemo/target/classes:/Users/thachnguyen/.m2/repository/org/junit/jupiter/junit-jupiter-api/5.8.2/junit-jupiter-api-5.8.2.jar:/Users/thachnguyen/.m2/repository/org/opentest4j/opentest4j/1.2.0/opentest4j-1.2.0.jar:/Users/thachnguyen/.m2/repository/org/junit/platform/junit-platform-commons/1.8.2/junit-platform-commons-1.8.2.jar:/Users/thachnguyen/.m2/repository/org/apiguardian/apiguardian-api/1.1.2/apiguardian-api-1.1.2.jar:/Users/thachnguyen/.m2/repository/org/junit/jupiter/junit-jupiter-engine/5.8.2/junit-jupiter-engine-5.8.2.jar:/Users/thachnguyen/.m2/repository/org/junit/platform/junit-platform-engine/1.8.2/junit-platform-engine-1.8.2.jar:/Users/thachnguyen/.m2/repository/io/rest-assured/rest-assured/5.1.1/rest-assured-5.1.1.jar:/Users/thachnguyen/.m2/repository/org/apache/groovy/groovy/4.0.1/groovy-4.0.1.jar:/Users/thachnguyen/.m2/repository/org/apache/groovy/groovy-xml/4.0.1/groovy-xml-4.0.1.jar:/Users/thachnguyen/.m2/repository/org/apache/httpcomponents/httpclient/4.5.13/httpclient-4.5.13.jar:/Users/thachnguyen/.m2/repository/org/apache/httpcomponents/httpcore/4.4.13/httpcore-4.4.13.jar:/Users/thachnguyen/.m2/repository/commons-logging/commons-logging/1.2/commons-logging-1.2.jar:/Users/thachnguyen/.m2/repository/commons-codec/commons-codec/1.11/commons-codec-1.11.jar:/Users/thachnguyen/.m2/repository/org/apache/httpcomponents/httpmime/4.5.13/httpmime-4.5.13.jar:/Users/thachnguyen/.m2/repository/org/hamcrest/hamcrest/2.1/hamcrest-2.1.jar:/Users/thachnguyen/.m2/repository/org/ccil/cowan/tagsoup/tagsoup/1.2.1/tagsoup-1.2.1.jar:/Users/thachnguyen/.m2/repository/io/rest-assured/json-path/5.1.1/json-path-5.1.1.jar:/Users/thachnguyen/.m2/repository/org/apache/groovy/groovy-json/4.0.1/groovy-json-4.0.1.jar:/Users/thachnguyen/.m2/repository/io/rest-assured/rest-assured-common/5.1.1/rest-assured-common-5.1.1.jar:/Users/thachnguyen/.m2/repository/io/rest-assured/xml-path/5.1.1/xml-path-5.1.1.jar:/Users/thachnguyen/.m2/repository/org/apache/commons/commons-lang3/3.11/commons-lang3-3.11.jar:/Users/thachnguyen/.m2/repository/org/json/json/20210307/json-20210307.jar:/Users/thachnguyen/.m2/repository/org/junit/platform/junit-platform-reporting/1.9.1/junit-platform-reporting-1.9.1.jar:/Users/thachnguyen/.m2/repository/org/junit/platform/junit-platform-launcher/1.9.1/junit-platform-launcher-1.9.1.jar:"/>
<property name="sun.cpu.endian" value="little"/>
<property name="user.home" value="/Users/thachnguyen"/>
<property name="user.language" value="en"/>
<property name="java.specification.vendor" value="Oracle Corporation"/>
<property name="java.version.date" value="2025-01-21"/>
<property name="java.home" value="/Library/Java/JavaVirtualMachines/temurin-17.jdk/Contents/Home"/>
<property name="file.separator" value="/"/>
<property name="basedir" value="/Users/thachnguyen/Work/autotest/JunitAgileTestDemo"/>
<property name="java.vm.compressedOopsMode" value="Zero based"/>
<property name="line.separator" value=" "/>
<property name="java.specification.name" value="Java Platform API Specification"/>
<property name="java.vm.specification.vendor" value="Oracle Corporation"/>
<property name="surefire.real.class.path" value="/Users/thachnguyen/Work/autotest/JunitAgileTestDemo/target/surefire/surefirebooter-20250507171755717_3.jar"/>
<property name="sun.management.compiler" value="HotSpot 64-Bit Tiered Compilers"/>
<property name="ftp.nonProxyHosts" value="local|*.local|169.254/16|*.169.254/16"/>
<property name="java.runtime.version" value="17.0.14+7"/>
<property name="user.name" value="thachnguyen"/>
<property name="path.separator" value=":"/>
<property name="os.version" value="15.2"/>
<property name="java.runtime.name" value="OpenJDK Runtime Environment"/>
<property name="file.encoding" value="UTF-8"/>
<property name="java.vm.name" value="OpenJDK 64-Bit Server VM"/>
<property name="java.vendor.version" value="Temurin-17.0.14+7"/>
<property name="localRepository" value="/Users/thachnguyen/.m2/repository"/>
<property name="java.vendor.url.bug" value="https://github.com/adoptium/adoptium-support/issues"/>
<property name="java.io.tmpdir" value="/var/folders/f0/hxzh9_fx1zb29pdn334l6nr40000gn/T/"/>
<property name="java.version" value="17.0.14"/>
<property name="user.dir" value="/Users/thachnguyen/Work/autotest/JunitAgileTestDemo"/>
<property name="os.arch" value="aarch64"/>
<property name="java.vm.specification.name" value="Java Virtual Machine Specification"/>
<property name="native.encoding" value="UTF-8"/>
<property name="java.library.path" value="/Users/thachnguyen/Library/Java/Extensions:/Library/Java/Extensions:/Network/Library/Java/Extensions:/System/Library/Java/Extensions:/usr/lib/java:."/>
<property name="java.vm.info" value="mixed mode, sharing"/>
<property name="java.vendor" value="Eclipse Adoptium"/>
<property name="java.vm.version" value="17.0.14+7"/>
<property name="java.specification.maintenance.version" value="1"/>
<property name="sun.io.unicode.encoding" value="UnicodeBig"/>
<property name="socksNonProxyHosts" value="local|*.local|169.254/16|*.169.254/16"/>
<property name="java.class.version" value="61.0"/>
</properties>
<testcase name="testAdd" classname="calculateTest" time="0.002"/>
<testcase name="testSubtract" classname="calculateTest" time="0.0"/>
</testsuite>
If you need more detailed examples, please refer to our public repository on AgileTest GitHub
There are 2 main approaches to uploading your test results:
AgileTest Cloud - circleci-pipelines.yml
version: 2.1

orbs:
  maven: circleci/maven@2.0.0

jobs:
  build-and-test:
    executor: maven/default
    steps:
      - checkout
      - run:
          name: Build and Test with Maven
          command: mvn -B clean package
      - run:
          name: Upload test report
          command: |
            export token=$(curl "${BASE_AUTH_URL}/api/apikeys/authenticate" \
              -X POST \
              -H 'Content-Type:application/json' \
              --data '{"clientId":"'"$CLIENT_ID"'","clientSecret":"'"$CLIENT_SECRET"'"}' | tr -d '"')
            curl "${BASE_URL}/ds/test-executions/junit?projectKey=${PROJECT_KEY}" \
              -X POST -H "Content-Type:application/xml" \
              -H "Authorization:JWT $token" \
              --data-binary "@target/surefire-reports/TEST-calculateTest.xml"

workflows:
  build-test-and-upload-report:
    jobs:
      - build-and-test
In this file, we configure 2 steps, Build and Test with Maven and Upload test report. For the 1st step, we use pre-defined step from CircleCI to build and run tests on the repo.
In this file, we use 2 endpoints in the API document
post api/v1/apikeys/authenticate to get a temporary token using the acquired client_id and client_secret.
post ds/test-executions/nunit to submit the test report to Agile Test so that the application can create or update Test execution and Test cases accordingly.
AgileTest Data center - circleci-pipelines.yml
version: 2.1

orbs:
  maven: circleci/maven@2.0.0

jobs:
  build-and-test:
    executor: maven/default
    steps:
      - checkout
      - run:
          name: Build and Test with Maven
          command: mvn -B clean package
      - setup_remote_docker:
          docker_layer_caching: true
      - run:
          name: Upload test report
          command: |
            curl "${BASE_URL}/ds/test-executions/junit?projectKey=${PROJECT_KEY}" \
              -X POST -H "Content-Type:application/xml" \
              -H "Authorization:Bearer ${DC_TOKEN}" \
              --data-binary "@target/surefire-reports/TEST-calculateTest.xml"

workflows:
  build-test-and-upload-report:
    jobs:
      - build-and-test
For the Data center version, we only use 1 endpoint post ds/test-executions/nunit with DC_TOKEN variable instead of the token that is requested using the Client Id and Client Secret.
AgileTest Cloud - circleci-pipelines.yml
version: 2.1

orbs:
  maven: circleci/maven@2.0.0

jobs:
  build-and-test:
    executor: maven/default
    steps:
      - checkout
      - run:
          name: Build and Test with Maven
          command: mvn -B clean package
      - setup_remote_docker:
          docker_layer_caching: true
      - run:
          name: Upload test report
          command: |
            docker run --rm -i \
              -e AGILETEST_BASE_URL=${BASE_URL} \
              -e AGILETEST_AUTH_BASE_URL=${BASE_AUTH_URL} \
              -e AGILETEST_CLIENT_ID=${CLIENT_ID} \
              -e AGILETEST_CLIENT_SECRET=${CLIENT_SECRET} \
              ghcr.io/agiletestapp/agiletest-cli:latest \
              test-execution import --framework-type junit --project-key ${PROJECT_KEY} \
              < ${CIRCLE_WORKING_DIRECTORY}/target/surefire-reports/TEST-calculateTest.xml
workflows:
  build-test-and-upload-report:
    jobs:
      - build-and-test
The YAML file when using CLI also contains 2 steps Build and Test with Maven and Upload test report. However in the latter, Agile Test CLI image was used to upload the test report. Please refer to the command below.
docker run --rm -i \
              -e AGILETEST_BASE_URL=${BASE_URL} \
              -e AGILETEST_AUTH_BASE_URL=${BASE_AUTH_URL} \
              -e AGILETEST_CLIENT_ID=${CLIENT_ID} \
              -e AGILETEST_CLIENT_SECRET=${CLIENT_SECRET} \
              ghcr.io/agiletestapp/agiletest-cli:latest \
              test-execution import --framework-type junit --project-key ${PROJECT_KEY} \
              < ${CIRCLE_WORKING_DIRECTORY}/target/surefire-reports/TEST-calculateTest.xml
AgileTest Data center - circleci-pipelines.yml
version: 2.1

orbs:
  maven: circleci/maven@2.0.0

jobs:
  build-and-test:
    executor: maven/default
    steps:
      - checkout
      - run:
          name: Build and Test with Maven
          command: mvn -B clean package
      - setup_remote_docker:
          docker_layer_caching: true
      - run:
          name: Upload test report
          command: |
            docker run --rm -i \
              -e AGILETEST_DC_TOKEN=${DC_TOKEN} \
              -e AGILETEST_BASE_URL=${BASE_URL} \
              ghcr.io/agiletestapp/agiletest-cli:latest \
              --data-center \
              test-execution import --framework-type junit --project-key ${PROJECT_KEY} \
              < ${CIRCLE_WORKING_DIRECTORY}/target/surefire-reports/TEST-calculateTest.xml
workflows:
  build-test-and-upload-report:
    jobs:
      - build-and-test
Same as Cloud, in this file we also have 2 steps, run-test and upload-report. However, in run-test step, the command will be slightly different.
docker run --rm -i \
              -e AGILETEST_DC_TOKEN=${DC_TOKEN} \
              -e AGILETEST_BASE_URL=${BASE_URL} \
              ghcr.io/agiletestapp/agiletest-cli:latest \
              --data-center
              test-execution import --framework-type junit --project-key ${PROJECT_KEY} \
              < ${CIRCLE_WORKING_DIRECTORY}/target/surefire-reports/TEST-calculateTest.xml
Should you need any assistance or further AgileTest inquiries, contact our 24/7 Support Desk
.png)