.png)
Plans change. That is normal.
What-if scenario planning gives teams a better way to respond to changes that happen in the workflow. Instead of changing the official plan right away, they can test possible options first, compare the trade-offs, and make a more confident decision about what should happen next.
How what-if scenario planning helps before rebaselining
A good workflow is straightforward: review the current schedule, identify the trigger, test alternative options, compare the effect on milestones, dependencies, deadlines, and workload, then choose the most realistic path.
This leads to better planning decisions. Instead of asking, “How do we update the date right now?” teams start asking, “Which option protects the key milestone?” or “Which option is realistic for the people doing the work?”
That is where TeamBoard ProScheduler fits naturally. It gives Jira teams a structured planning view to review timelines, dependencies, milestones, and workload before making the change official.
That is the real value of what-if planning. It gives teams a chance to think clearly before they commit.
How to perform what-if scenario planning in TeamBoard ProScheduler
Once a plan starts to shift, the goal is not to react immediately. The goal is to review the situation in a structured way, test realistic options, and only then decide whether the official plan should change.
TeamBoard ProScheduler supports this well through its Gantt view, baselines, dependencies, critical path, saved views, and Schedule Board.
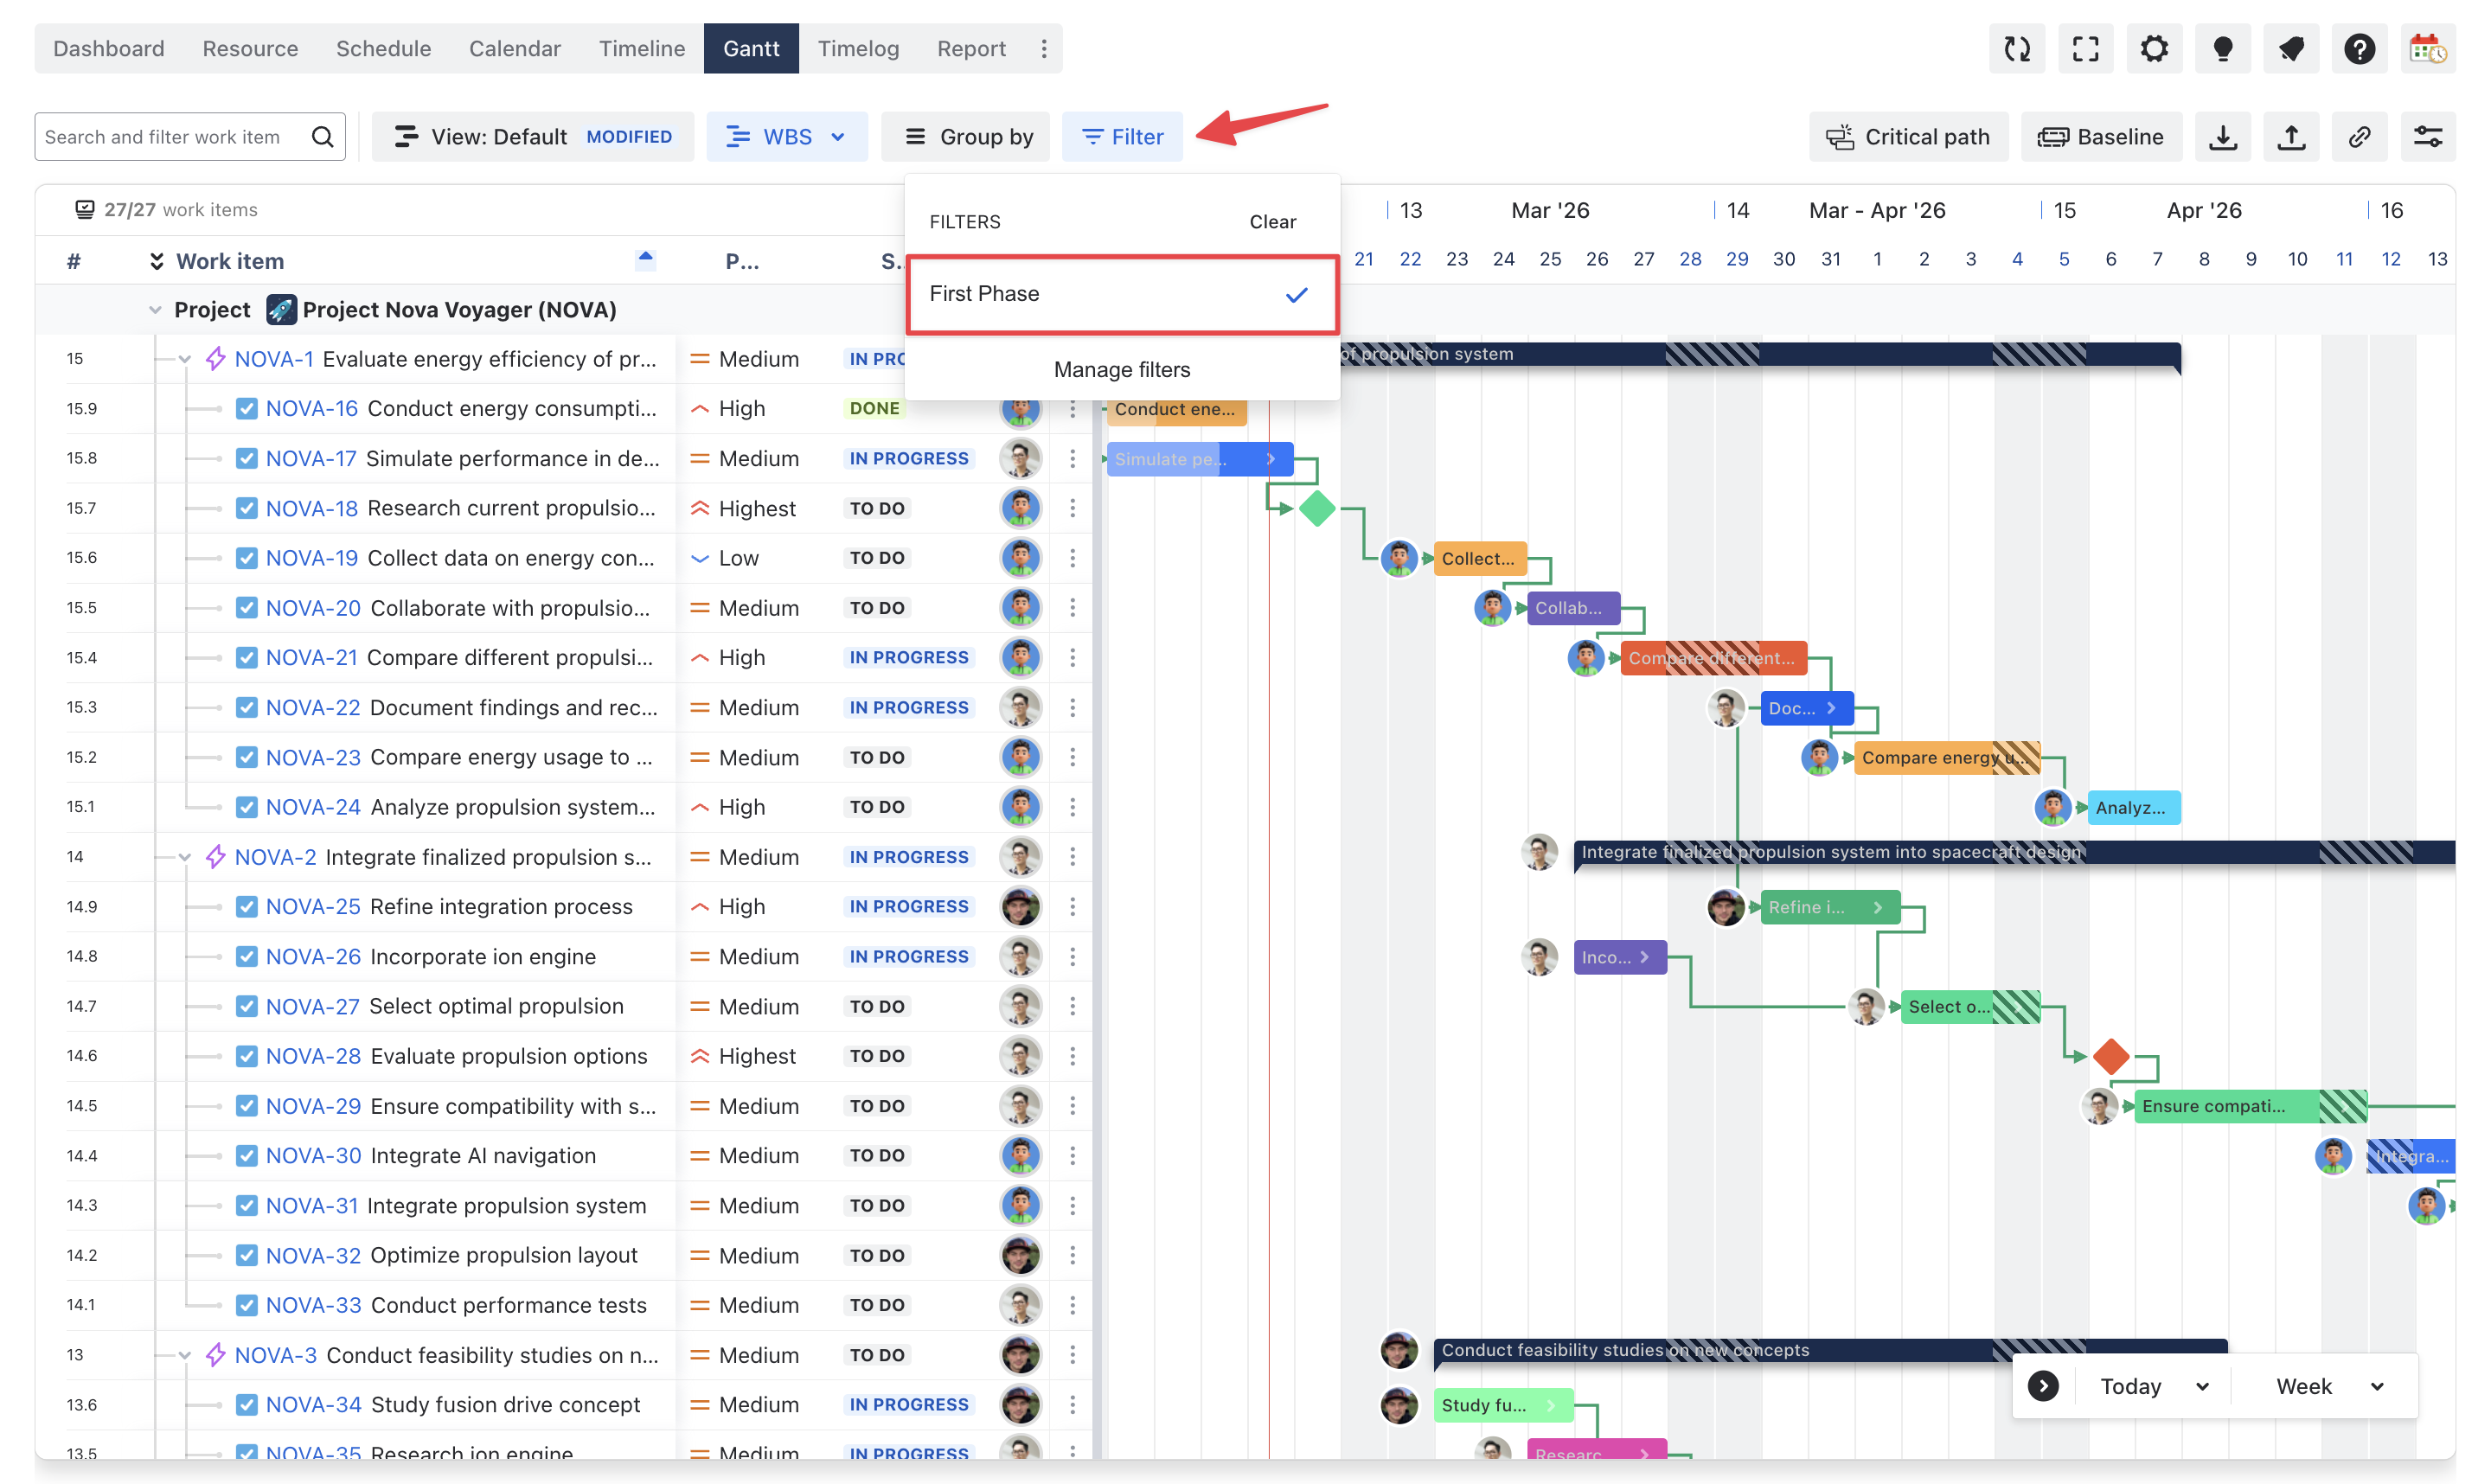
Step 1. Open the current plan in Gantt and narrow the scope
Start in Gantt, which is ProScheduler’s main planning workspace. It combines the timeline, work item table, dependencies, milestones, critical path, and baseline tracking in one view.
Then narrow the board to the part of the plan you actually want to review.
What to do:
-
Open the relevant project or portfolio plan in Gantt
-
Use Quick Filters to focus on one release, one team, one project, or one risk area
-
Use Save view if you want to preserve this setup and return to it later
Why this matters:
-
What-if analysis gets harder when too much work is visible at once
-
A focused view makes the impact easier to understand
-
Saved views help teams return to the same scenario without rebuilding the setup each time
ProScheduler supports Quick Filters with predefined JQL and lets users save multiple customized Gantt views.
Step 2. Identify the trigger for replanning
Before changing anything, define exactly what triggered the review.
Typical triggers:
-
a key task is delayed
-
a dependency slips
-
a milestone is at risk
-
a team member becomes unavailable
-
a new urgent request affects the schedule
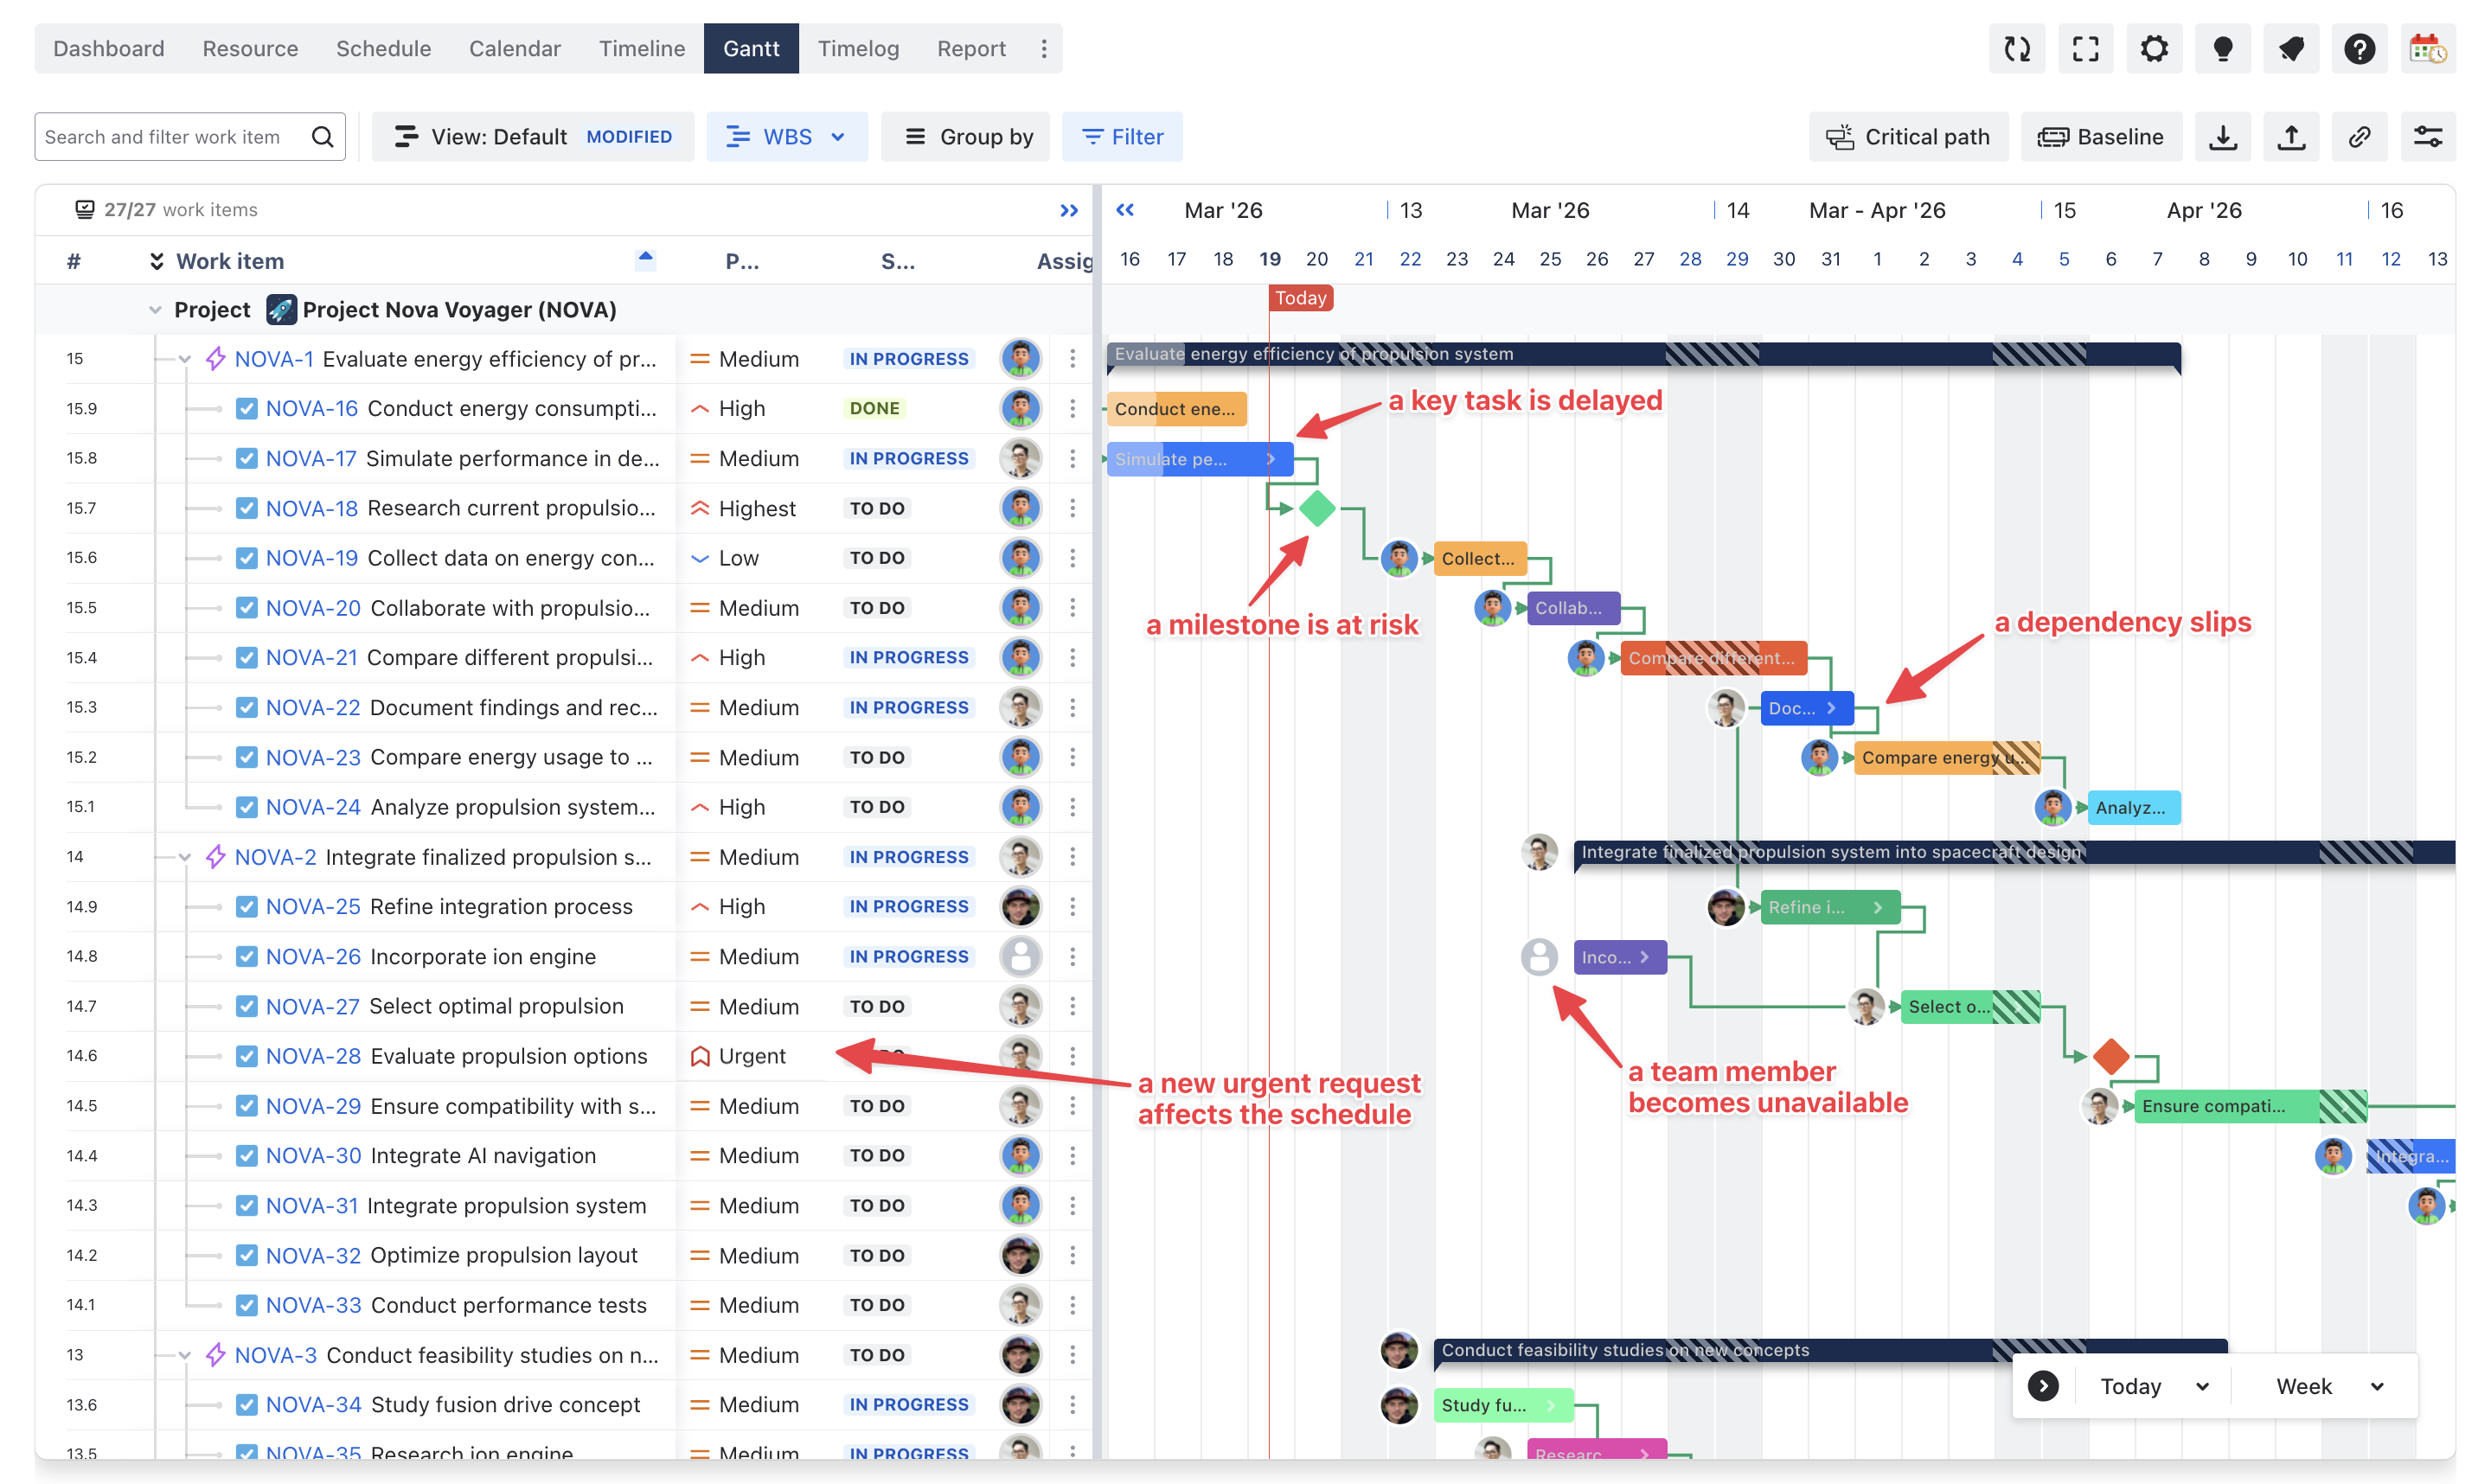
In Gantt, review the affected items and their context. Look at the current dates, owners, linked work, and any nearby milestones. ProScheduler’s Gantt is designed to show durations, dependencies, milestones, and progress together, which makes it the right place to understand the issue before testing responses.
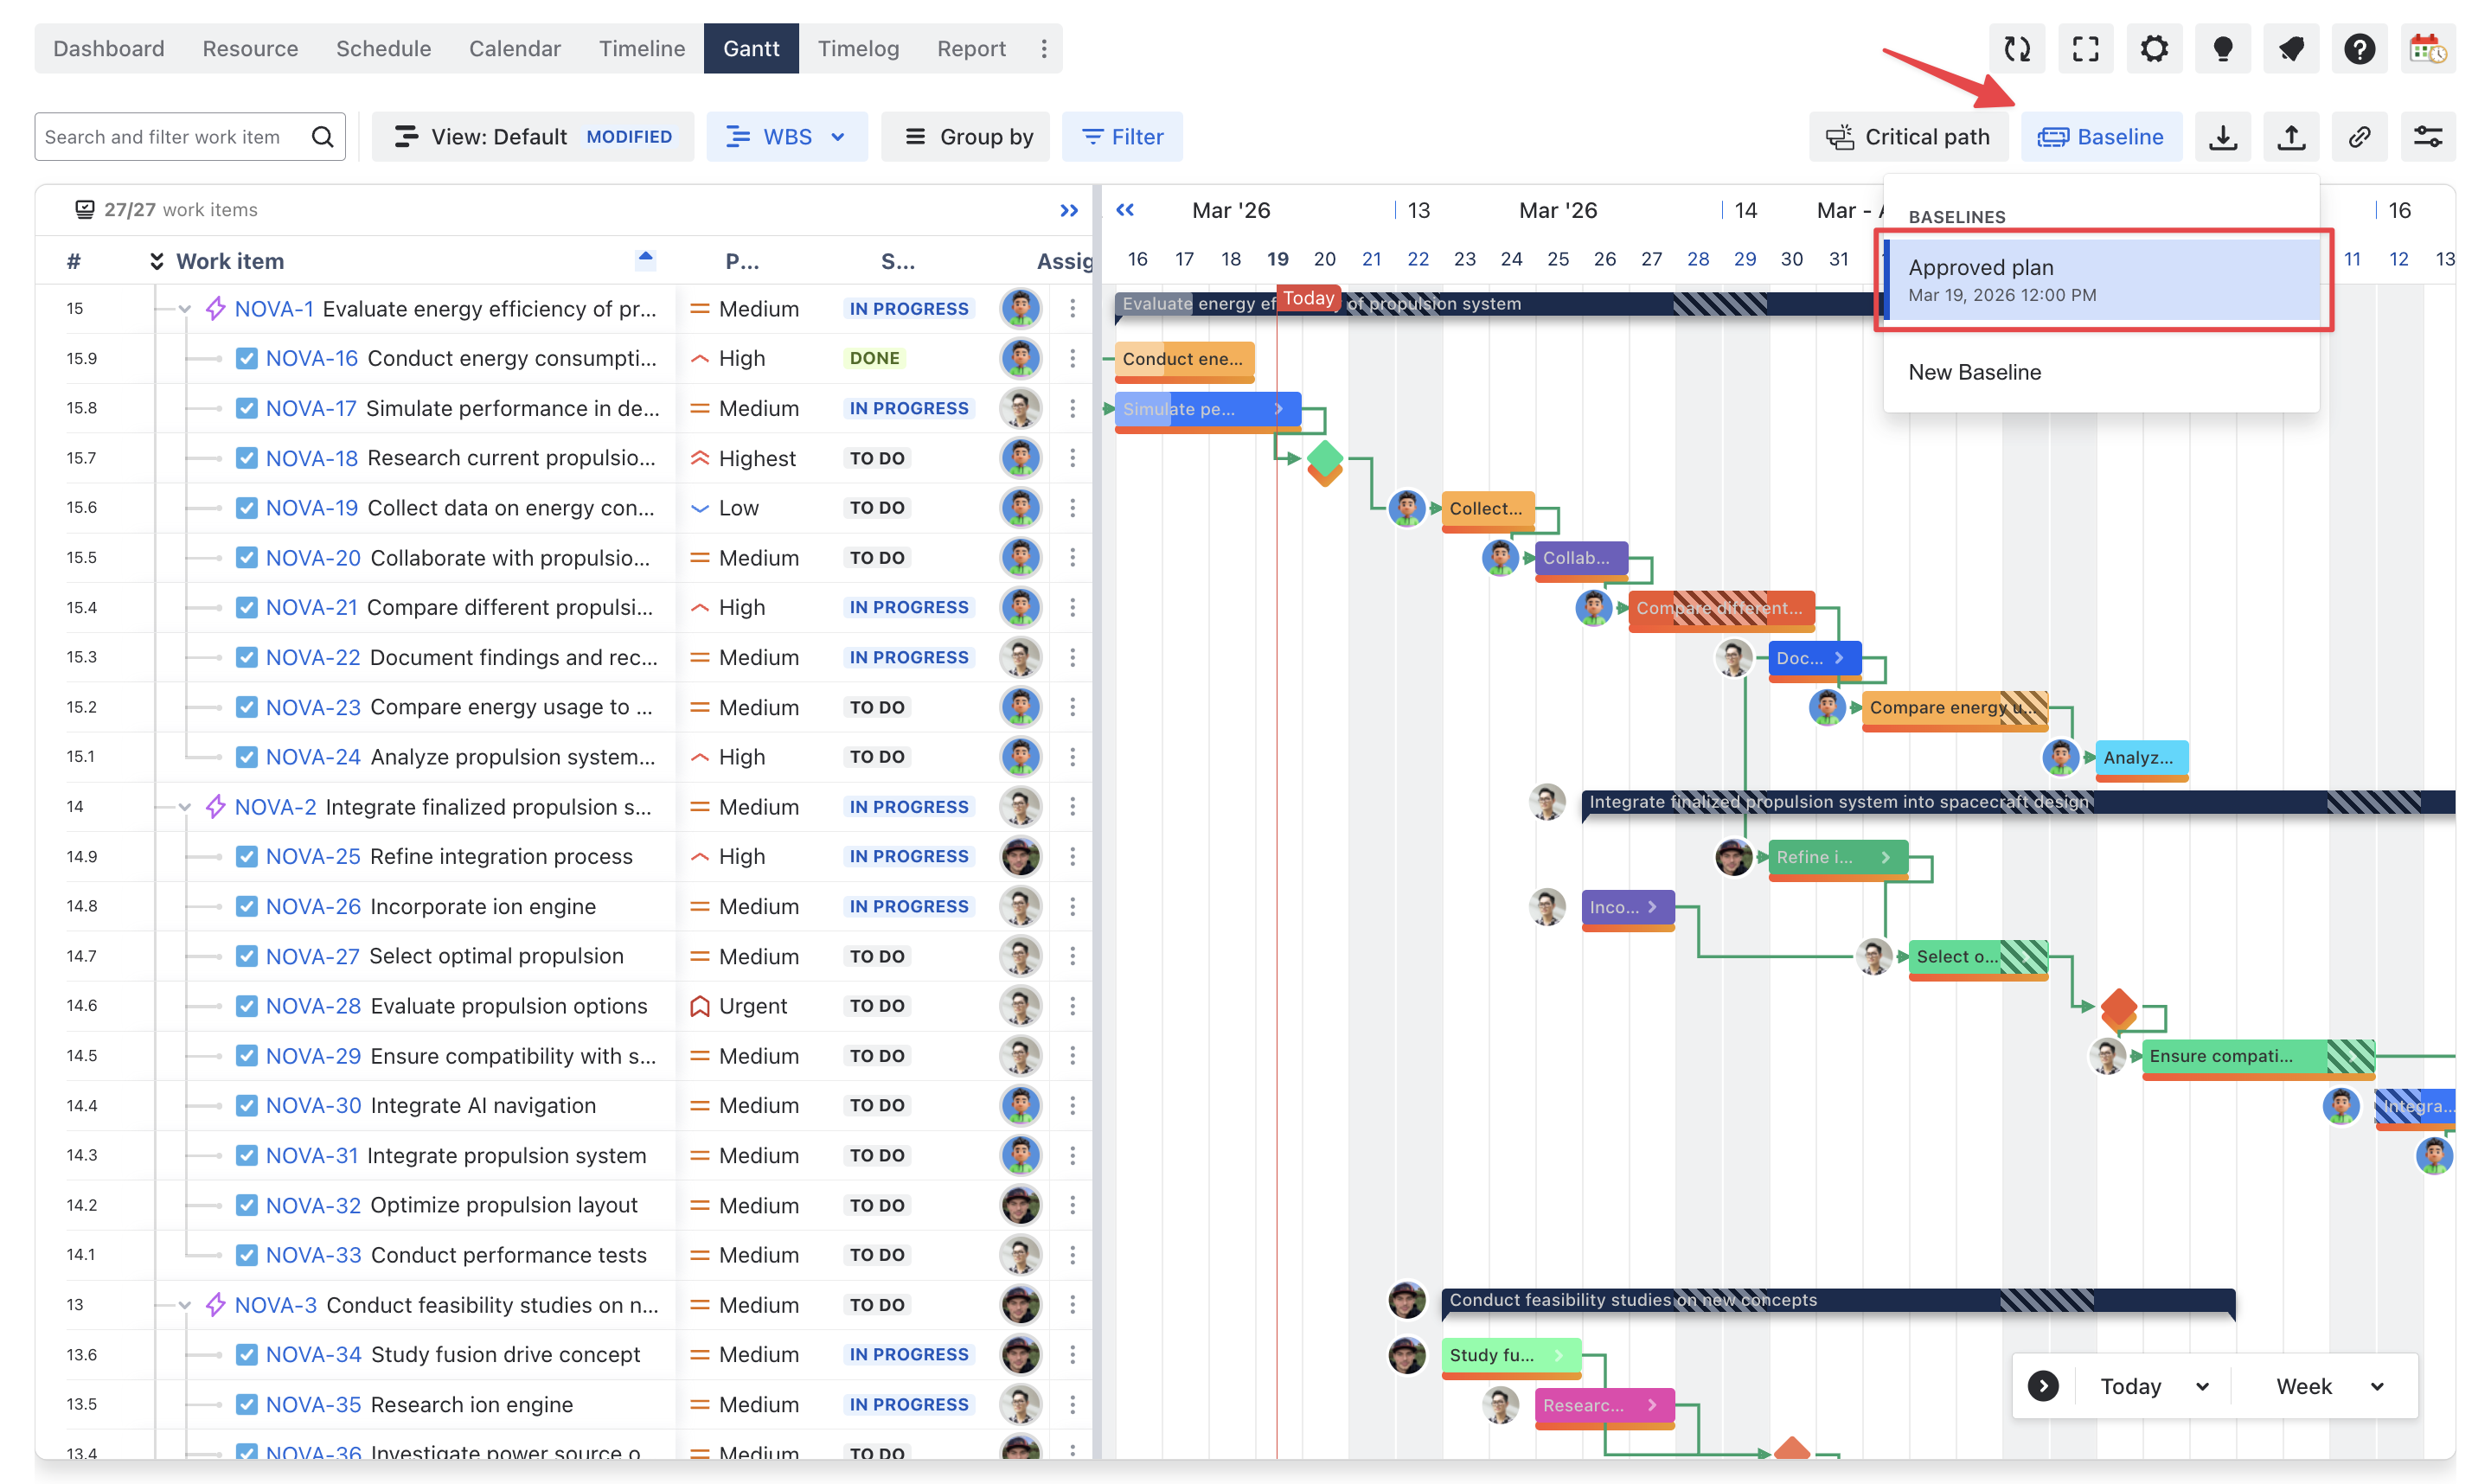
Step 3. Preserve the approved plan with a baseline
Before testing options, make sure the approved plan is protected with a baseline. In ProScheduler, baseline tracking captures a snapshot of the current schedule so teams can compare the plan they approved with the plan they are now evaluating.
What to do:
-
Display the current baseline, or create one if the approved plan has not been captured yet
-
Keep that baseline visible while reviewing alternatives
Why this matters:
-
This is what makes the exercise “what-if before rebaselining”
-
Without a baseline, it is much harder to compare what changed and whether the new option is actually better
If your board uses date mapping, changes made in ProScheduler can sync start and end dates with Jira date fields, and changes made in Jira can also flow back into ProScheduler.
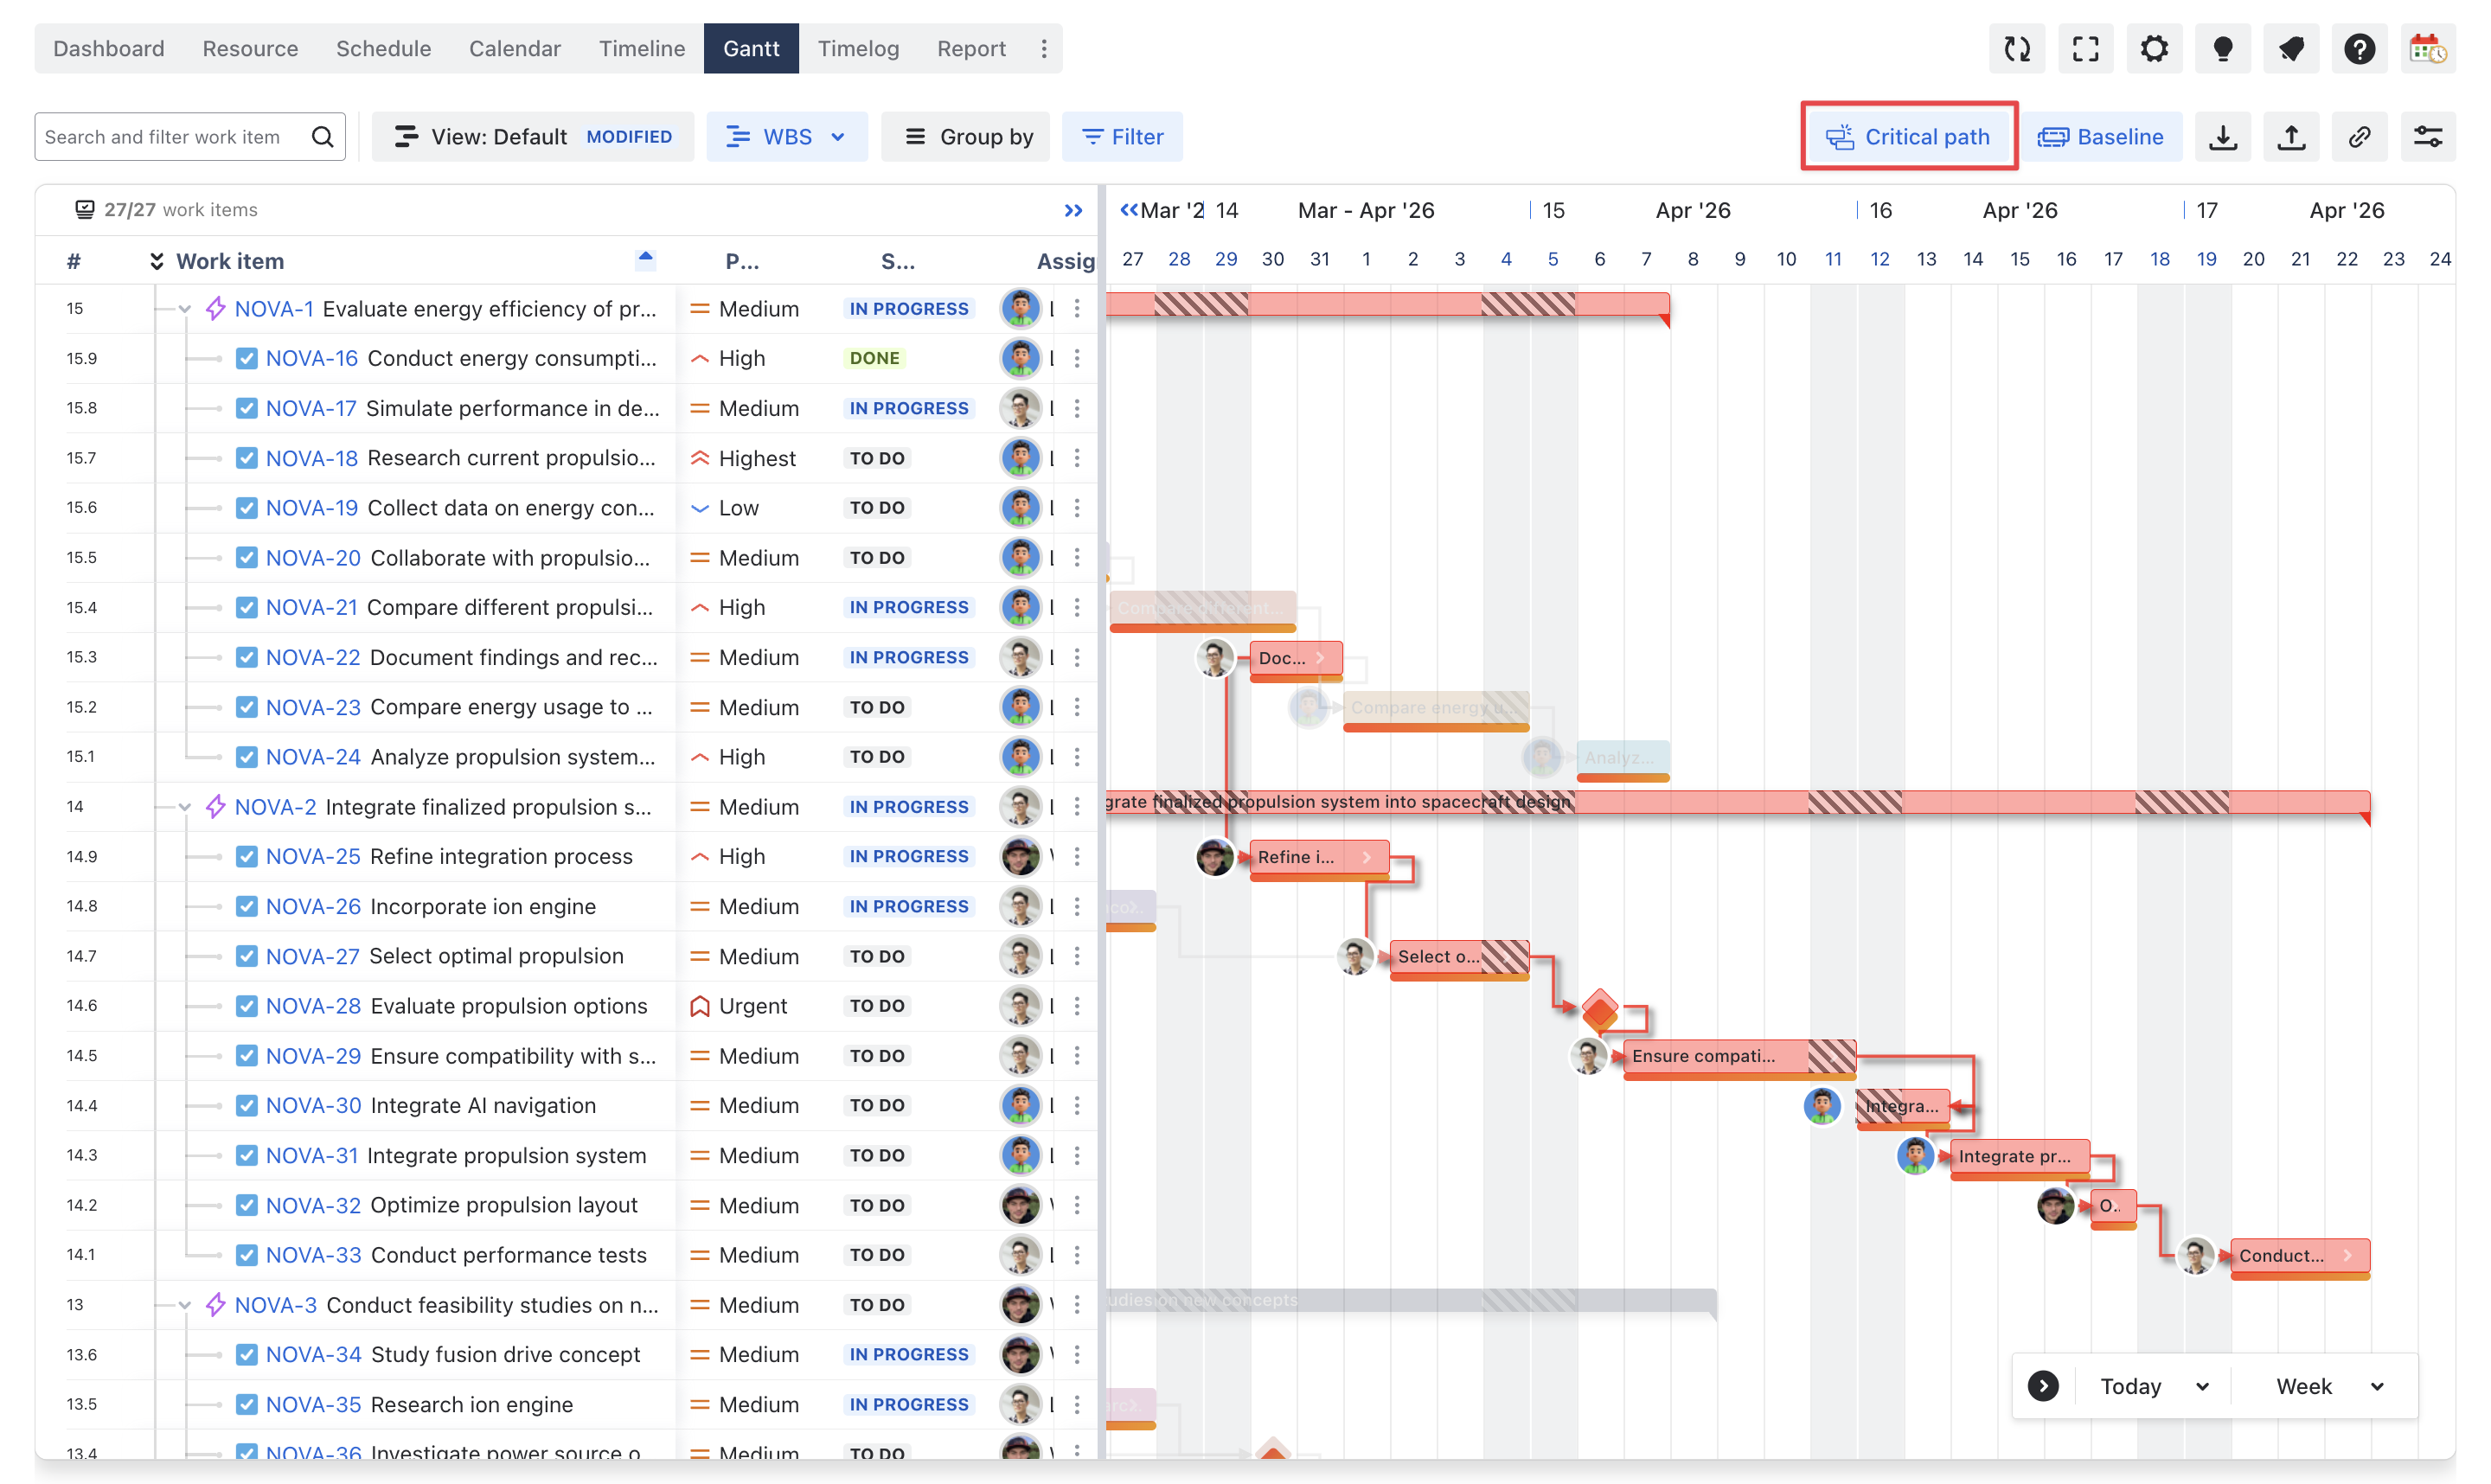
Step 4. Review dependencies, milestones, and critical impact
Next, inspect what else may be affected if the problem task moves. In ProScheduler, dependencies are visualized in Gantt and influence the order of work and often the start and end dates of related items. The app supports four dependency types: Finish-to-Start, Start-to-Start, Finish-to-Finish, and Start-to-Finish.
What to review:
-
predecessor and successor links
-
milestone timing
-
progress status
-
the Critical Path, which identifies the sequence of tasks that defines the project’s minimum completion time
Why this matters:
-
Not every delay affects the final delivery date
-
Critical path helps you see whether the issue threatens the real completion path or just a non-critical area
ProScheduler includes Critical Path and milestones directly in Gantt, making this analysis easier to do in one view.
Step 5. Test planning options in the timeline
This is the core step. Now the team can test different responses directly in the planning view.
ProScheduler supports:
-
drag-and-drop scheduling on the timeline
-
inline editing in the work item table
-
changing start dates, end dates, durations, status, and assignee
-
creating and adjusting task relationships in Gantt
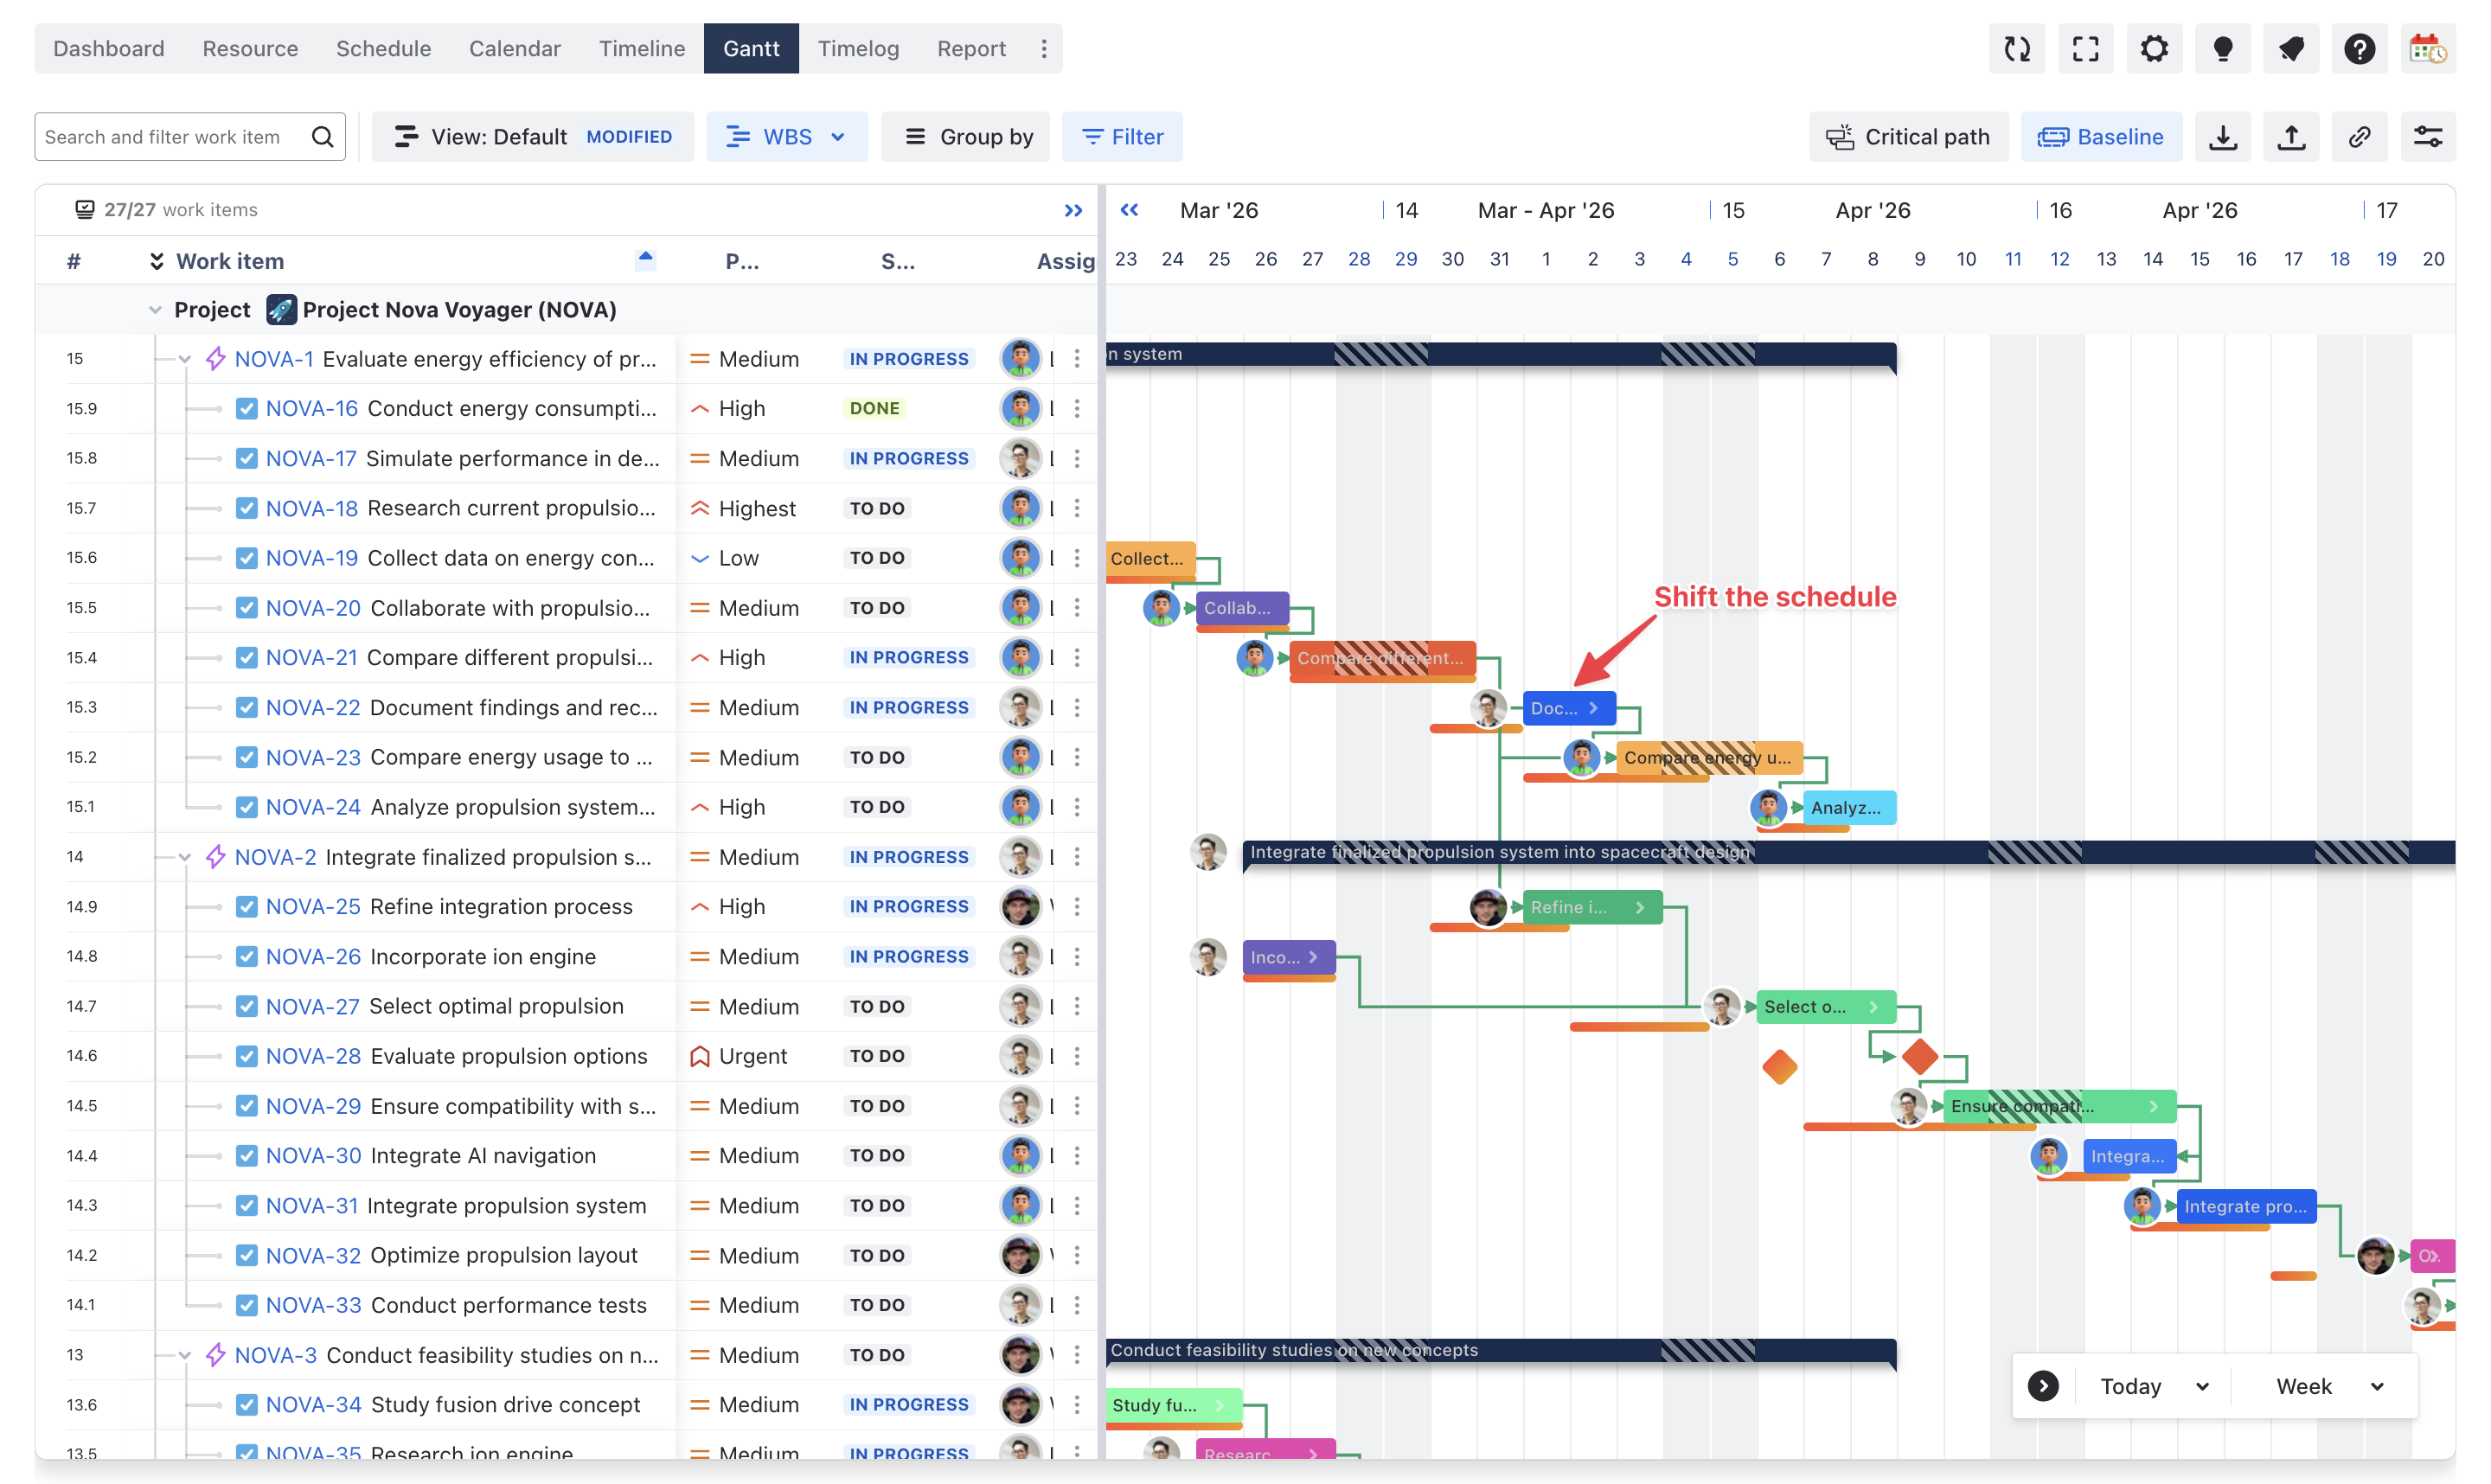
A practical way to structure this is to test three common option types:
-
Shift the schedule
Move the affected work and see how the timeline changes. -
Reassign or rebalance work
Move work to another person or team if that is realistic. -
Defer lower-priority work
Protect a more important milestone by postponing less critical items.
Why this matters:
-
The goal is not to find a perfect plan
-
The goal is to compare realistic trade-offs before changing the official schedule
Step 6. Check workload and resource feasibility
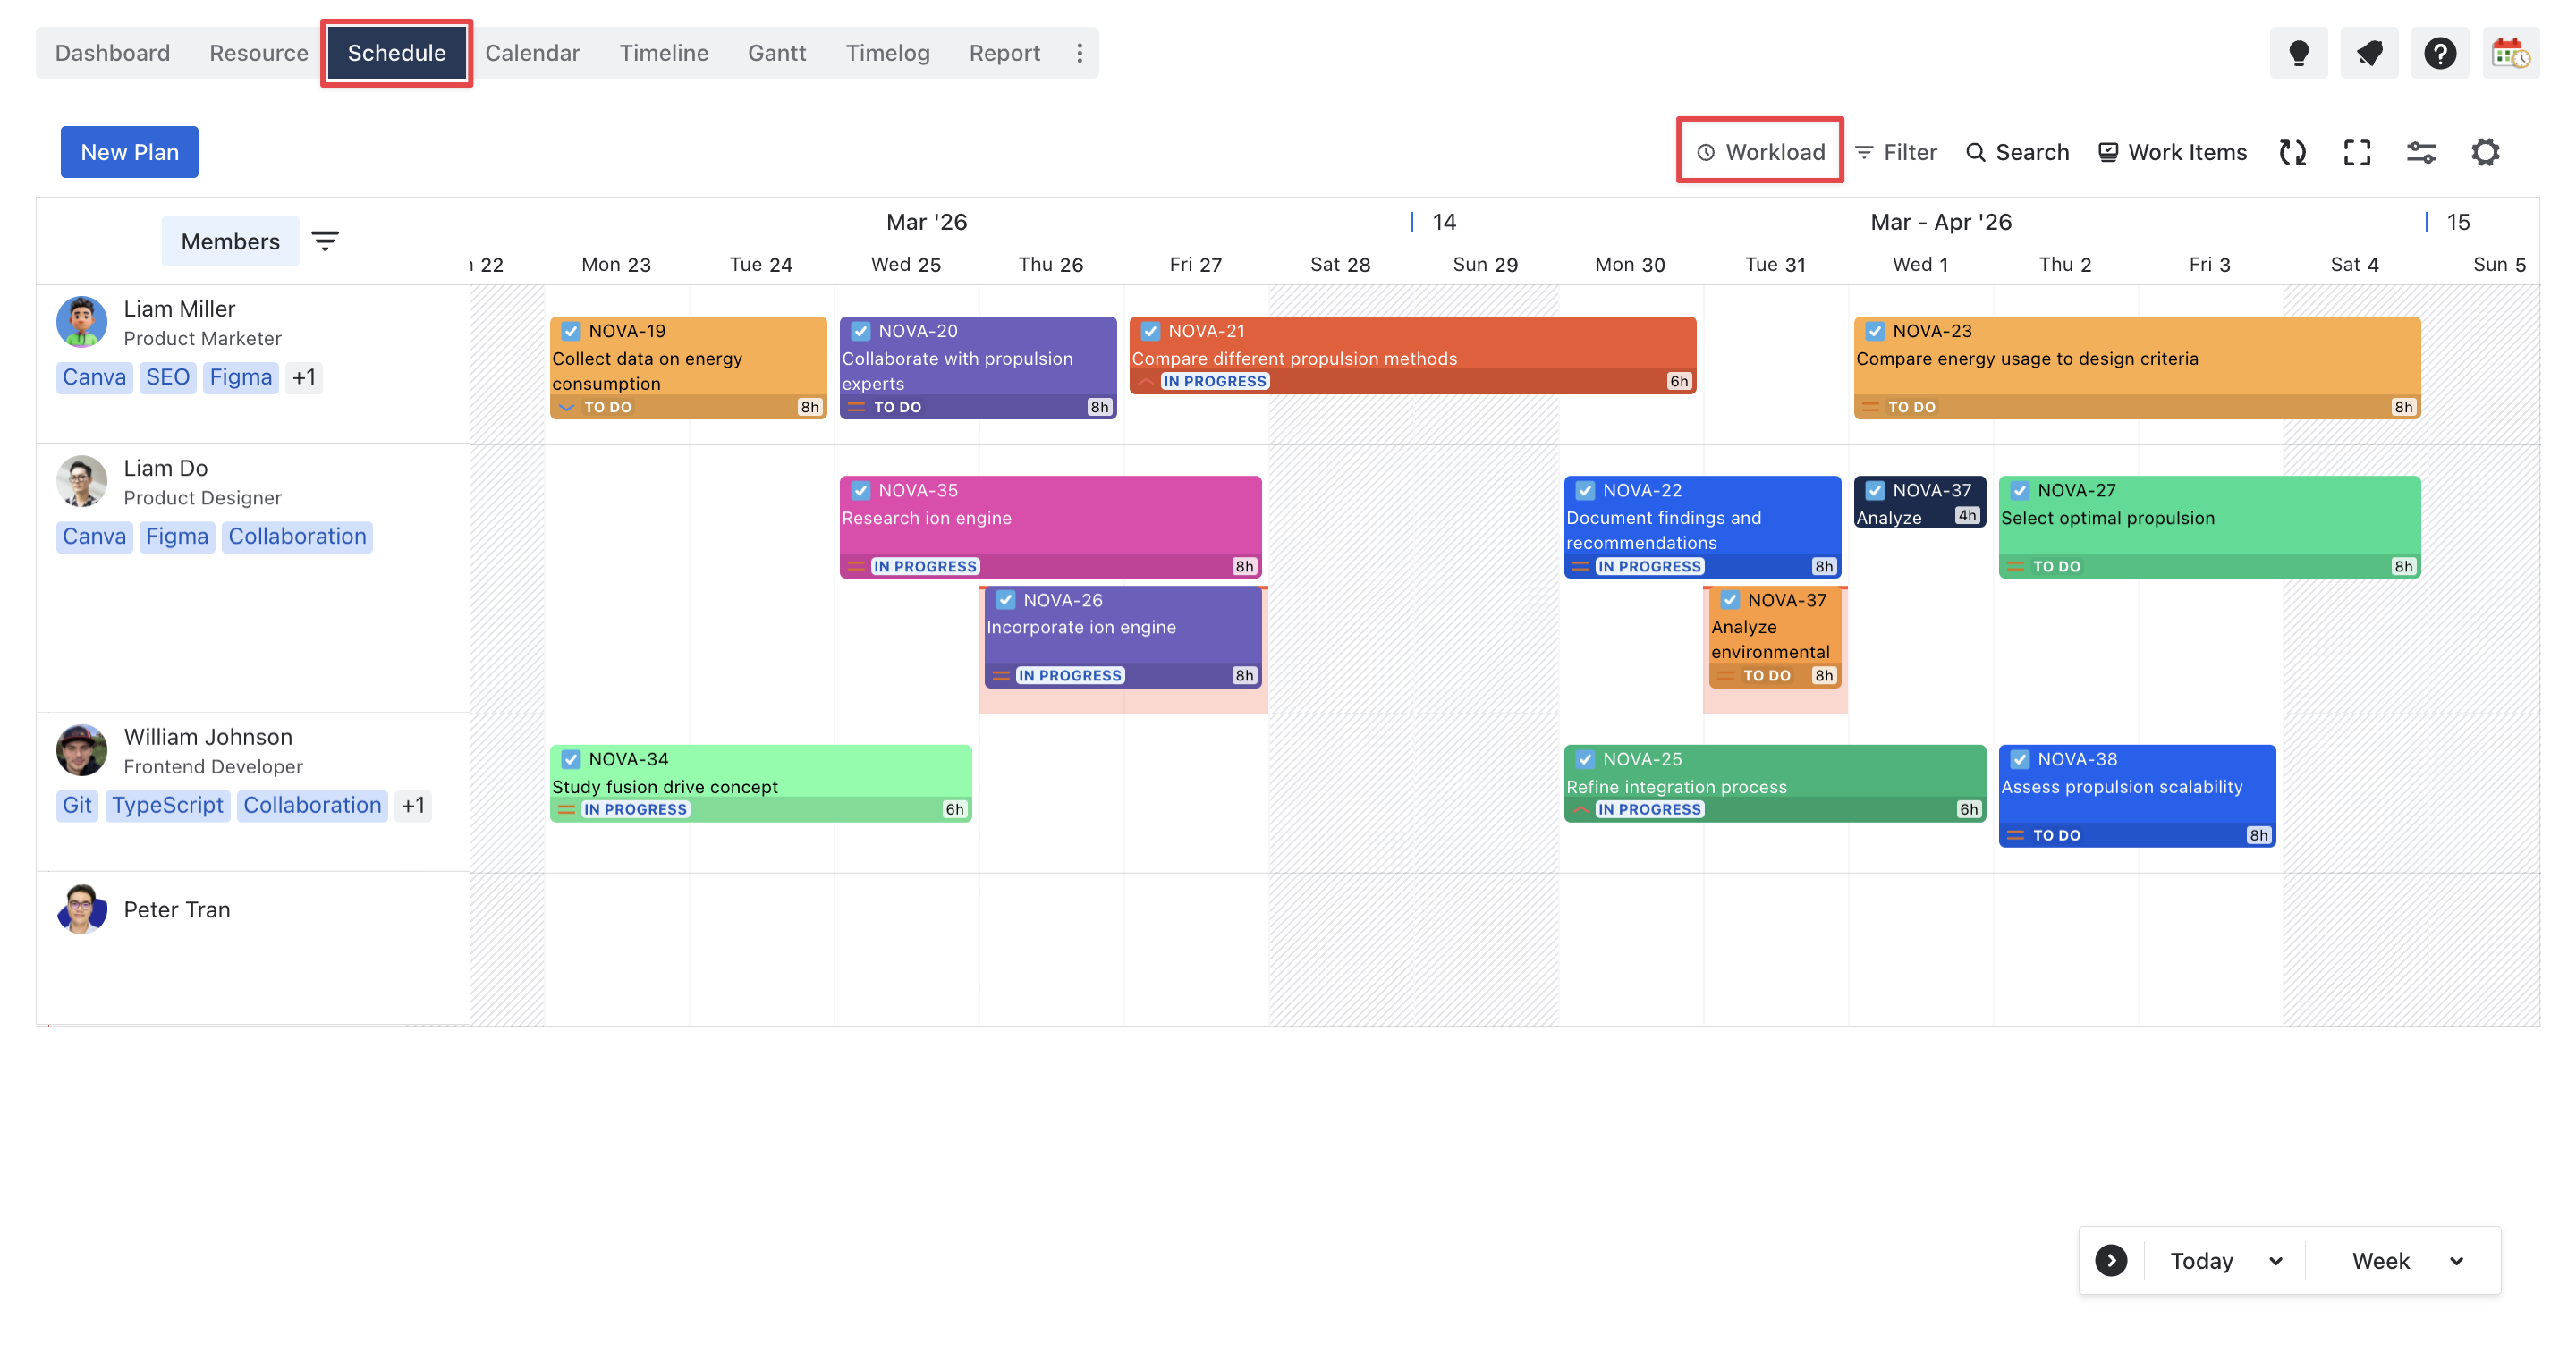
A timeline can look fine on paper and still fail in execution. That is why the next step is to review the option in Schedule Board.
ProScheduler describes Schedule Board as an interactive, calendar-like interface showing each team member’s assigned tasks, availability, and workload. It also lets users filter resources and switch to Workload view to see who is underloaded, balanced, or overloaded.
What to check:
-
whether a person or team is overloaded
-
whether shared resources are double-booked
-
whether the revised option still fits real capacity
Step 7. Compare outcomes and align on the best option
Once you have tested a few options, compare them using a few practical questions:
-
Does this protect the key milestone?
-
Does it reduce or create critical-path risk?
-
Is the capacity realistic?
-
Is the trade-off acceptable?
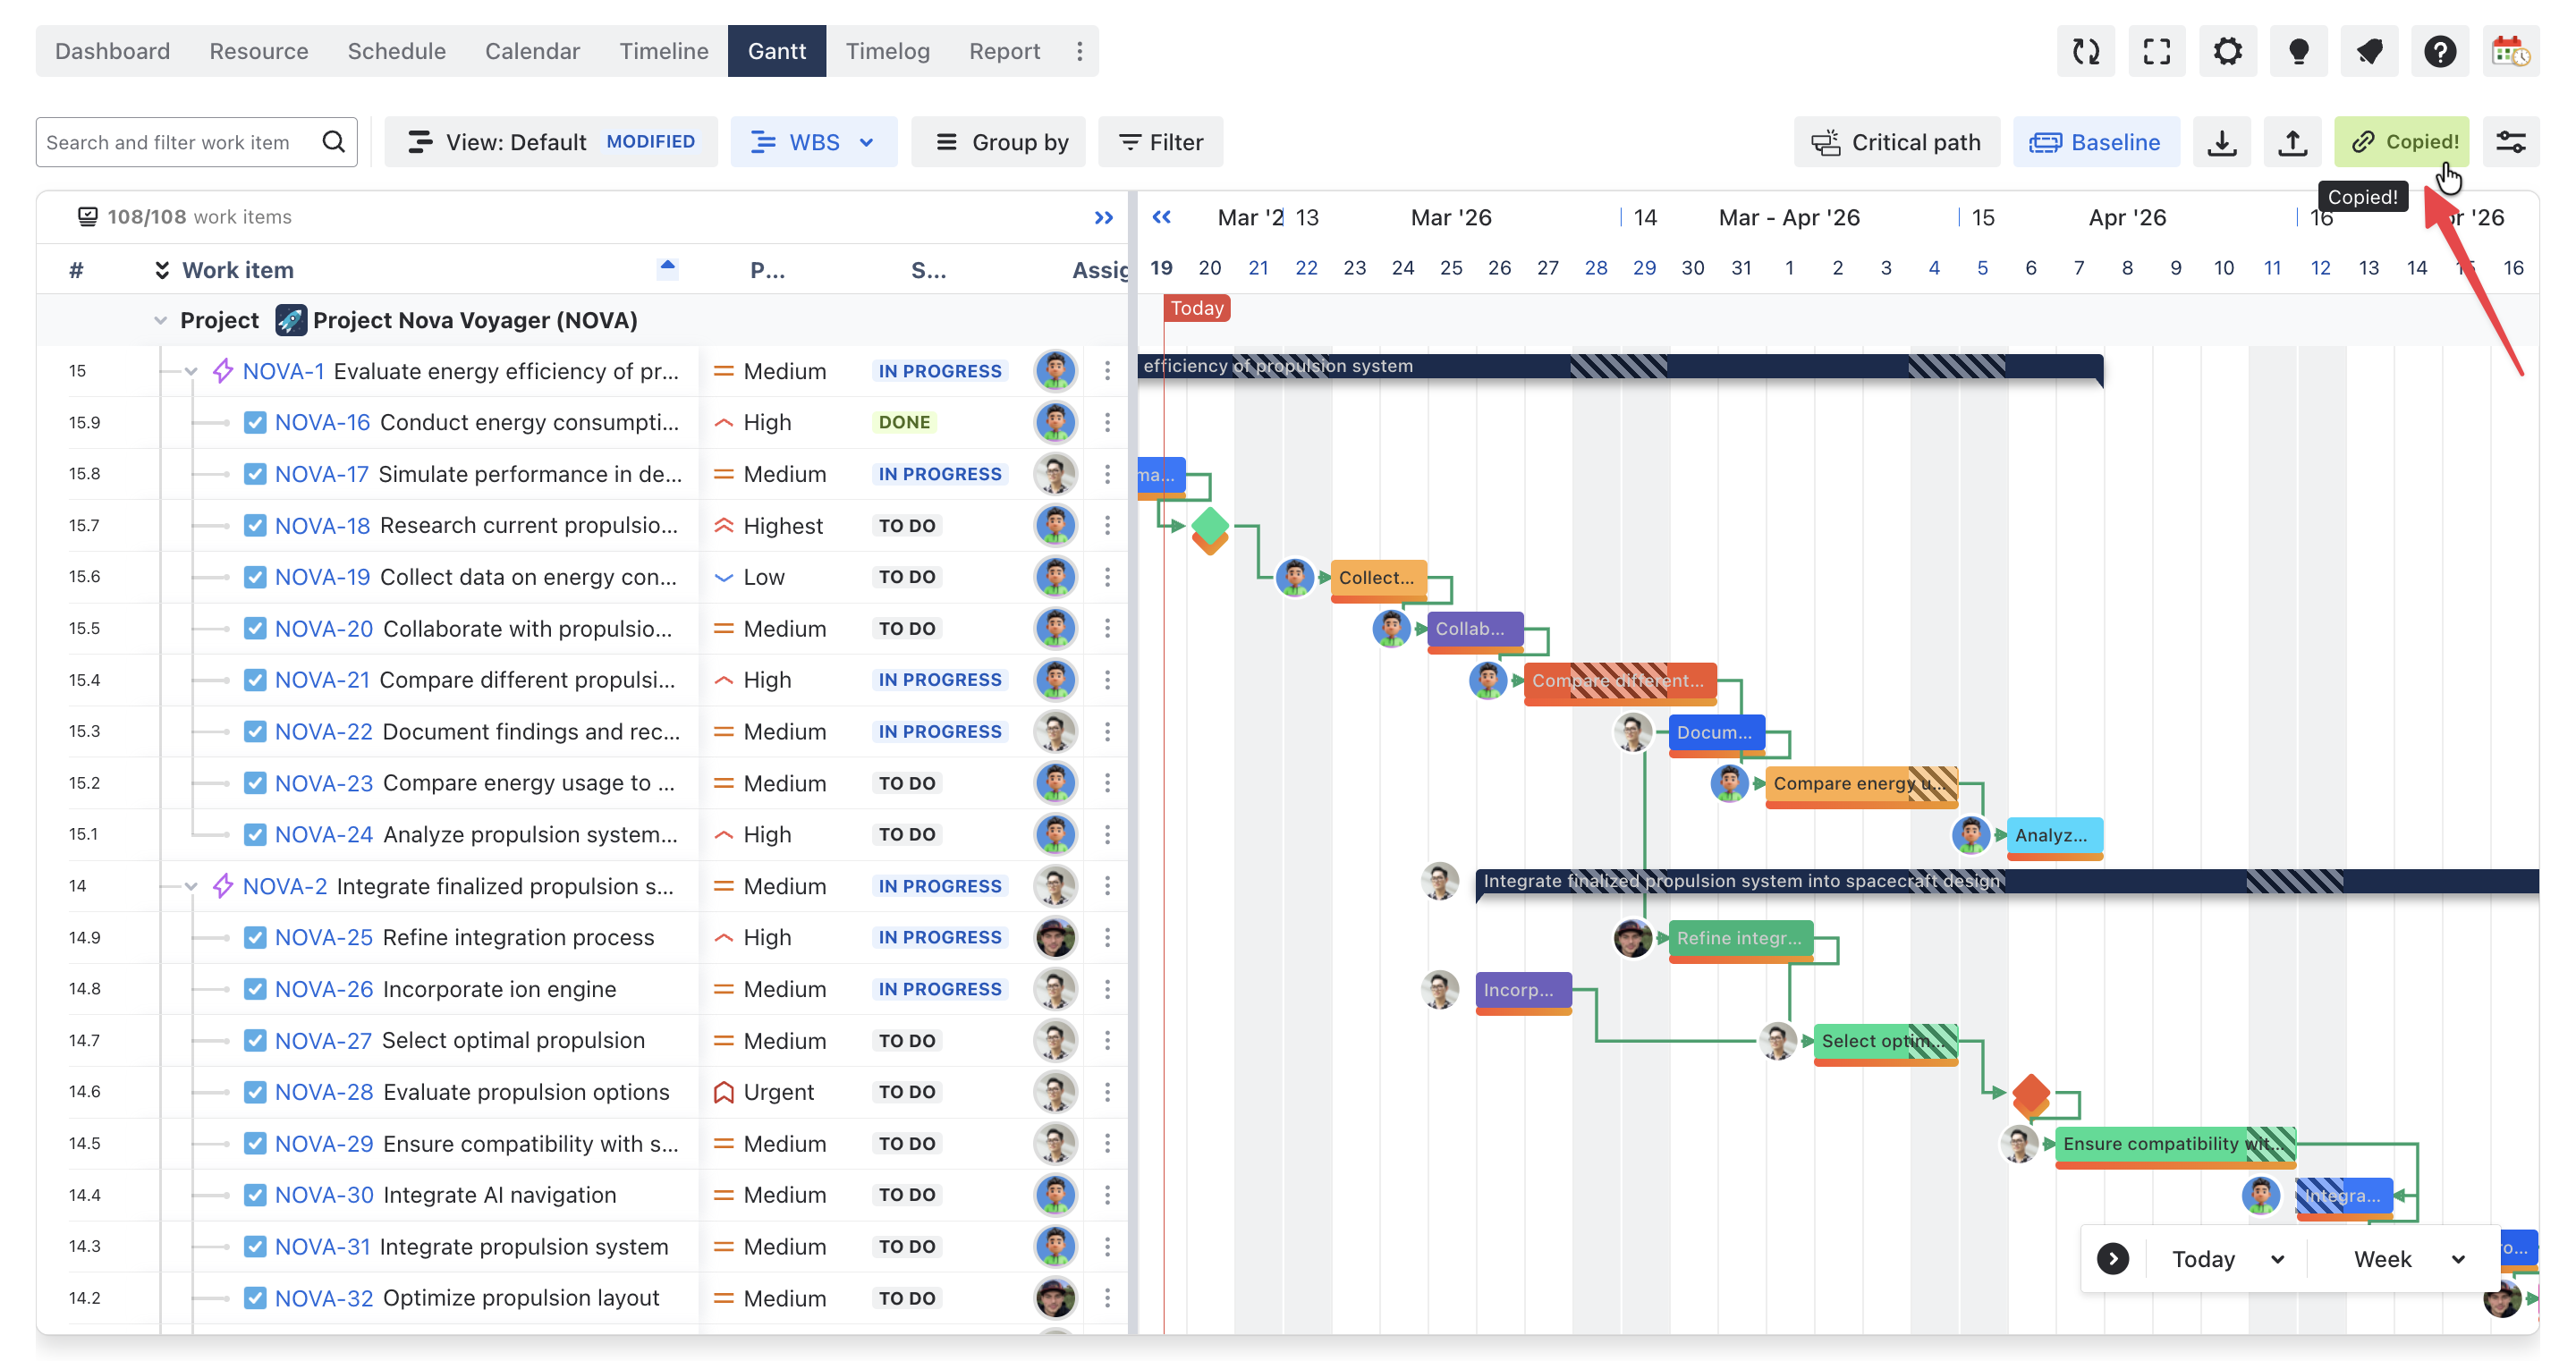
At this point, save the view or copy the Gantt link so others can review the same scenario. ProScheduler supports saved views and shareable Gantt links that preserve active settings such as filters and critical path.
Step 8. Rebaseline only after approval
Once the team agrees on the most realistic option, update the schedule officially and treat that revised version as the new committed plan. Only then should you rebaseline.
Why this matters:
-
Rebaselining should reflect a decision, not an experiment
-
It gives the team a clean reference point for future tracking
If your team needs stronger traceability, ProScheduler also provides an Audit Logs that records changes across the app, including configuration and data updates.
The key rule is simple: rebaseline only after the team has tested options and agreed on the most realistic path forward.
Conclusion
What-if scenario planning gives teams a more controlled way to replan. Instead of immediately changing dates and hoping the new schedule will hold, they can review the impact first, compare realistic options, and choose the best path before updating the official plan.
That is what makes this approach so valuable in Jira. It helps teams protect visibility, understand trade-offs, and avoid rebaselining too early.
With TeamBoard ProScheduler, teams can bring that process into one structured planning space. They can review timelines, dependencies, milestones, and workload together, then make schedule changes with a clearer understanding of the impact.