.png)
When you click on any Requirement key in the requirement table, you'll be redirected to the Requirement Detail Screen. On this screen, you can view more detailed Jira-related information associated with the requirement.
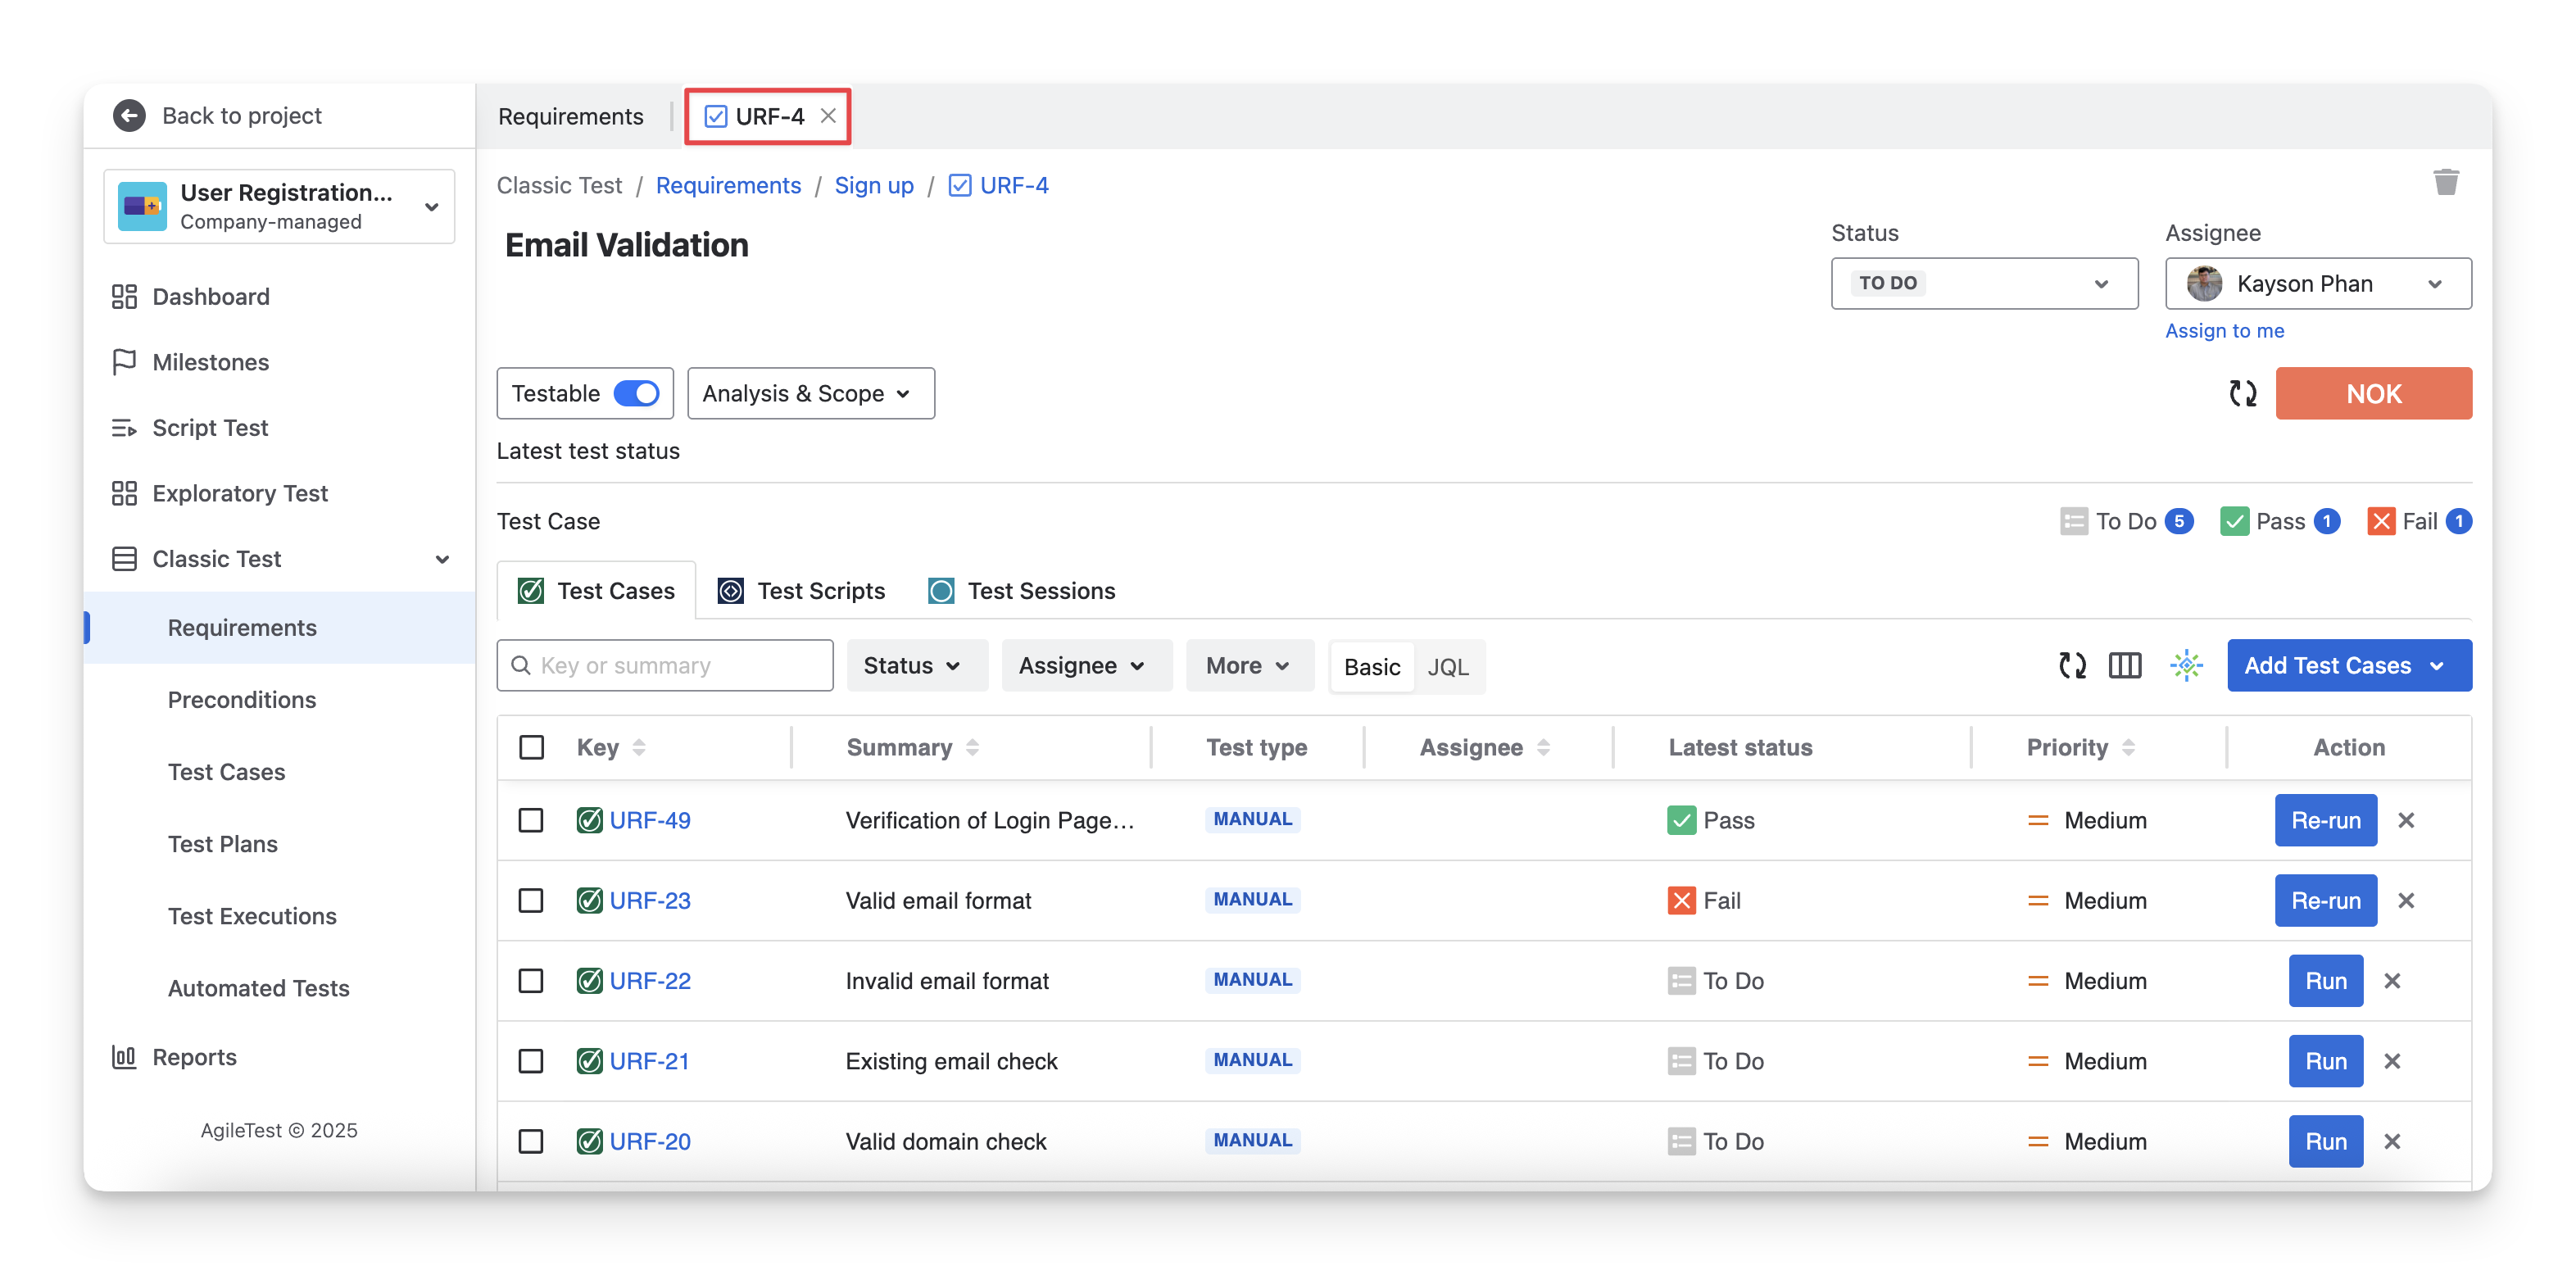
In each Requirement Detail Screen, there are two sections:
-
(1) Requirement Information.
-
(2) Requirement Relationship with 3 testing strategies.
1. Requirement Information
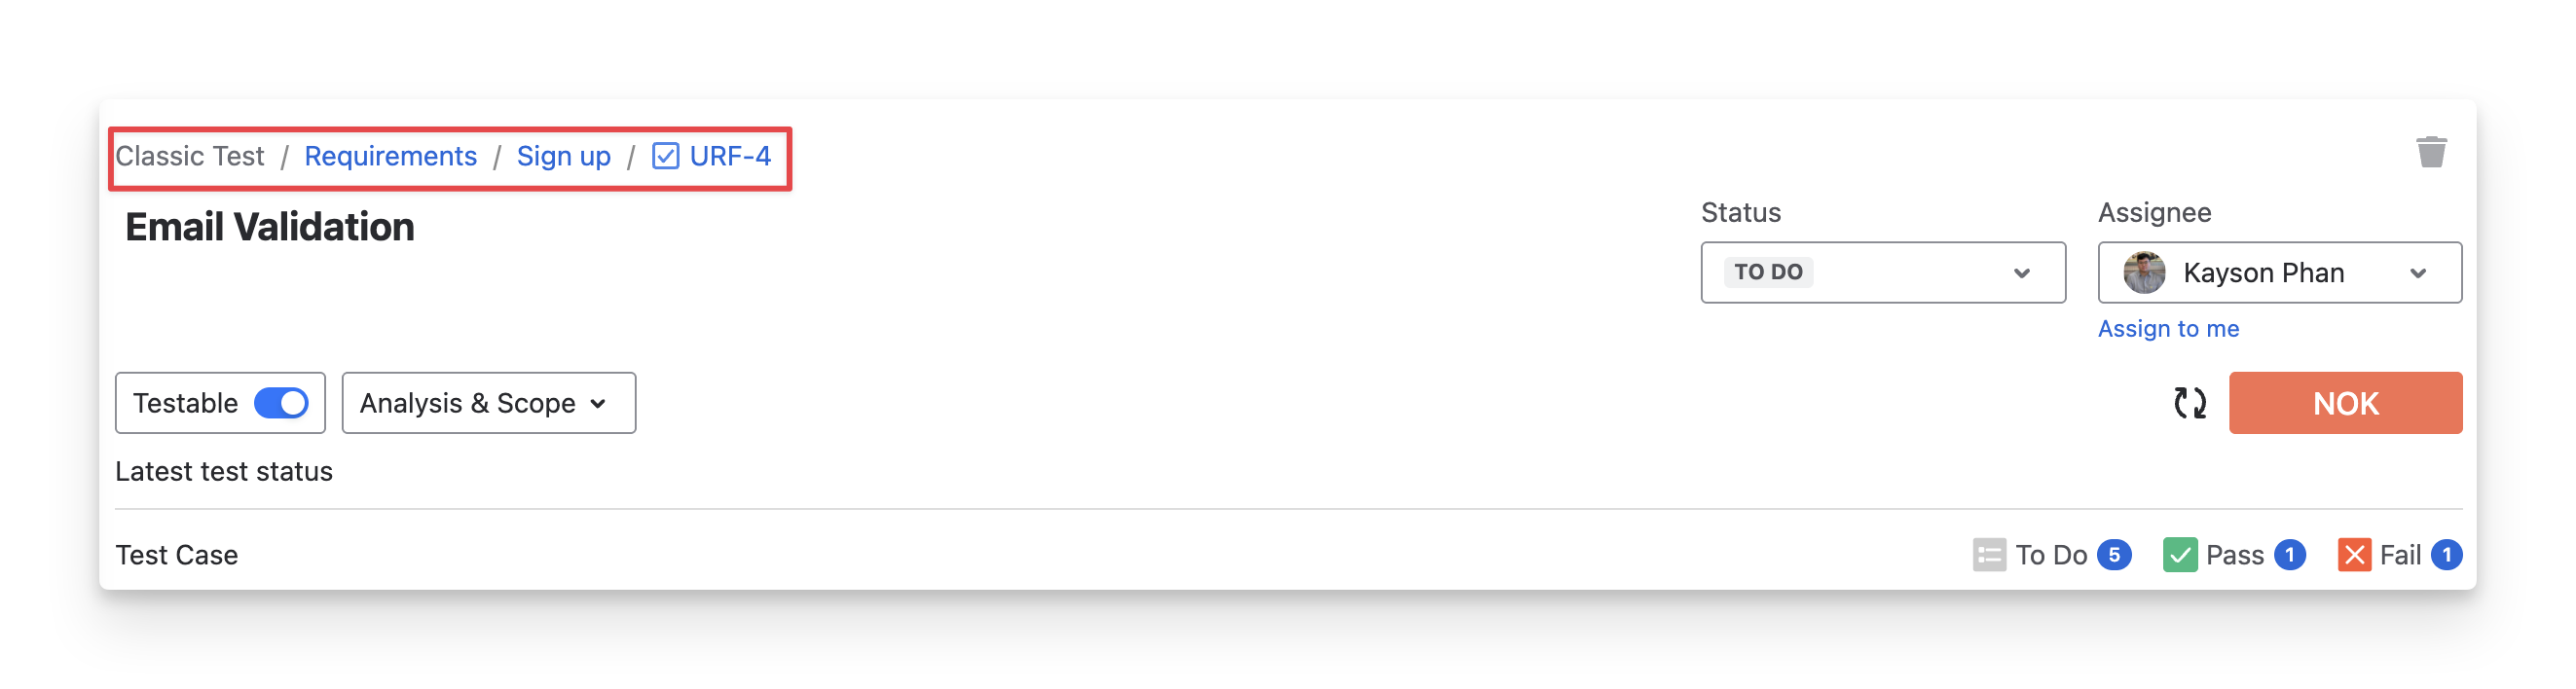
1.1 Storage Path
In the top left corner of the Requirement detail, you can see the structure and details of a requirement. This storage path helps you in three ways:
-
Locating: Identify the folder & subfolder where the requirement is organized. For example, Requirement URF-4 belongs to the Sign-up Folders.
-
Sharing: Copy the Requirement ticket to share within your teams.
-
Redirecting: Click on the Jira ID to access the Jira ticket for this requirement.
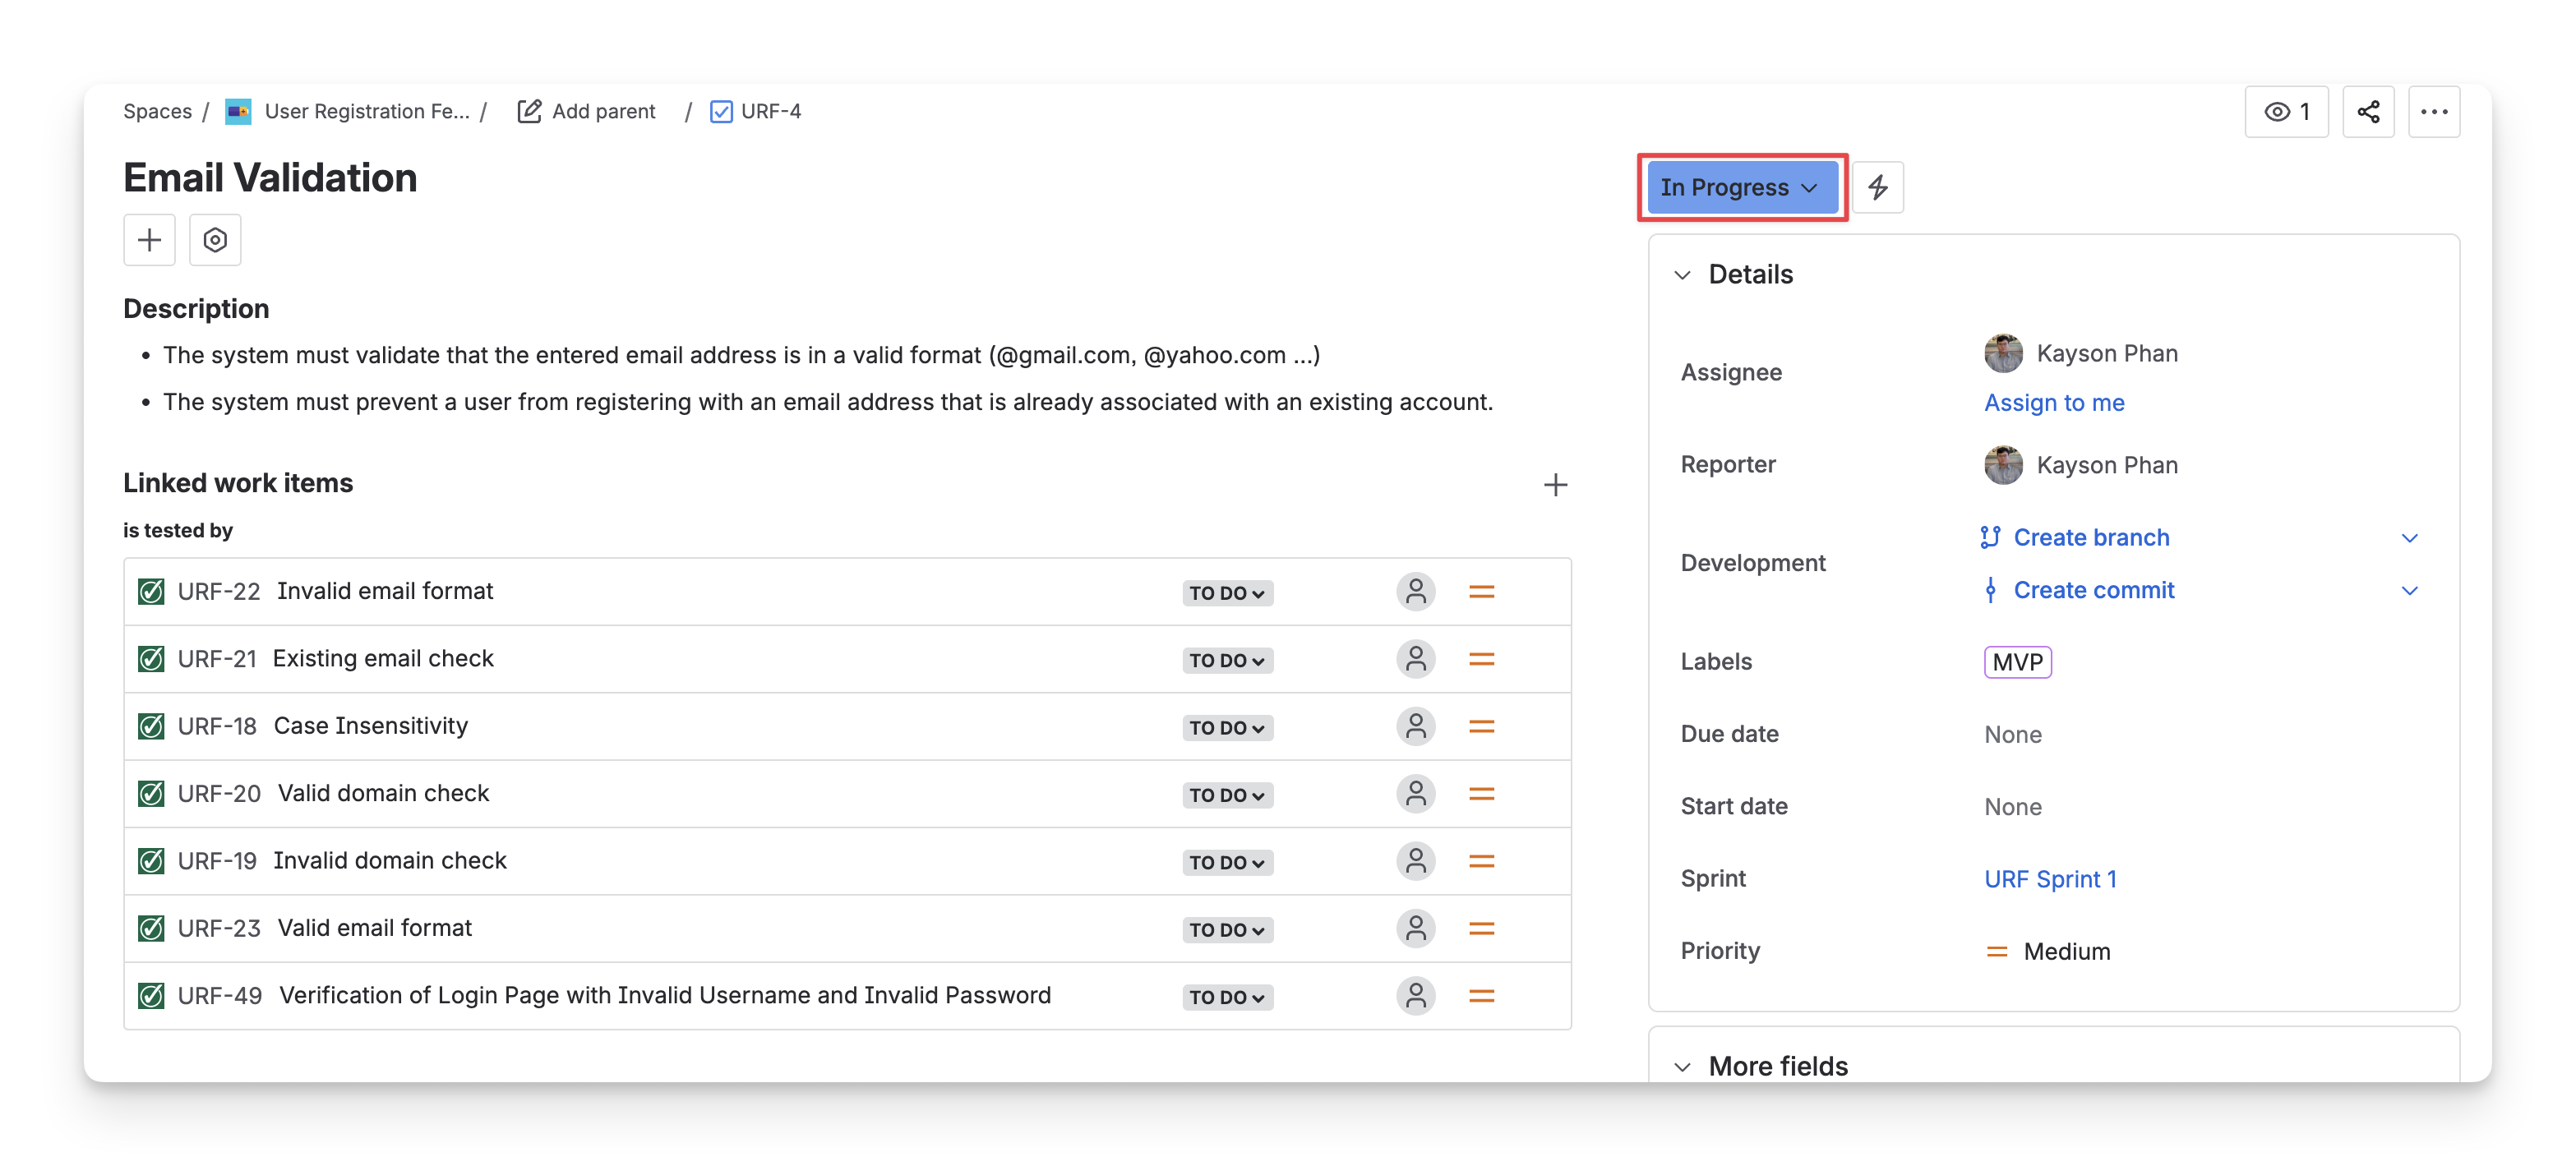
1.2 Jira Status
The Status box shows the Jira status of the requirement ticket ( todo ; in progress ; done ). It reflects the progress of the requirement in your team workflow on the Jira board.
To change this status to match your team’s testing process, click on the dropdown and select the right Jira status.
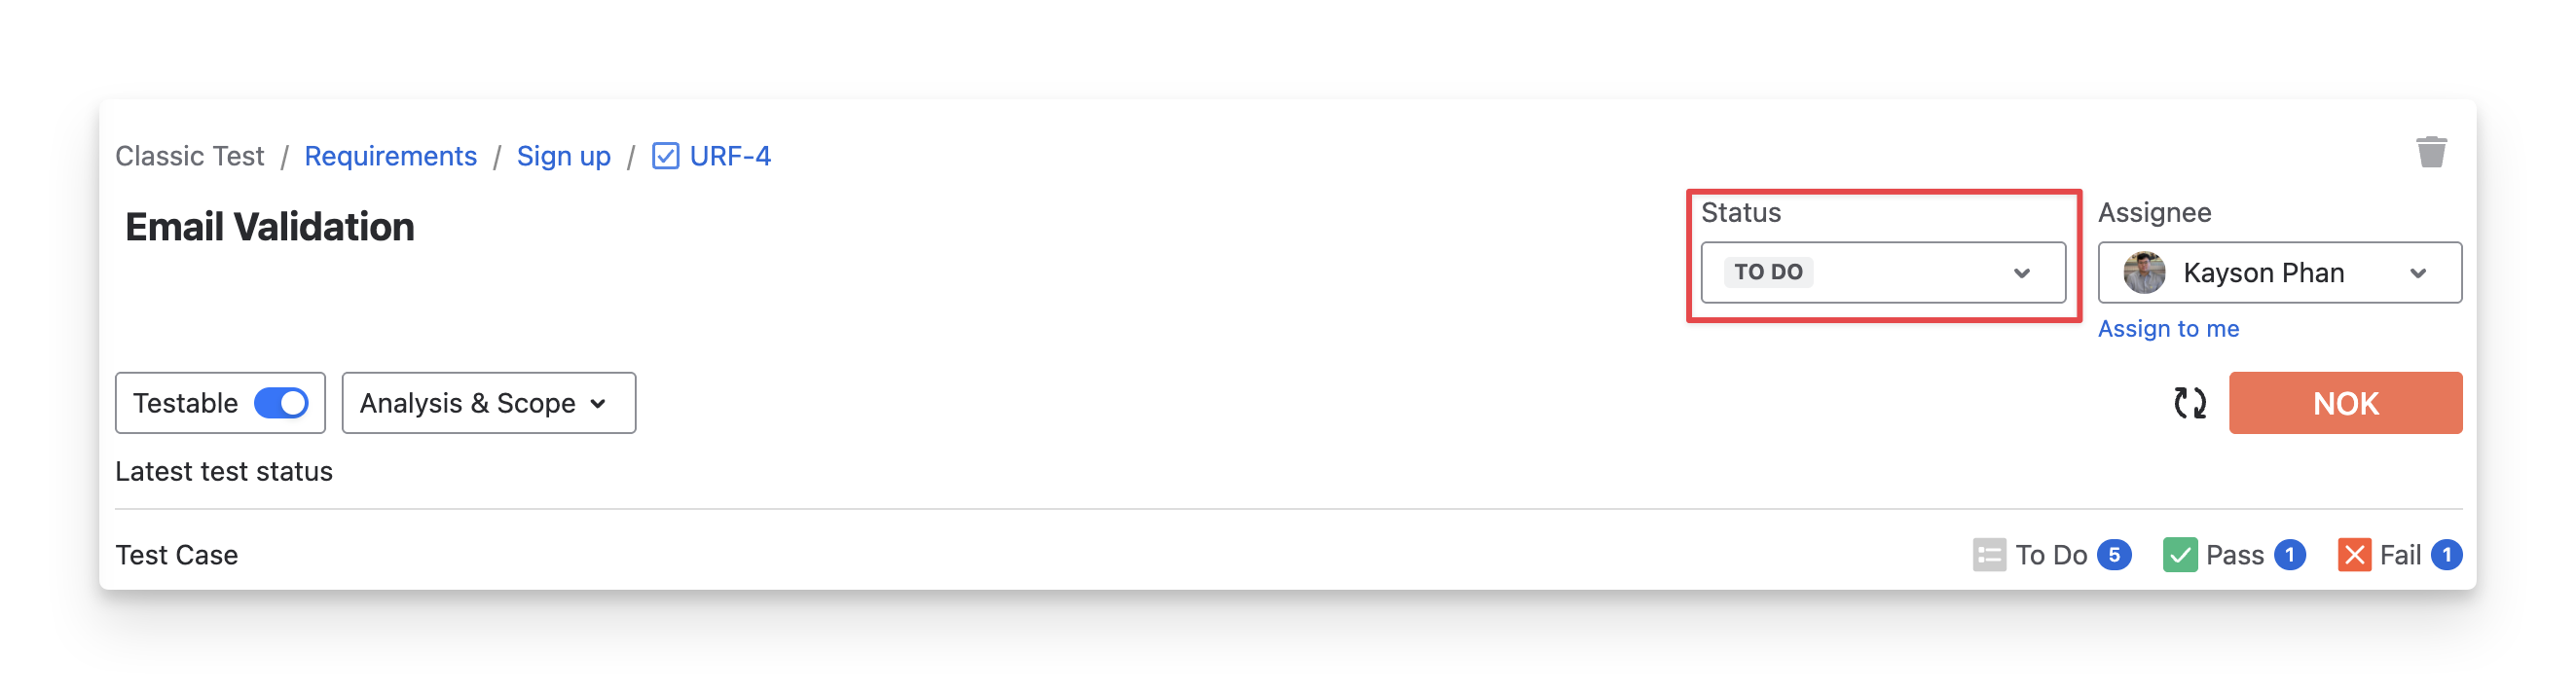
Updating the Jira status on the Requirement Detail screen syncs it with the Jira ticket, and vice versa.
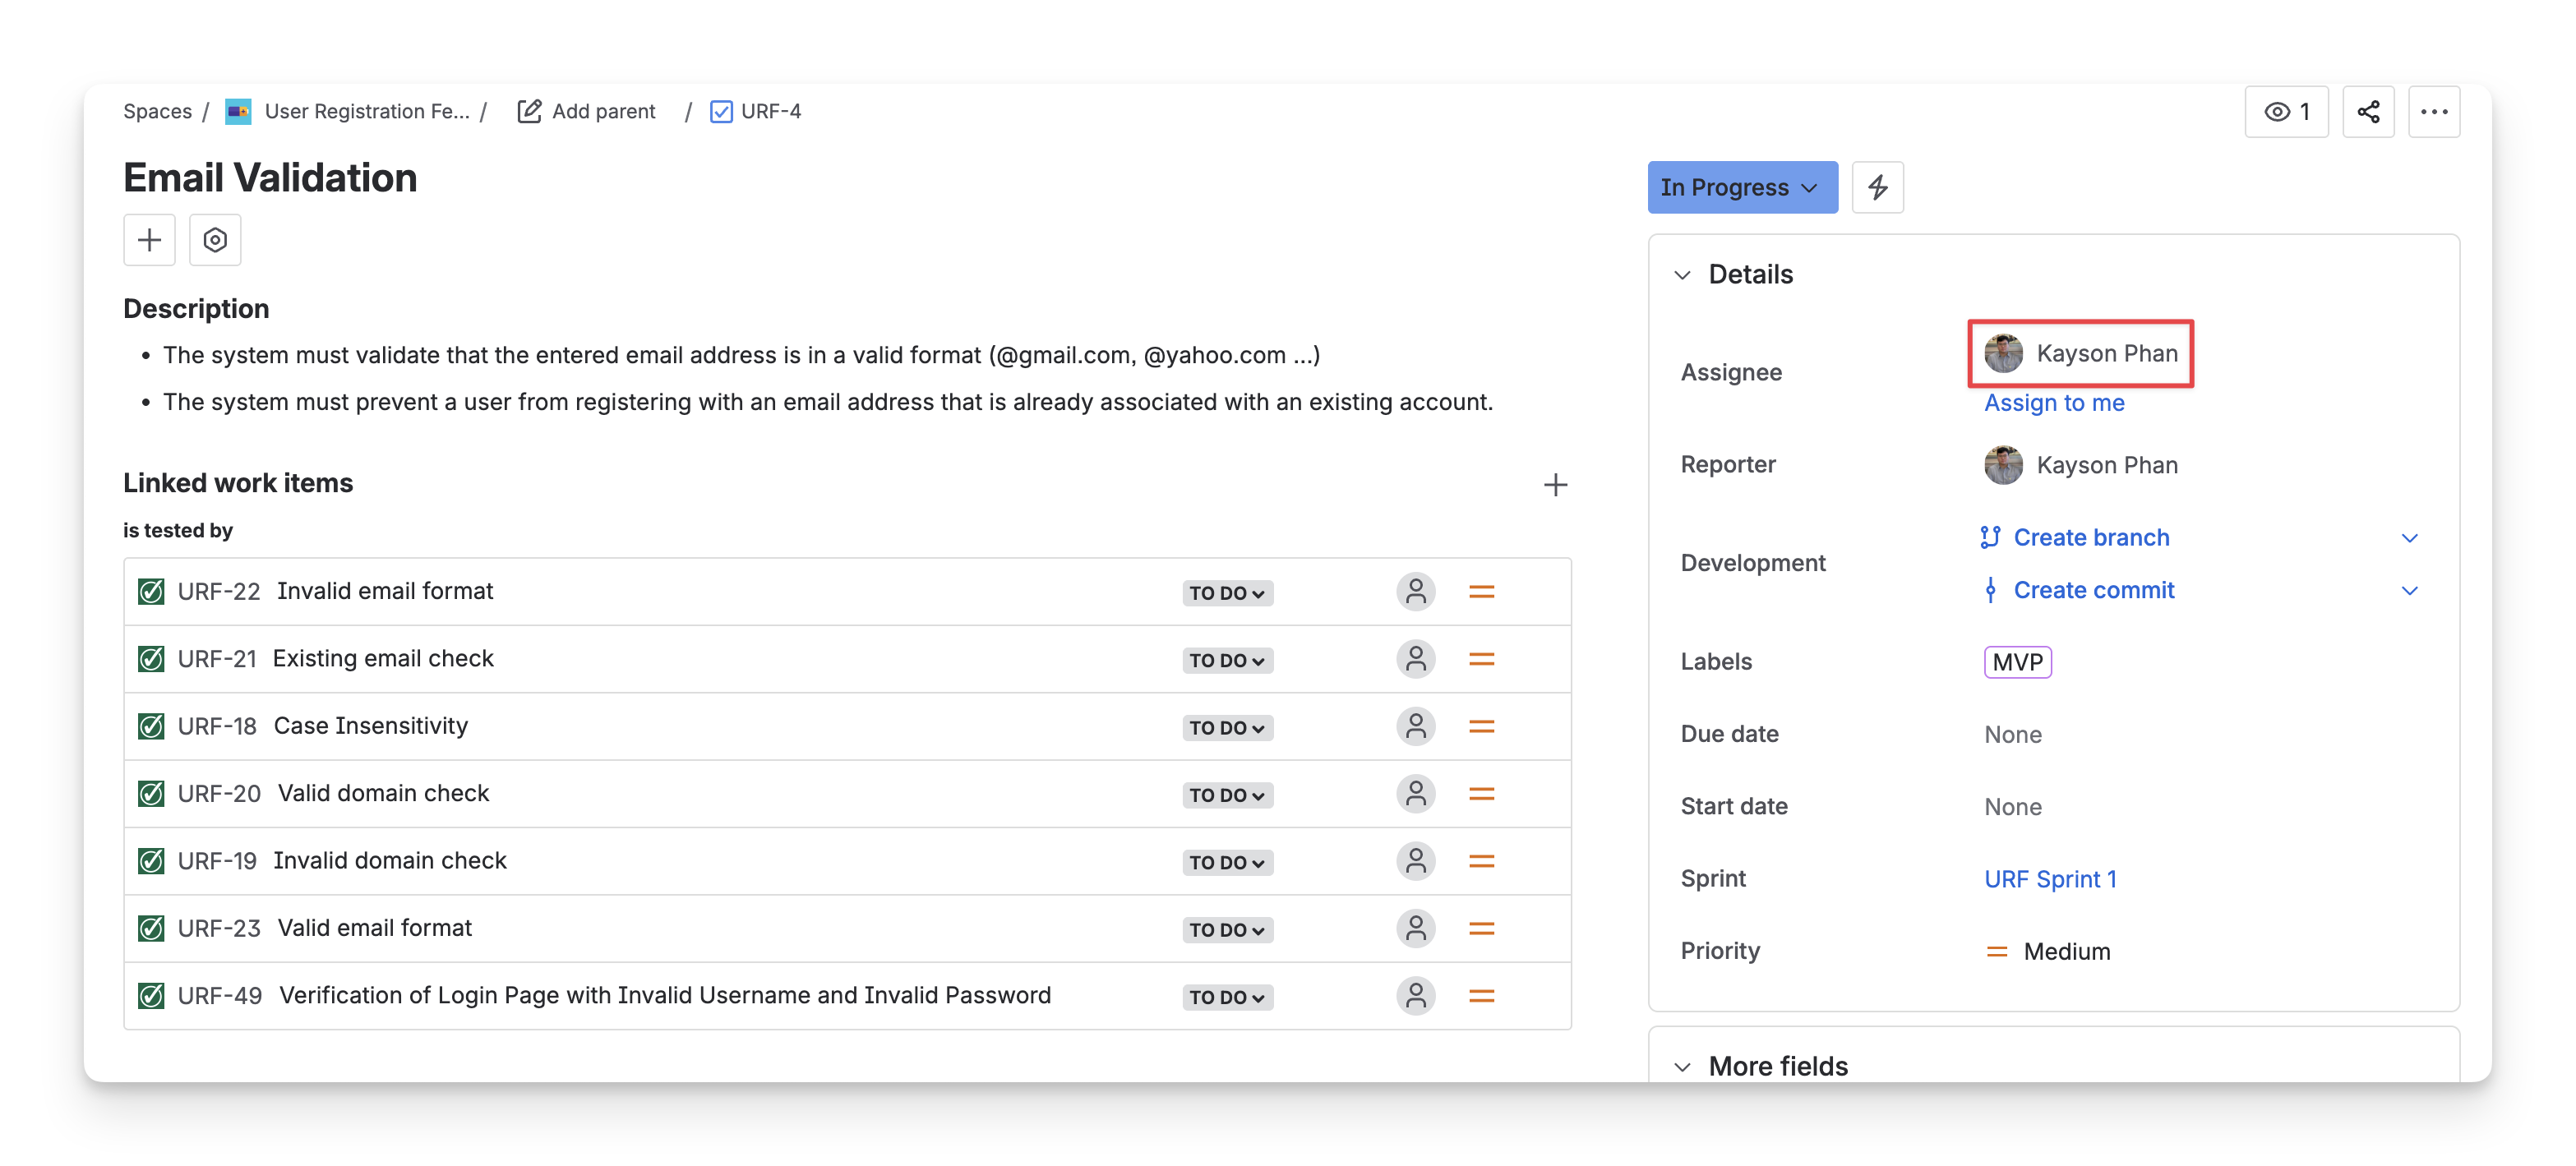
1.3 Assignee
The Assignee box shows who is responsible for this requirement. To change the assignee, click the dropdown and select a team member.
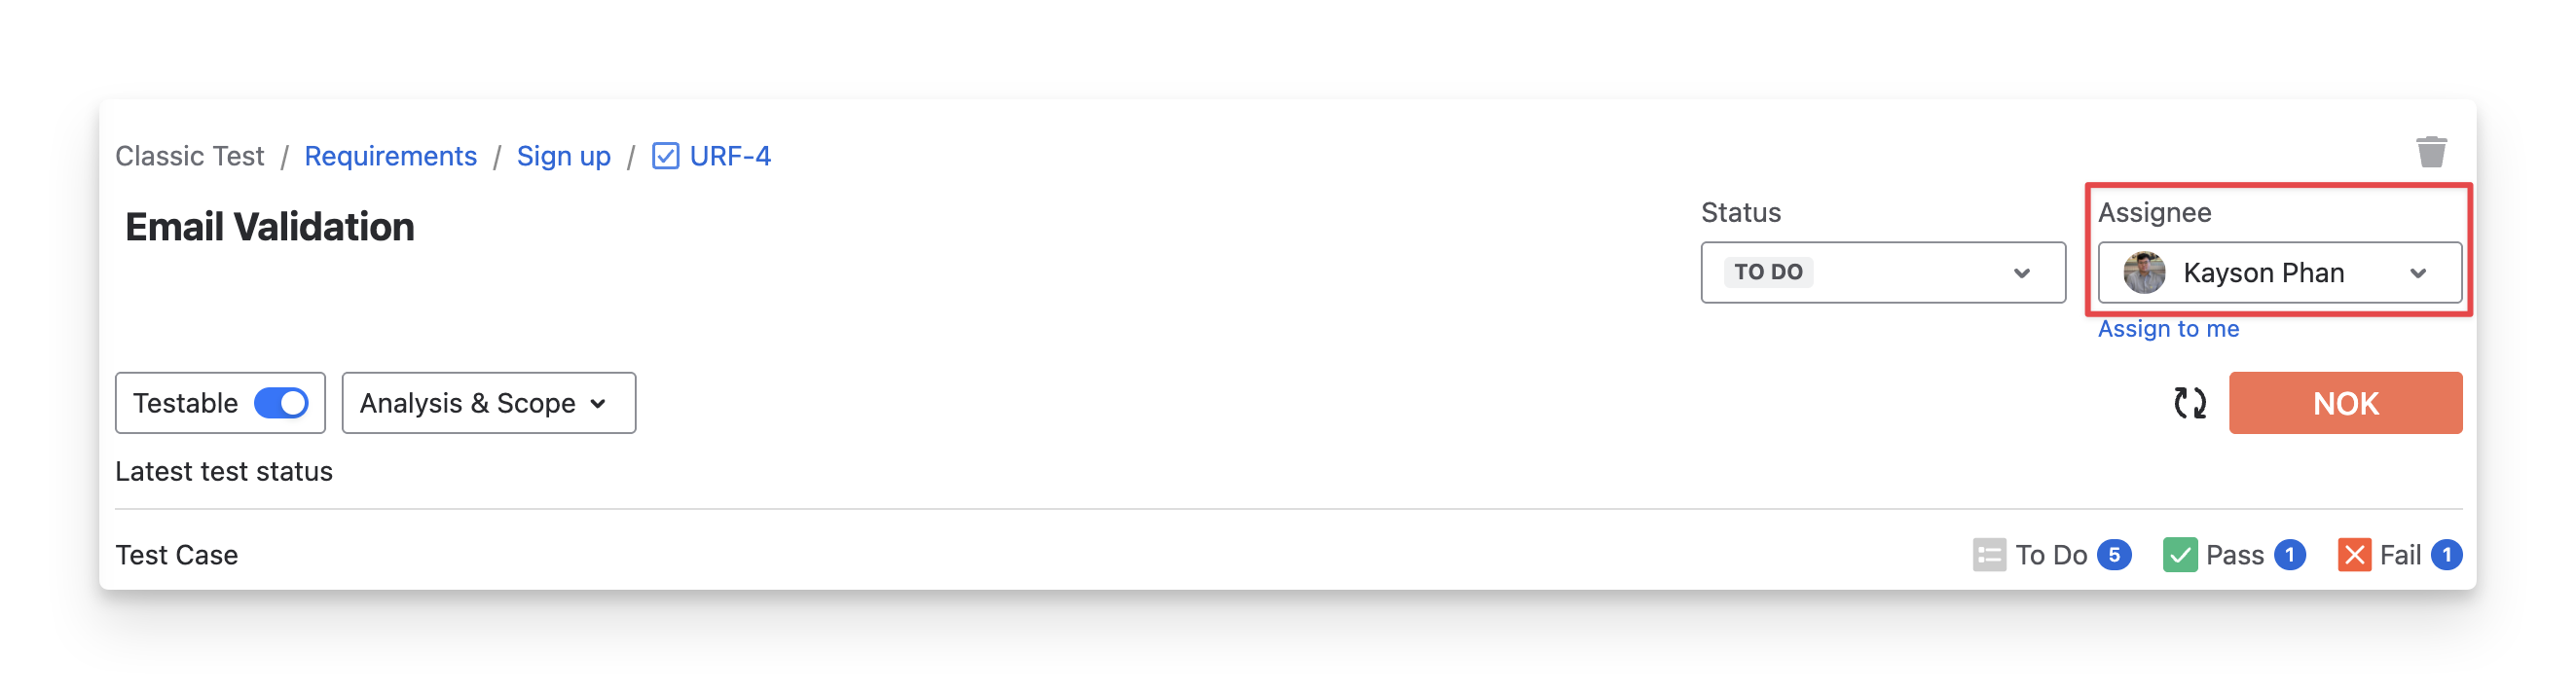
Updating the Assignee on the Requirement Detail screen syncs it with the Jira ticket, and vice versa.
1.4 Latest Test Status
The Latest Test Status represents the overall testing status of a requirement. It is automatically calculated based on the execution results of linked Test Cases and Test Scripts, depending on the Analysis and Scope you choose. Based on these results, the Latest Test Status indicates whether the requirement is fully tested or still requires attention, using statuses ( NOK ; not run ; Unknown ; ok ; Uncovered ; covered ).
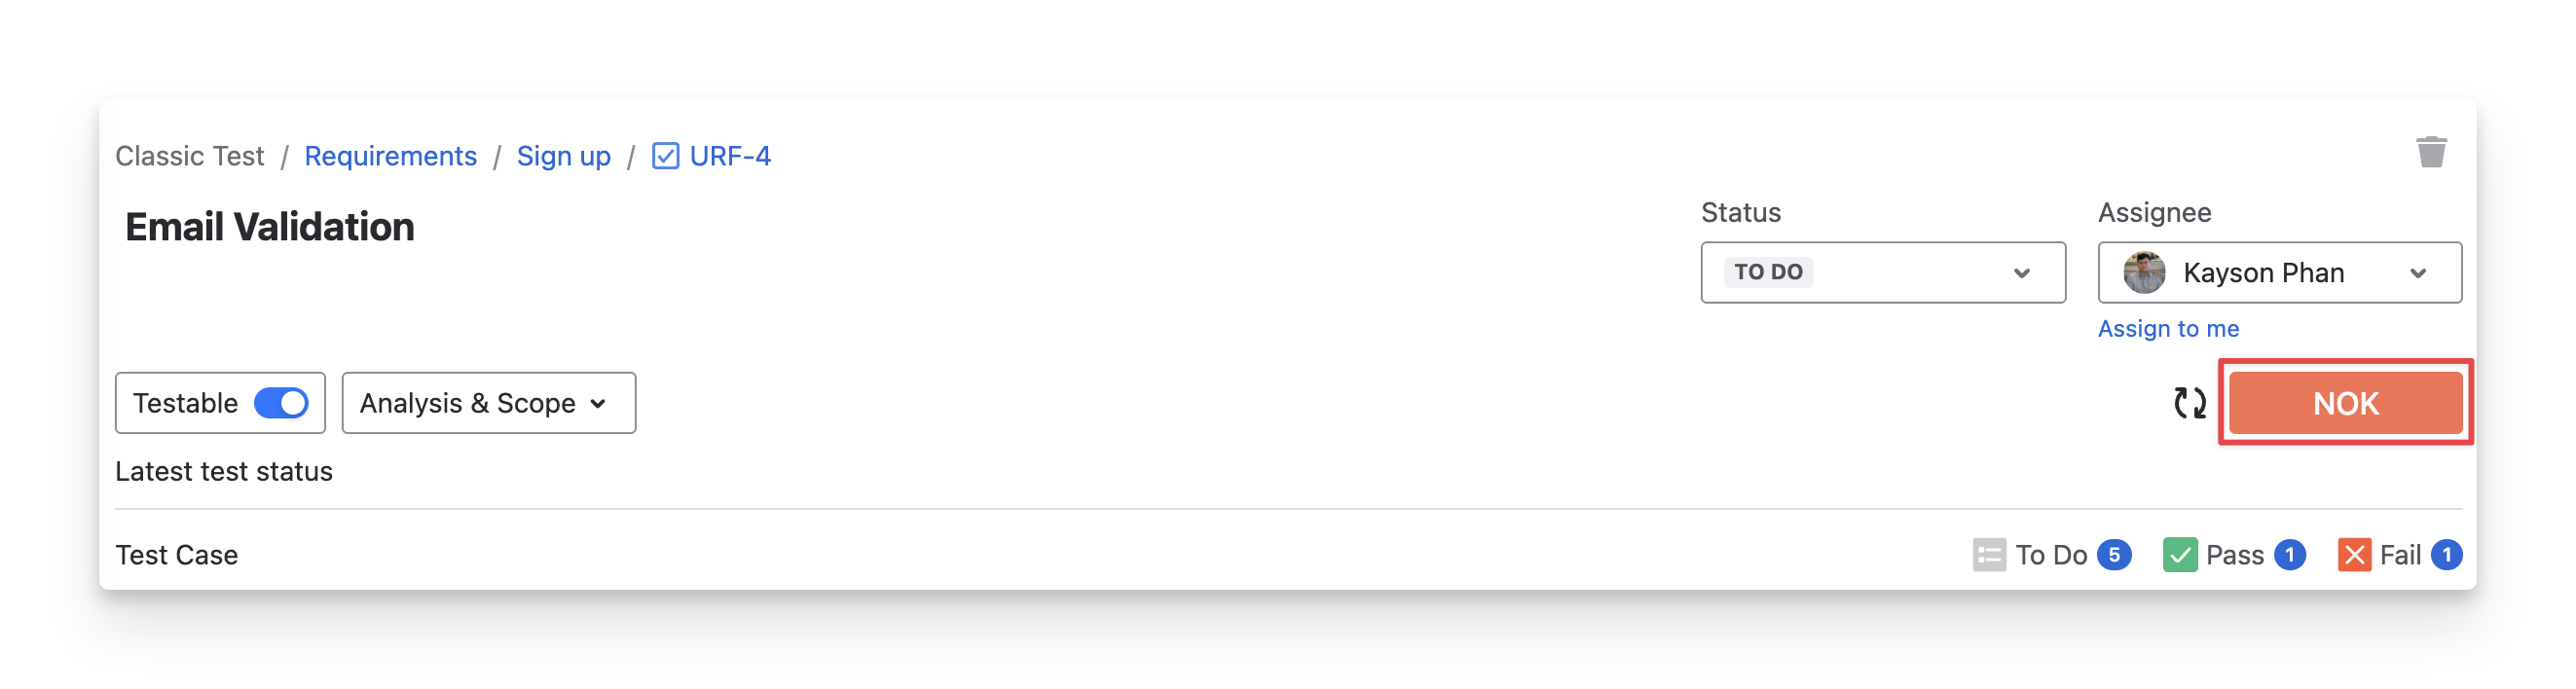
By default, the Latest Test Status is calculated based on all Test Case Status linked with this requirement. To change the scope of this calculation, click on the “Analysis & Scope” button and apply suitable filters.
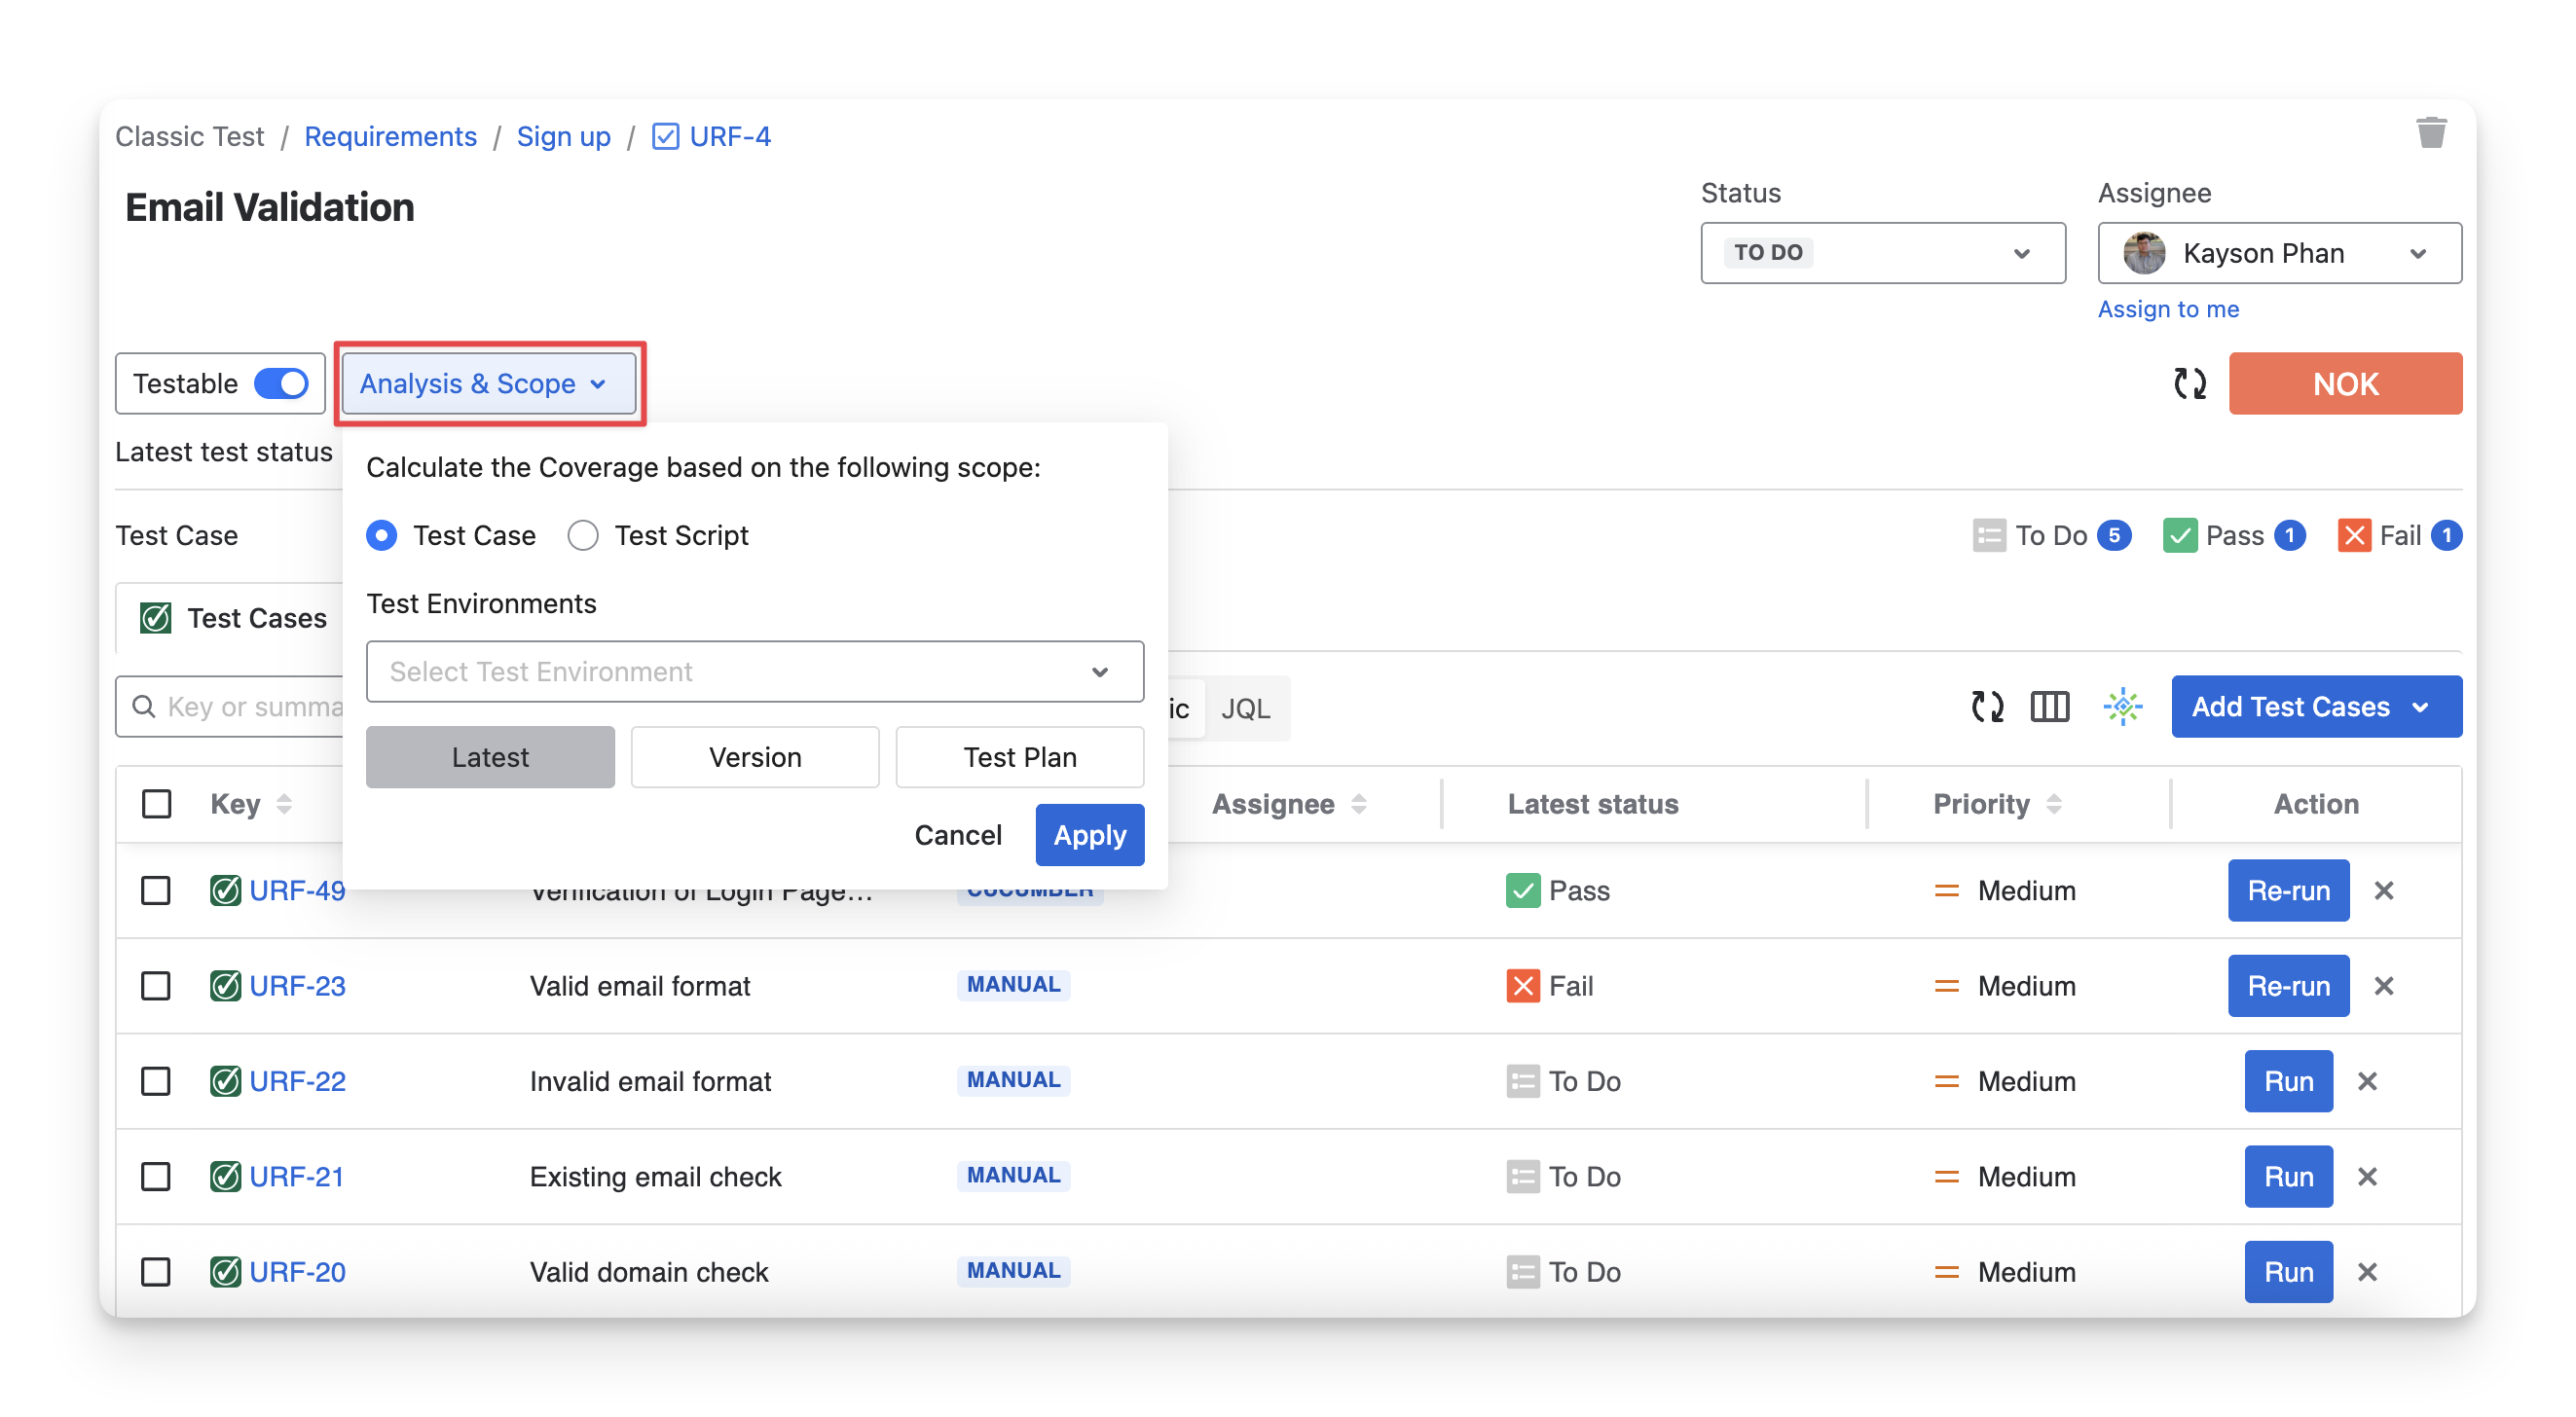
Read more about Coverage Analysis.
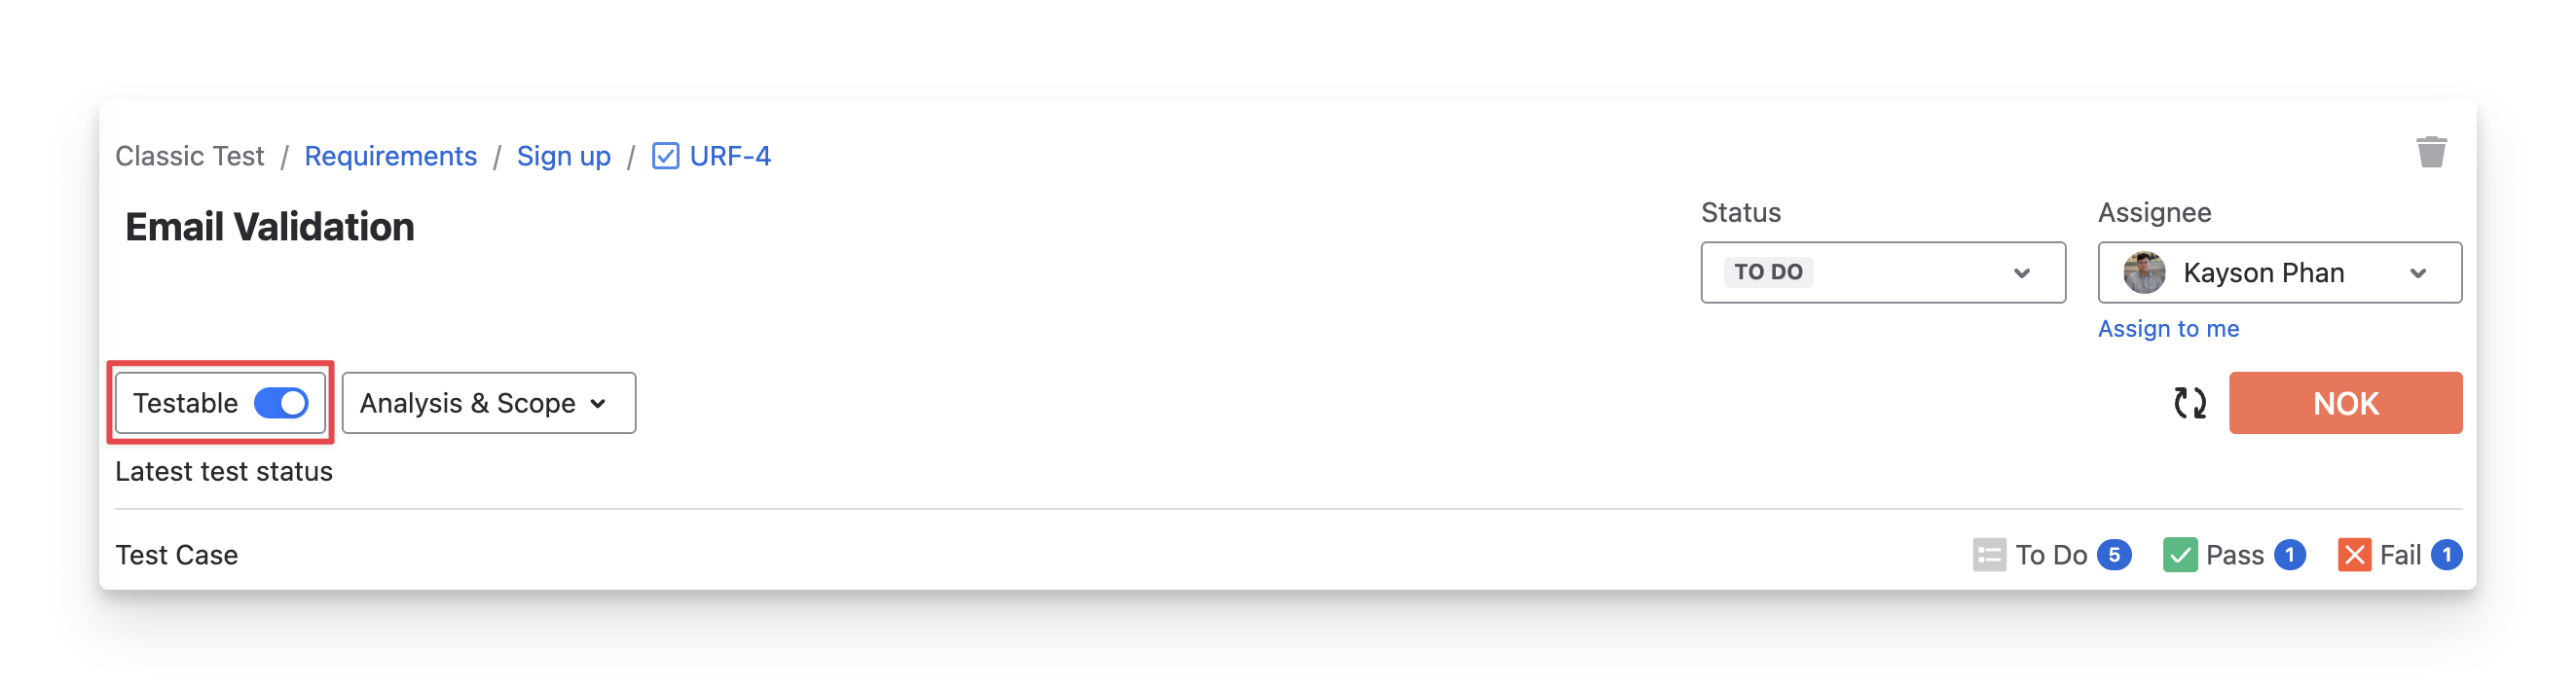
1.5 Include/Exclude Requirement In Analysis
The “Testable” box shows that this requirement counts toward the dashboard and report metrics.
Sometimes, to refine testing metrics in the Test Traceability and Test Coverage report, you can exclude specific requirements by turning off the Testable button.
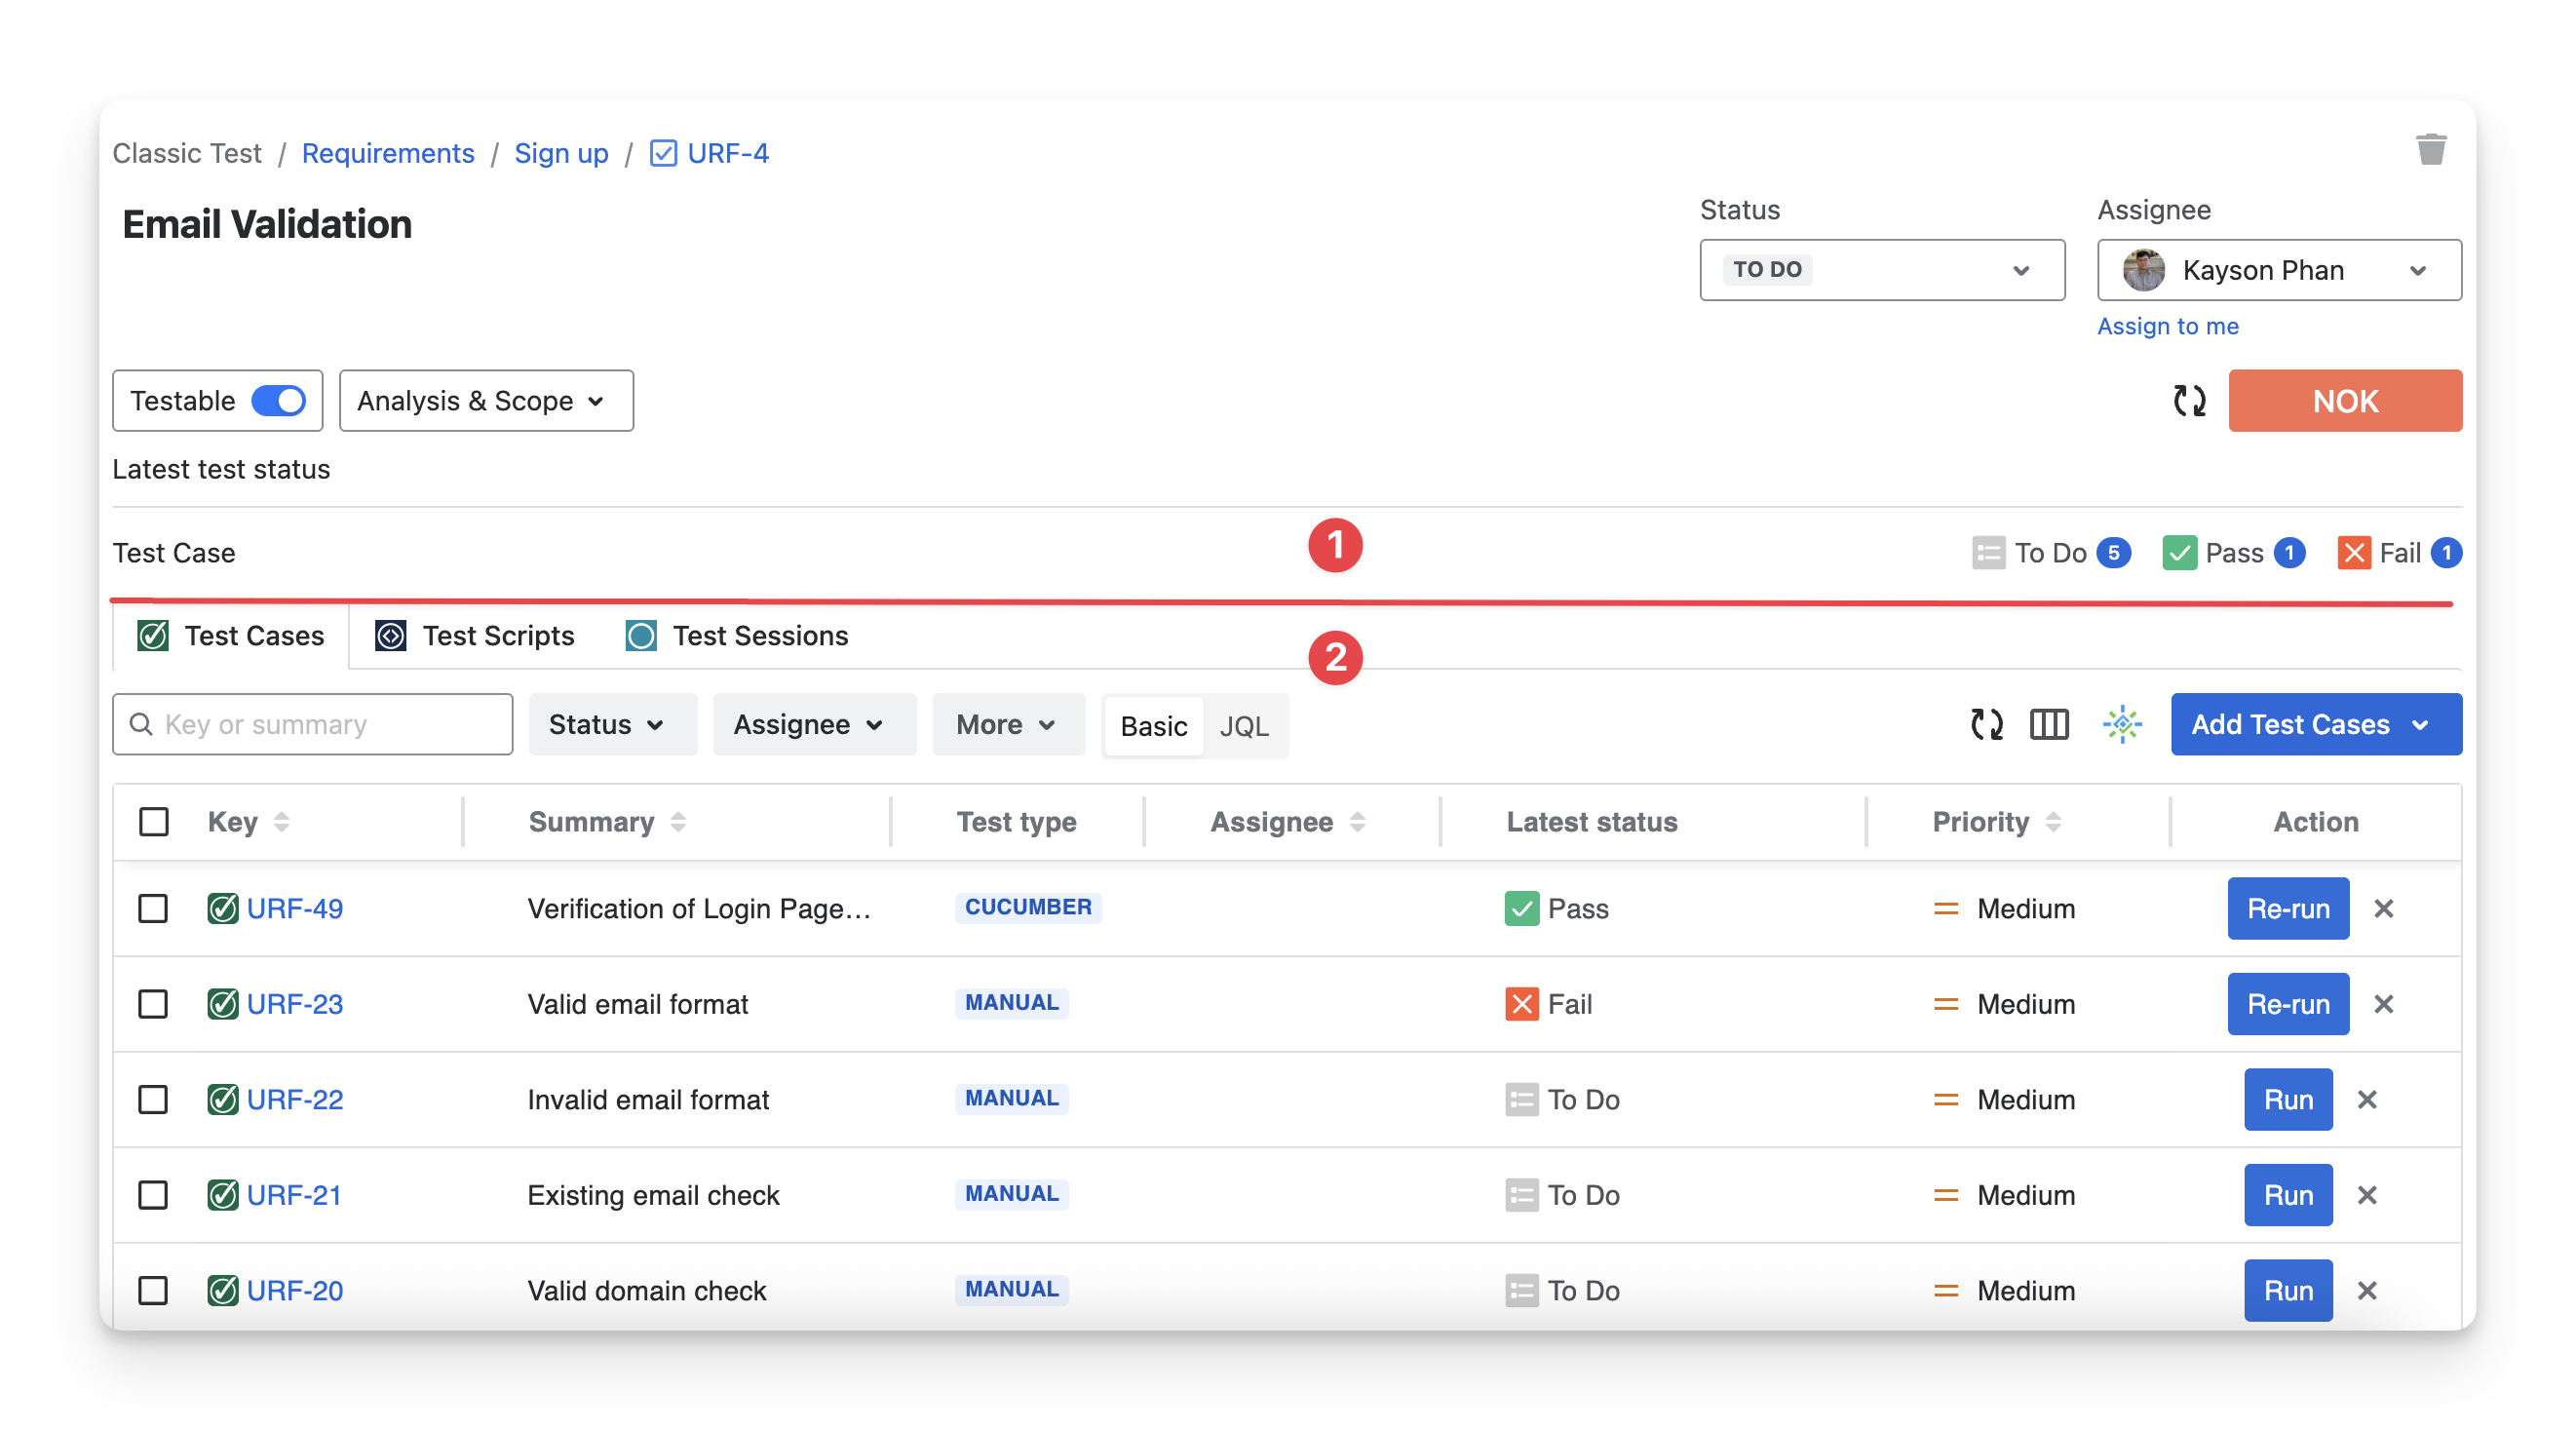
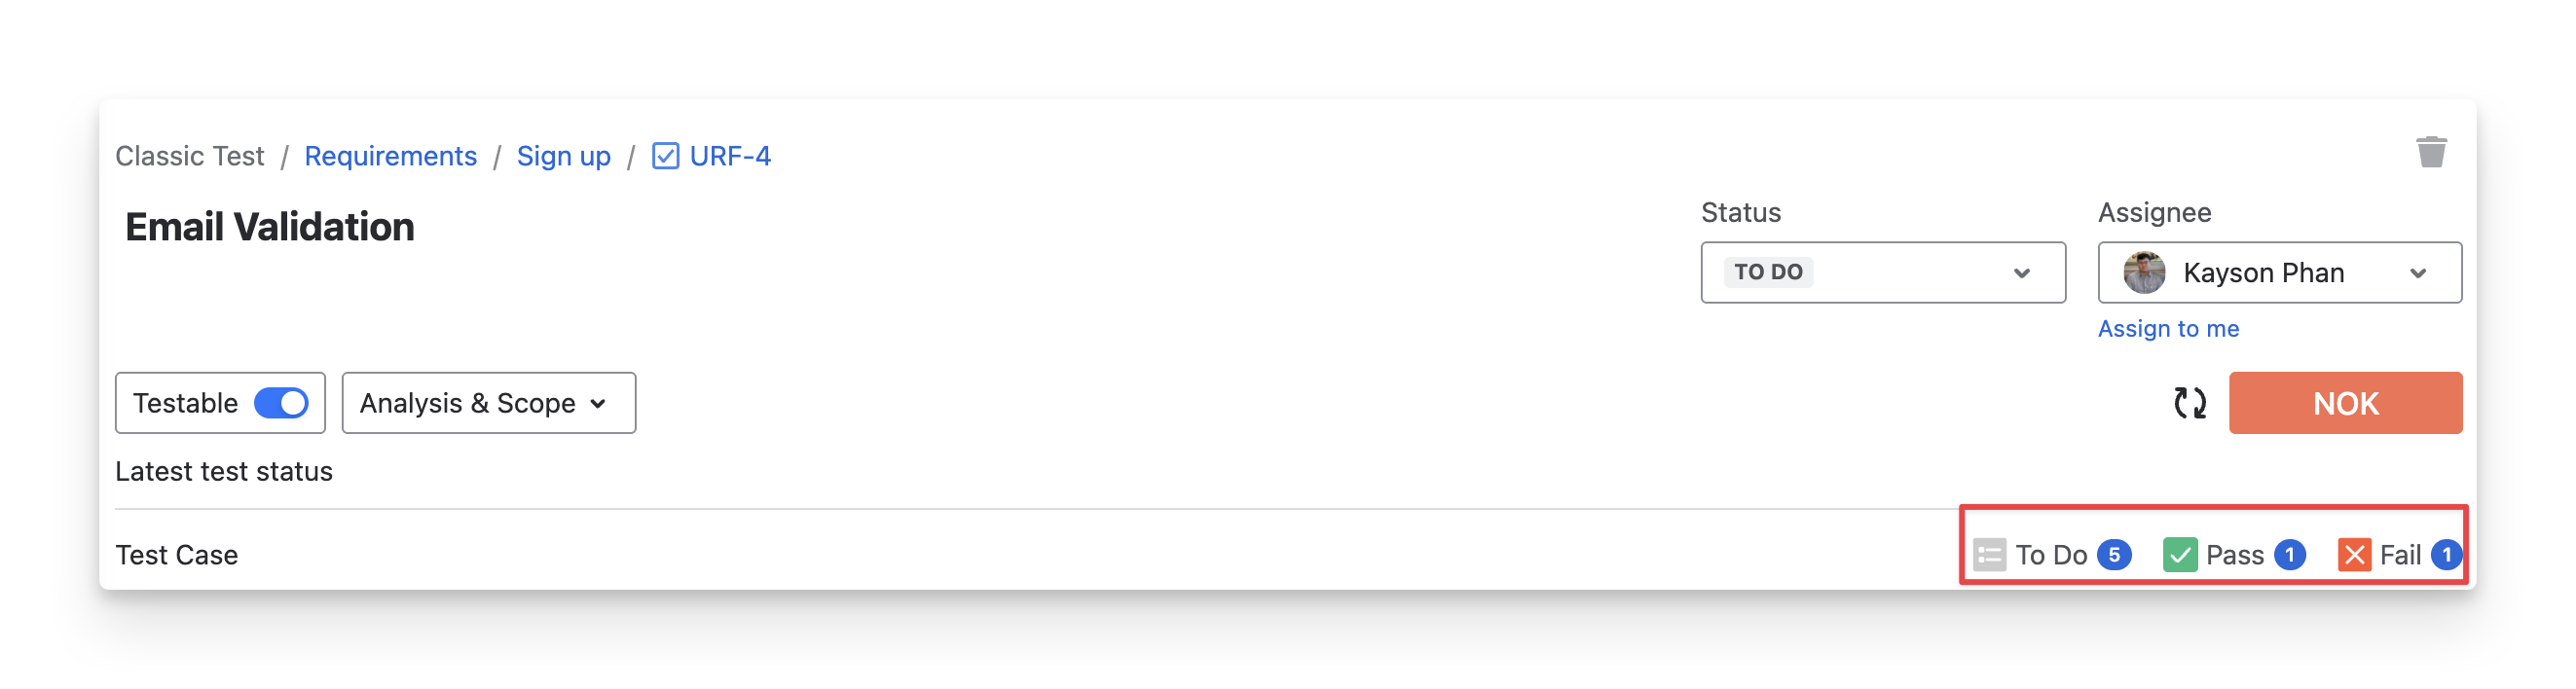
1.6 Test Case Status
The Test Case Status shows the recent status of test cases linked to this requirement. These statuses summarize all test case statuses linked in the Requirement Relationship section. They show you:
-
- How many test cases have passed
-
- How many test cases have failed
-
⚪ - How many test cases are not yet executed
2. Requirement Relationship With Testing Strategy
Linking requirements with testing strategies helps ensure that each requirement is validated through appropriate test cases, test scripts, or test sessions. This linkage enables end-to-end traceability, supports test coverage analysis, and provides visibility into testing progress and results.
In AgileTest, requirements can be linked with Test Cases, Test Scripts, and Test Sessions.
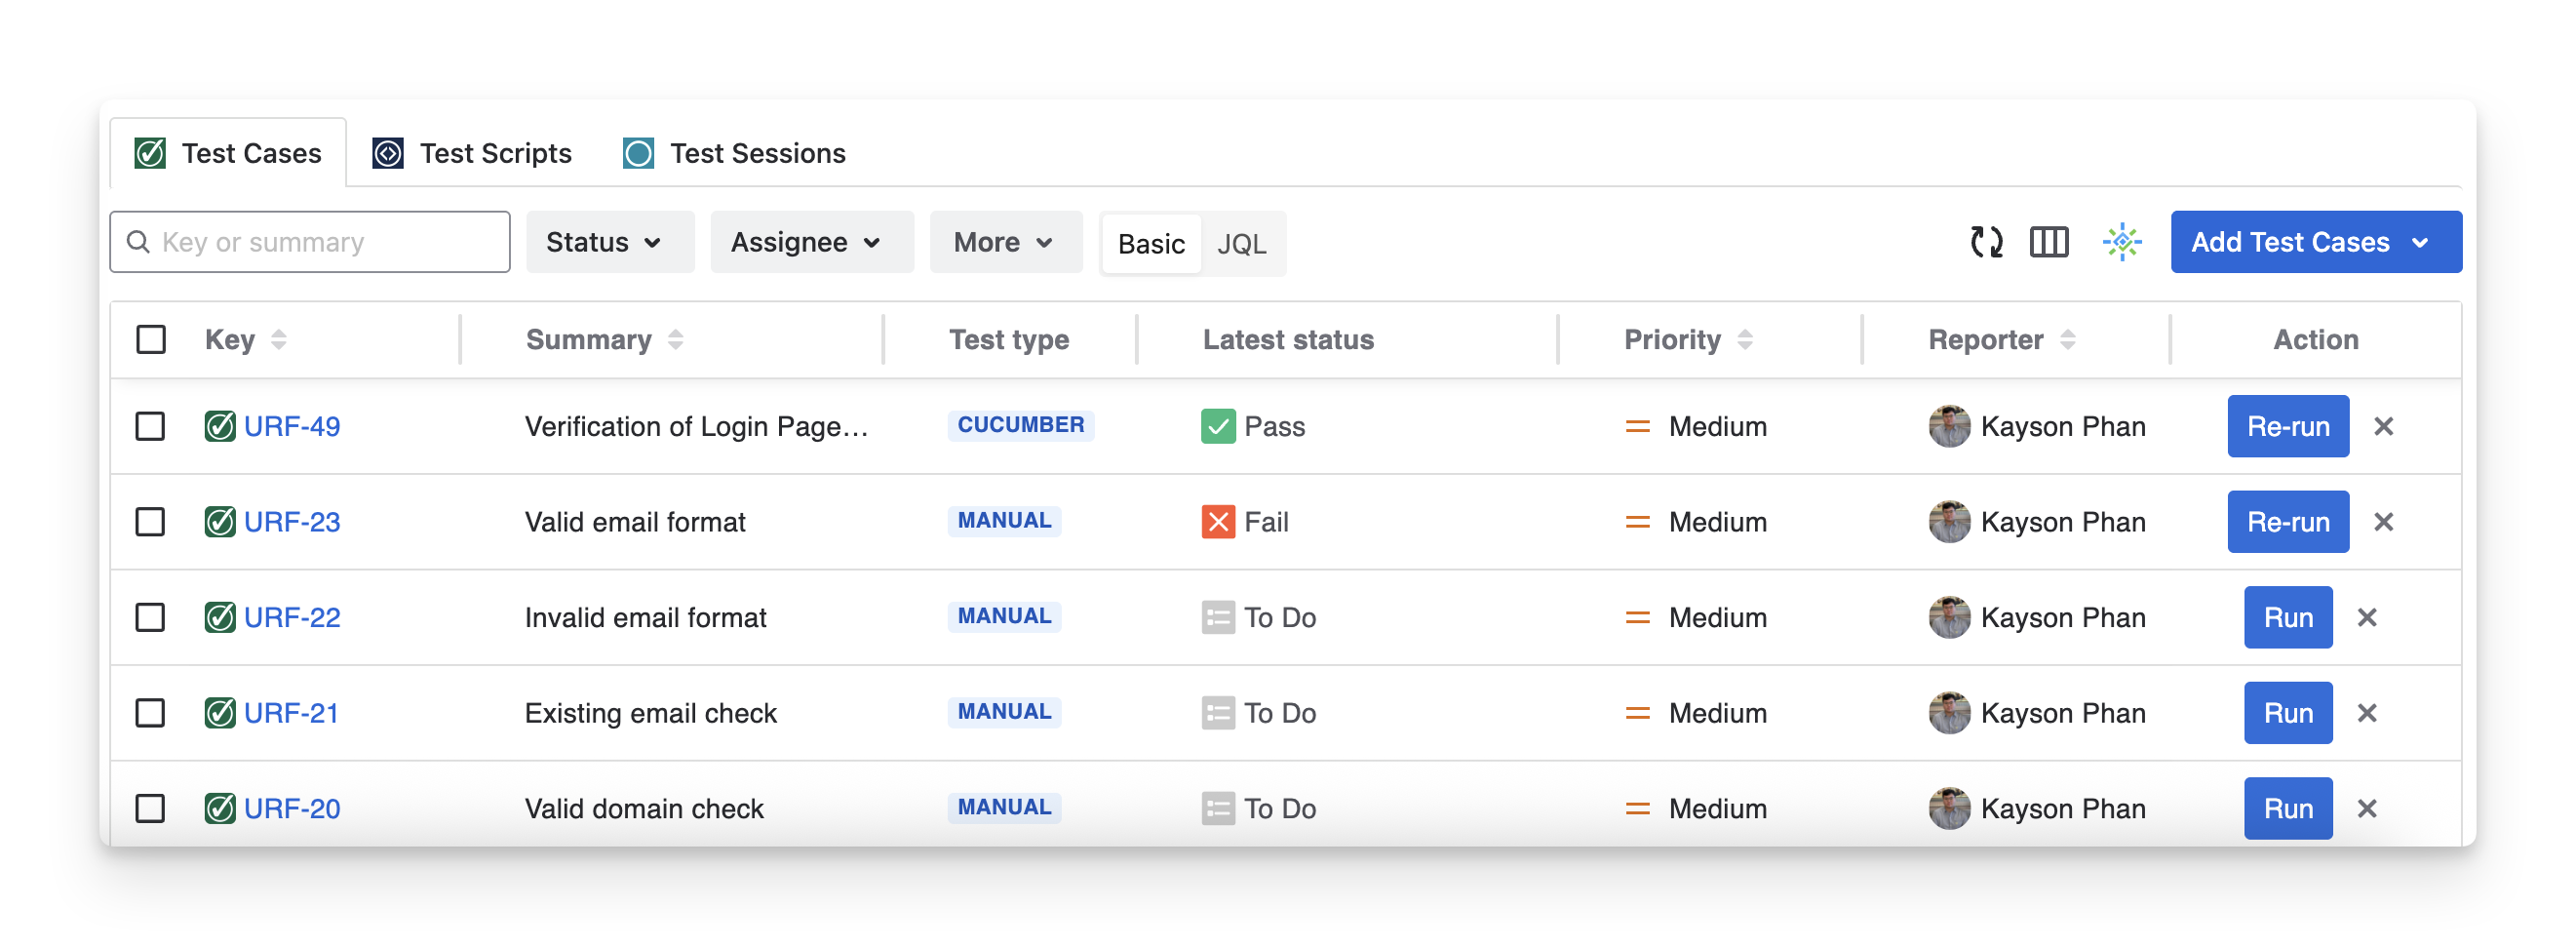
2.1 Test Cases
Test Cases in AgileTest define the specific scenarios, conditions, and expected outcomes used to verify that a requirement behaves as intended.
Test Cases appear in the Requirement linking section to help you track testing progress, measure coverage, and calculate the requirement’s testing status based on test execution results.
Read more about Test Cases in Classic Tests.
By linking test cases to a requirement, you can:
-
Progress Tracking: View how many test cases linked to the requirement have been executed and their latest results ( Fail Pass todo ). You can also check which failed test cases impact the testing progress, along with their details (e.g., test type, priority, assignee, etc.).
-
Requirement Status Calculating: From each test case status ( Fail Pass todo ), calculate the Requirement Latest Test Status when choosing test cases as scope for requirement status calculation ( NOK ; not run ; Unknown ; ok ; Uncovered ; covered ).
Pro Tip:
In addition, linking test cases to requirements is also mandatory for you to:
-
Coverage Reporting: Identify which test cases are associated with each requirement in Test Coverage and Test Traceability reports.
-
AI Generator Utilizing: Provide the necessary input for the AI Generator to generate relevant test cases and test steps based on the requirement.
To link test cases to a requirement, follow these steps:
-
Choose the Test Cases tab in the Requirement Detail screen.
-
Click the “Add Test Cases” button.
-
Choose “Existing Test Cases”.
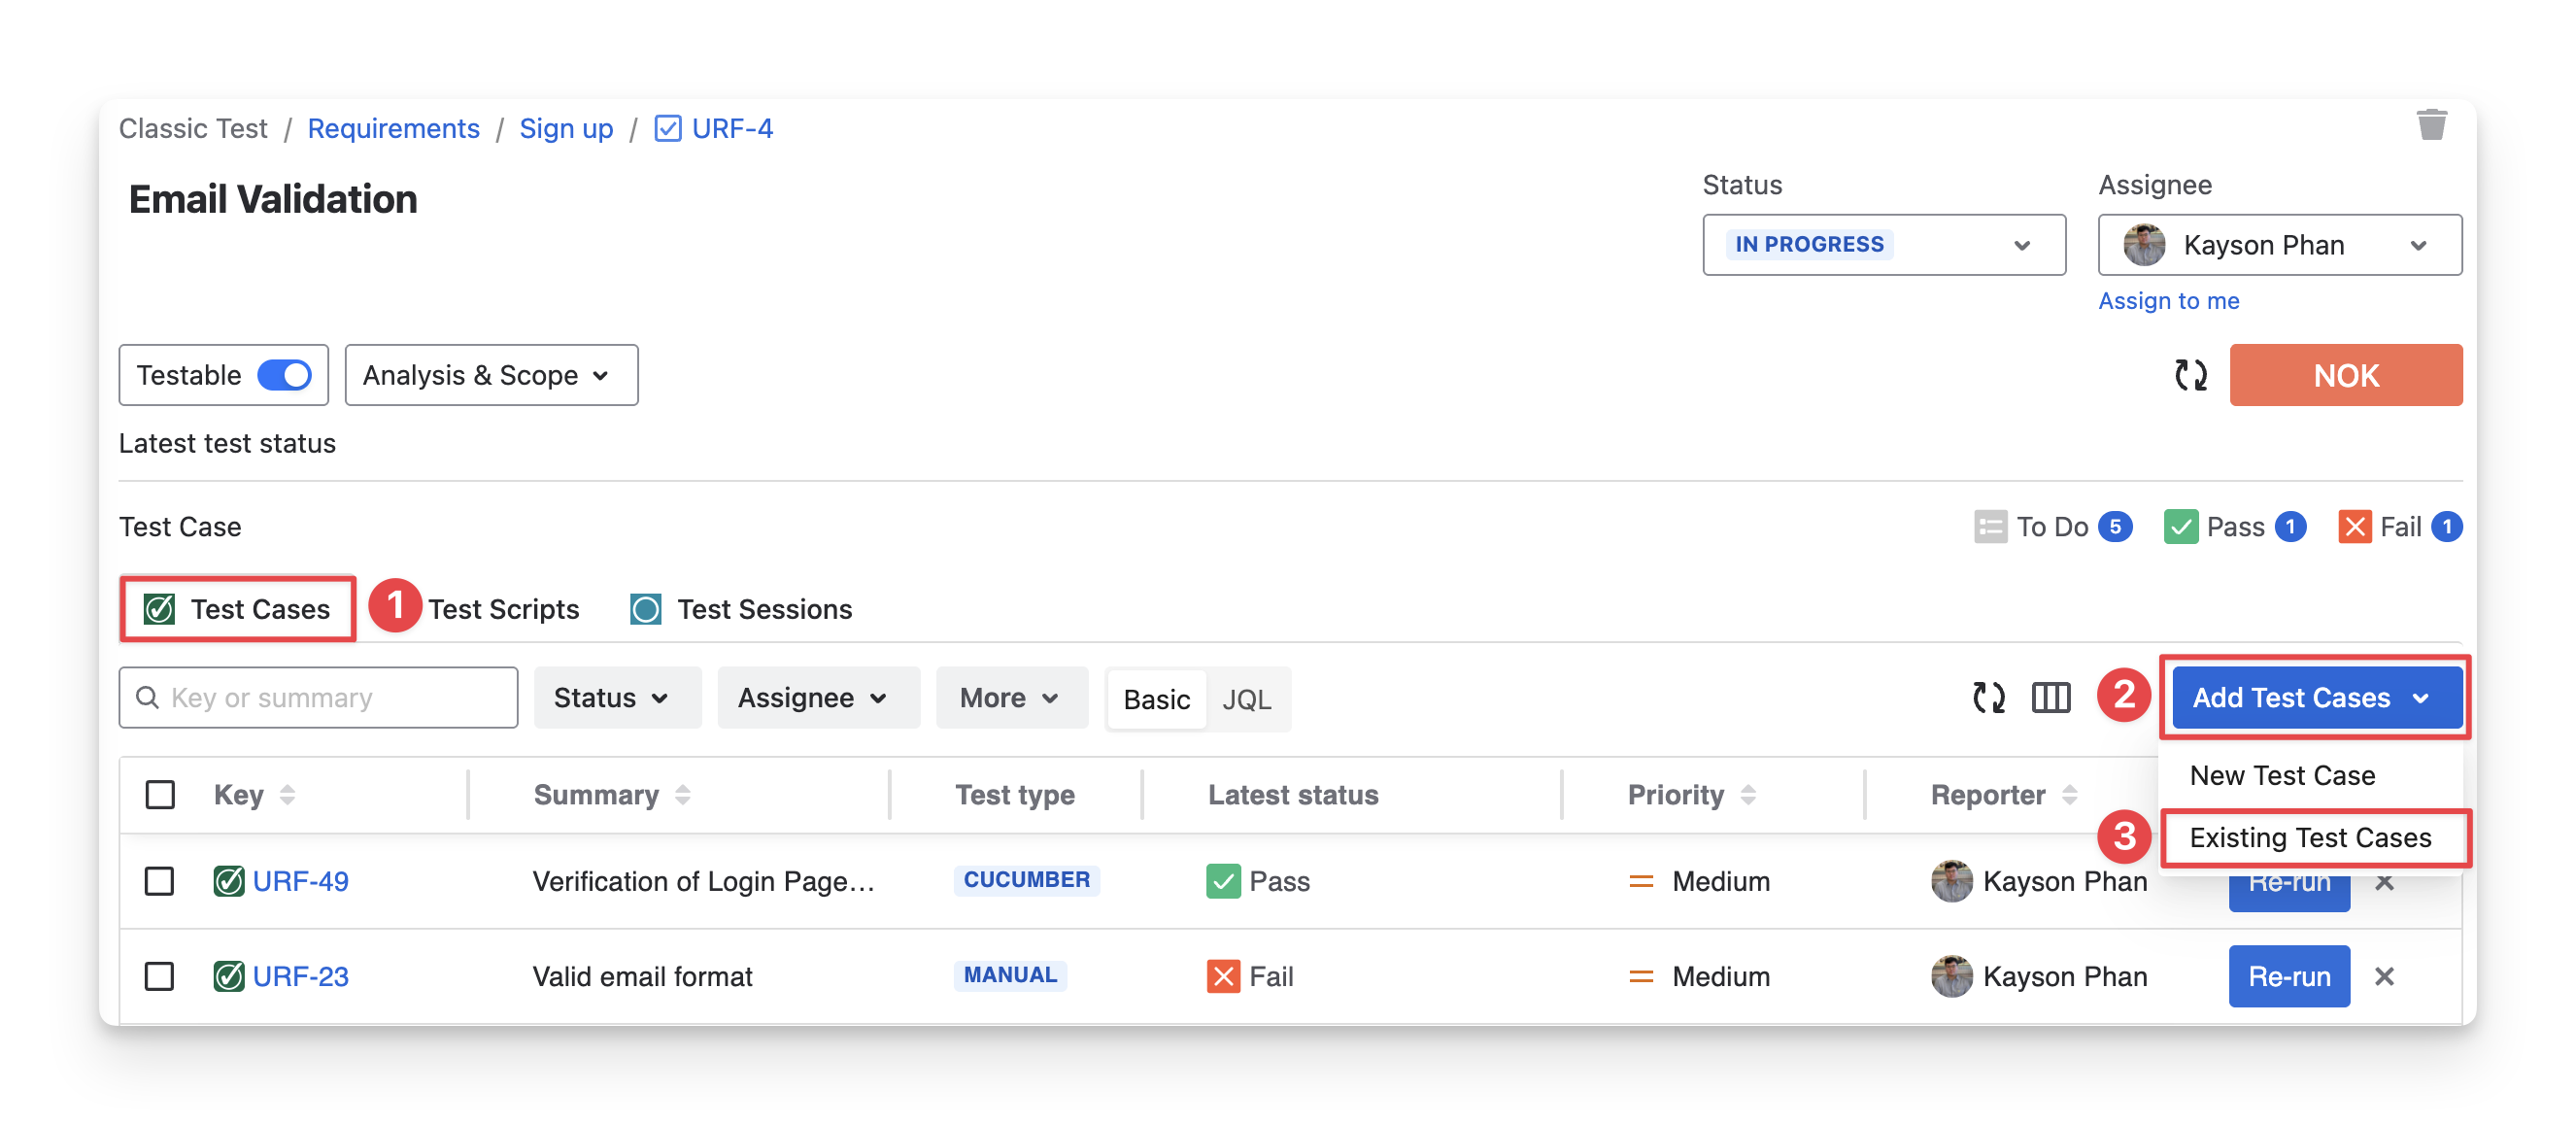
If you choose “New Test Cases” you will manually create a new test case here.
Learn more about creating a test case indirectly in the Requirement.
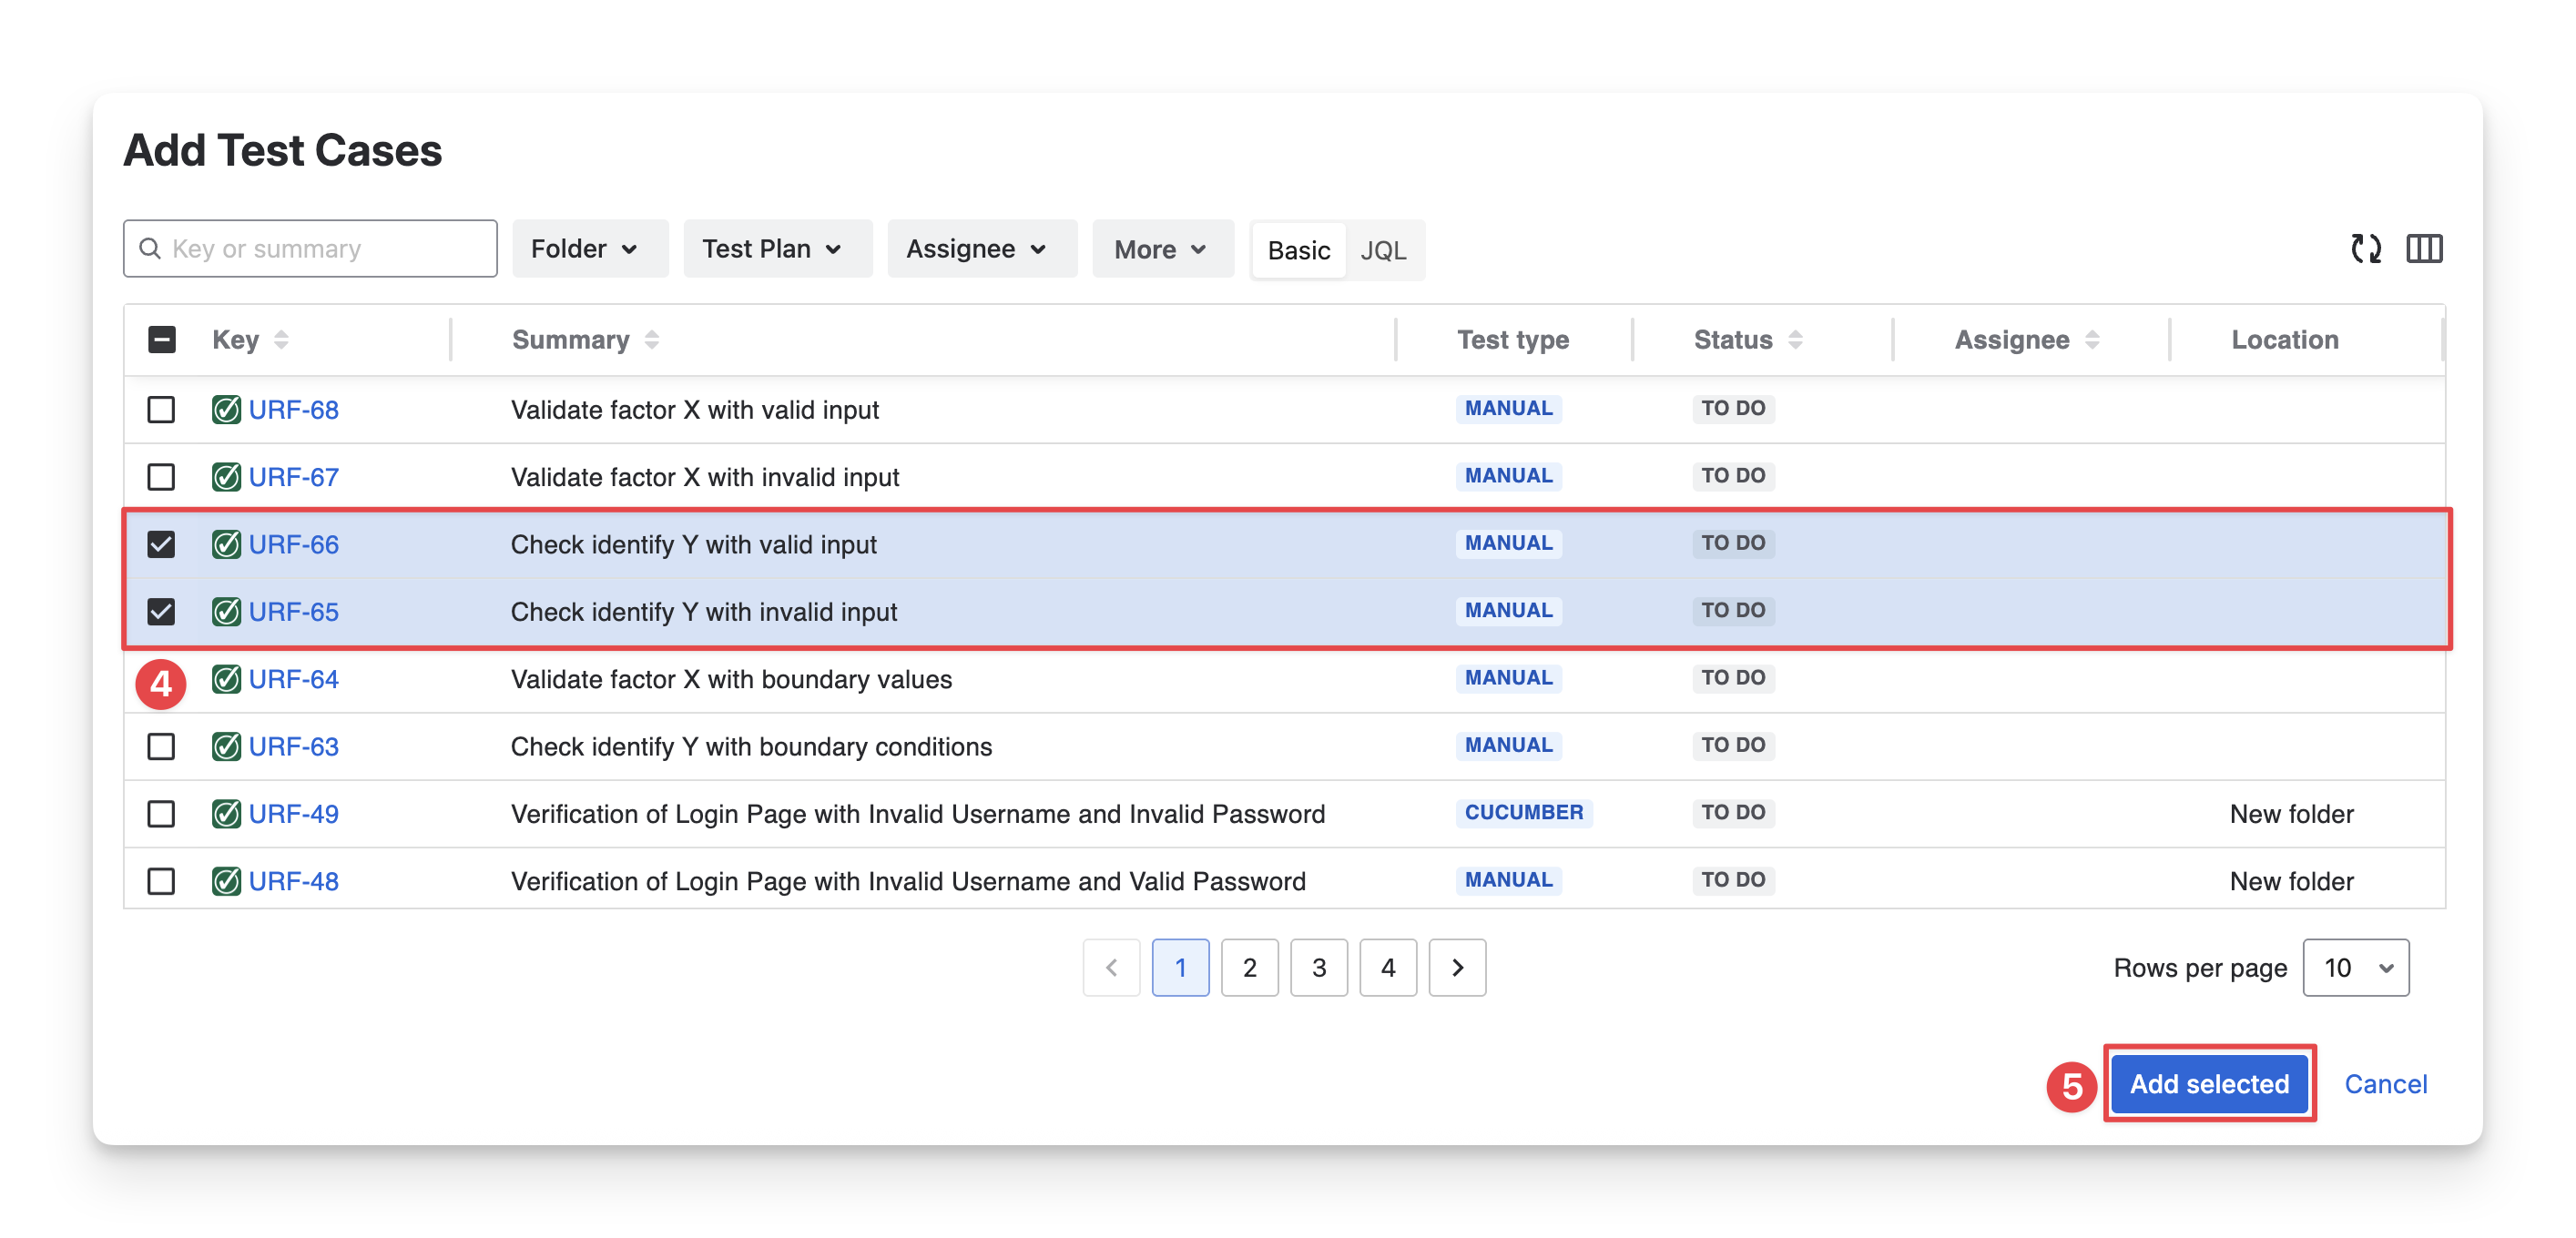
-
Select the test cases you want to link with this requirement.
-
Choose “Add Selected” to finish.
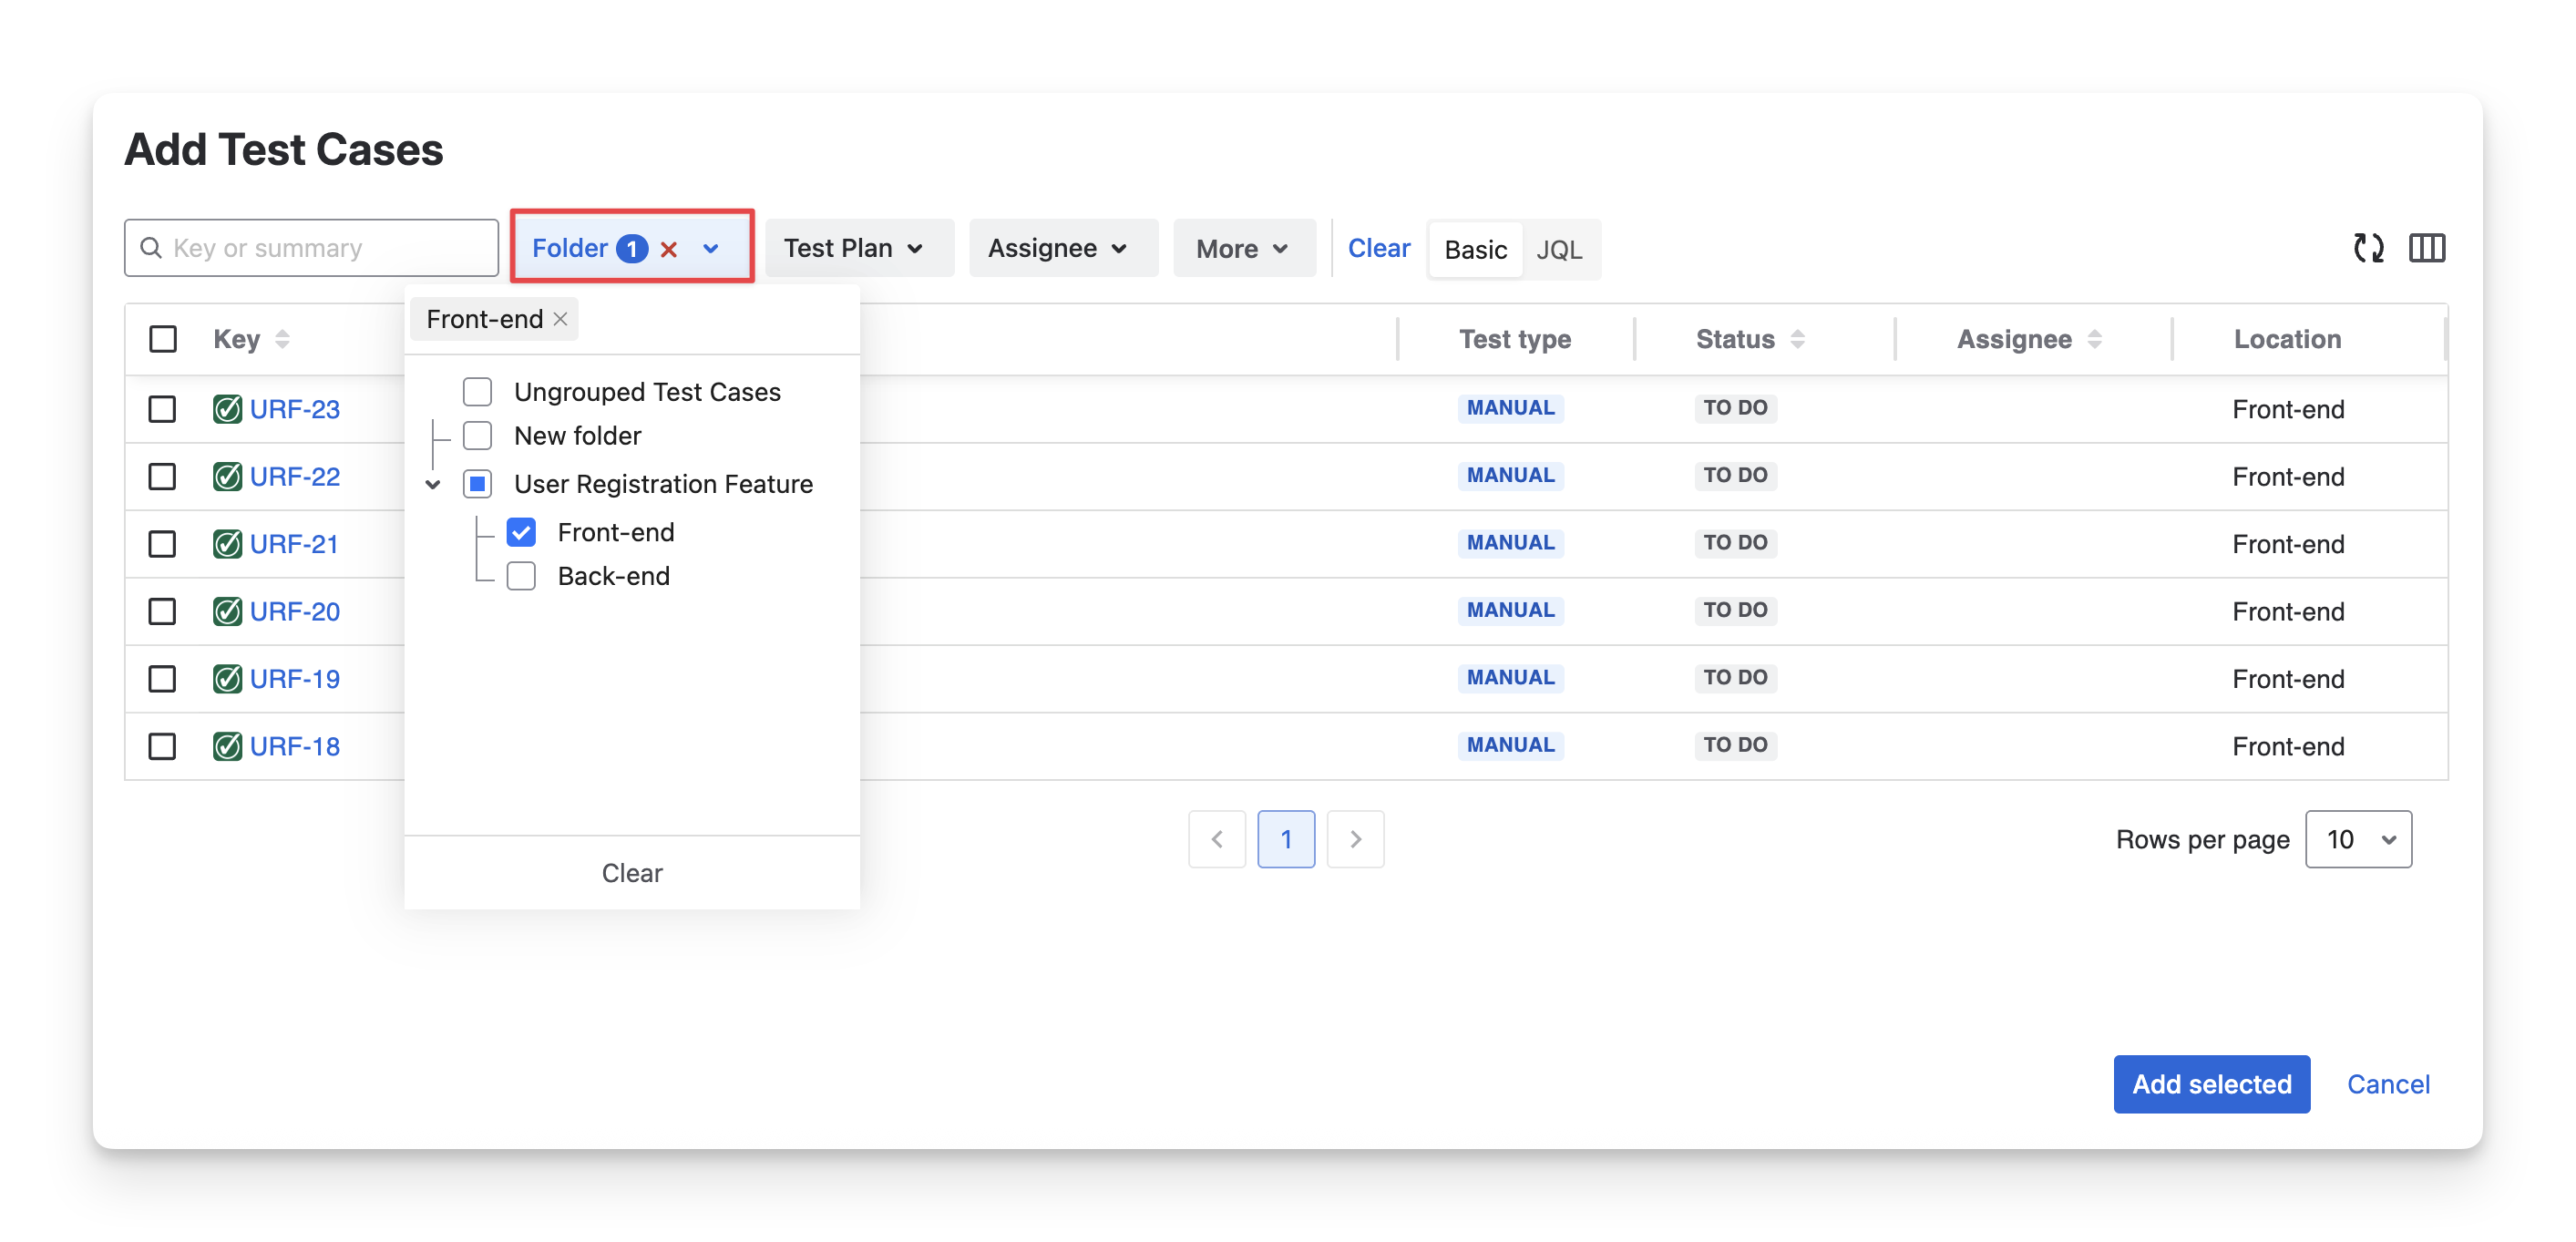
You have created a folder with 20 test cases, which is the most effective way to link them all to a requirement?
Apply the Folder Filter → Choose the folder that you want to link all test cases to this requirement.
2.2 Test Scripts
In AgileTest, Test Scripts are used as checklists for testing. They provide a structured list of testing actions or verification points from a requirement.
Test Scripts appear in the Requirement linking section to show how key aspects of a requirement have been verified through checklist-based testing and to contribute to progress tracking and requirement status calculation.
Read more about Test Scripts in Script Tests.
By linking test scripts with a requirement, you can:
-
Progress Tracking: View the results of test runs linked to the requirement along with the script test item run status ( Fail Pass todo query blocked skipped ).
-
Requirement Status Calculating: From each test run status ( Fail Pass todo query blocked skipped ), calculate the Requirement Latest Test Status when choosing test scripts as scope for requirement status calculation ( NOK ; not run ; Unknown ; ok ; Uncovered ; covered ).
To link test scripts to a requirement, follow these steps:
-
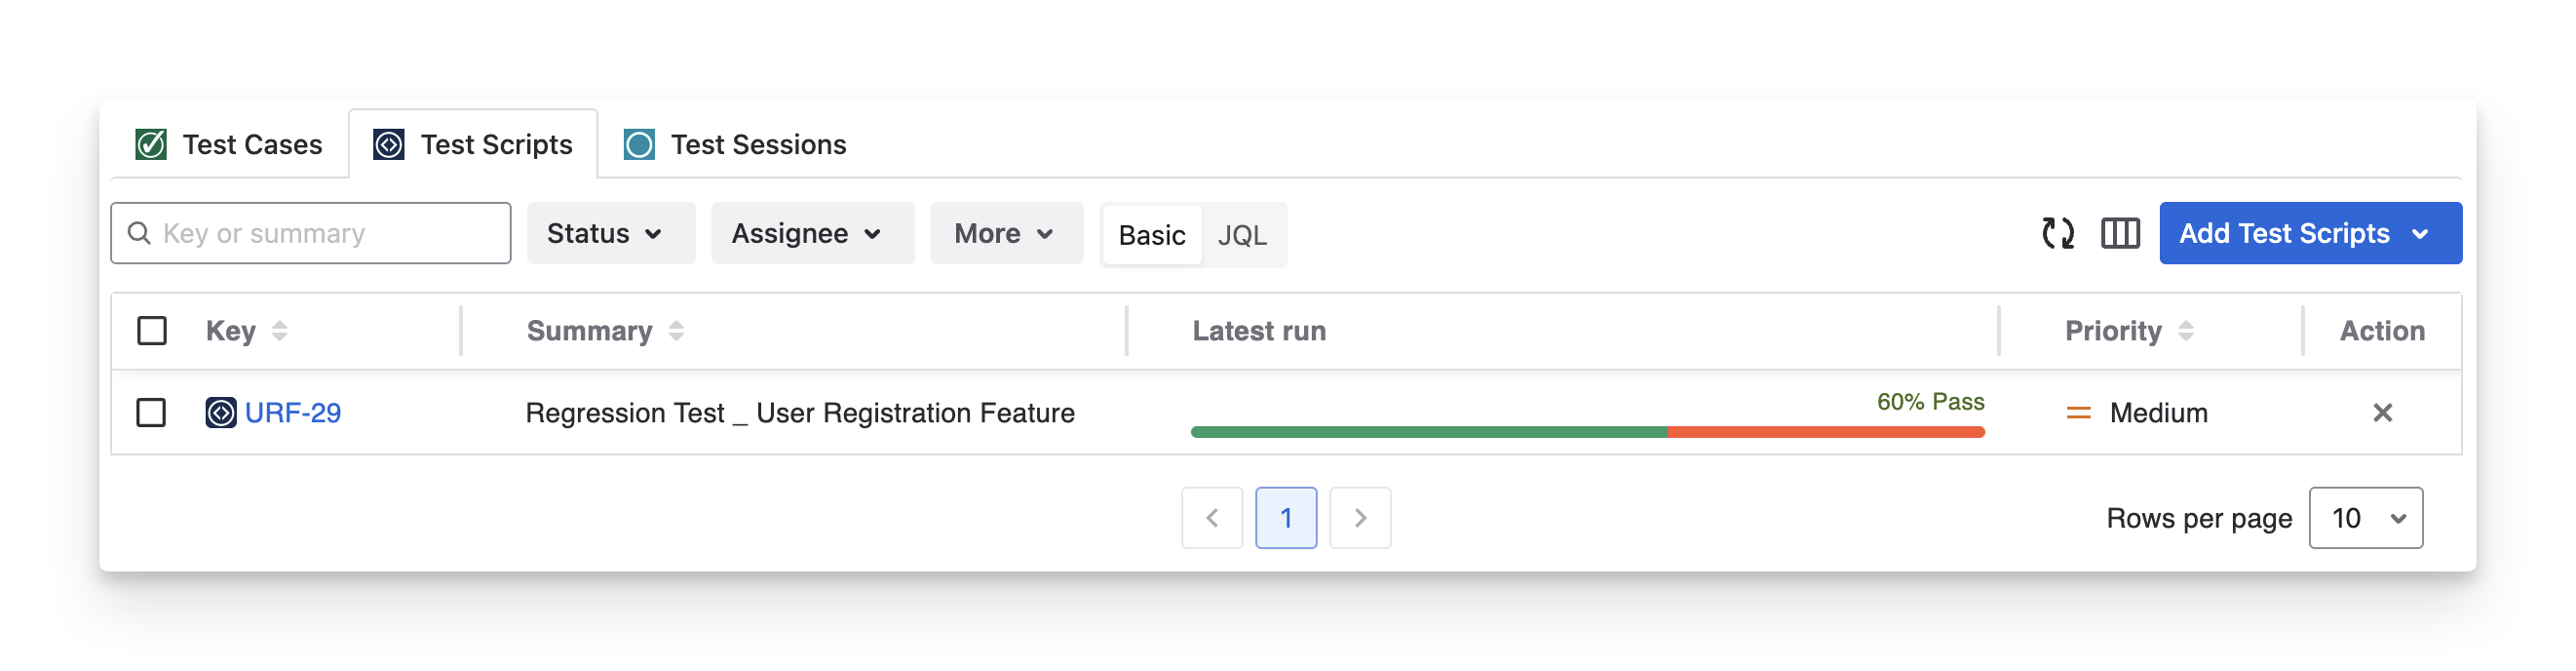
Choose the Test Scripts tab in the Requirement Detail screen.
-
Click the “Add Test Scripts” button.
-
Choose “Existing Test Scripts”.
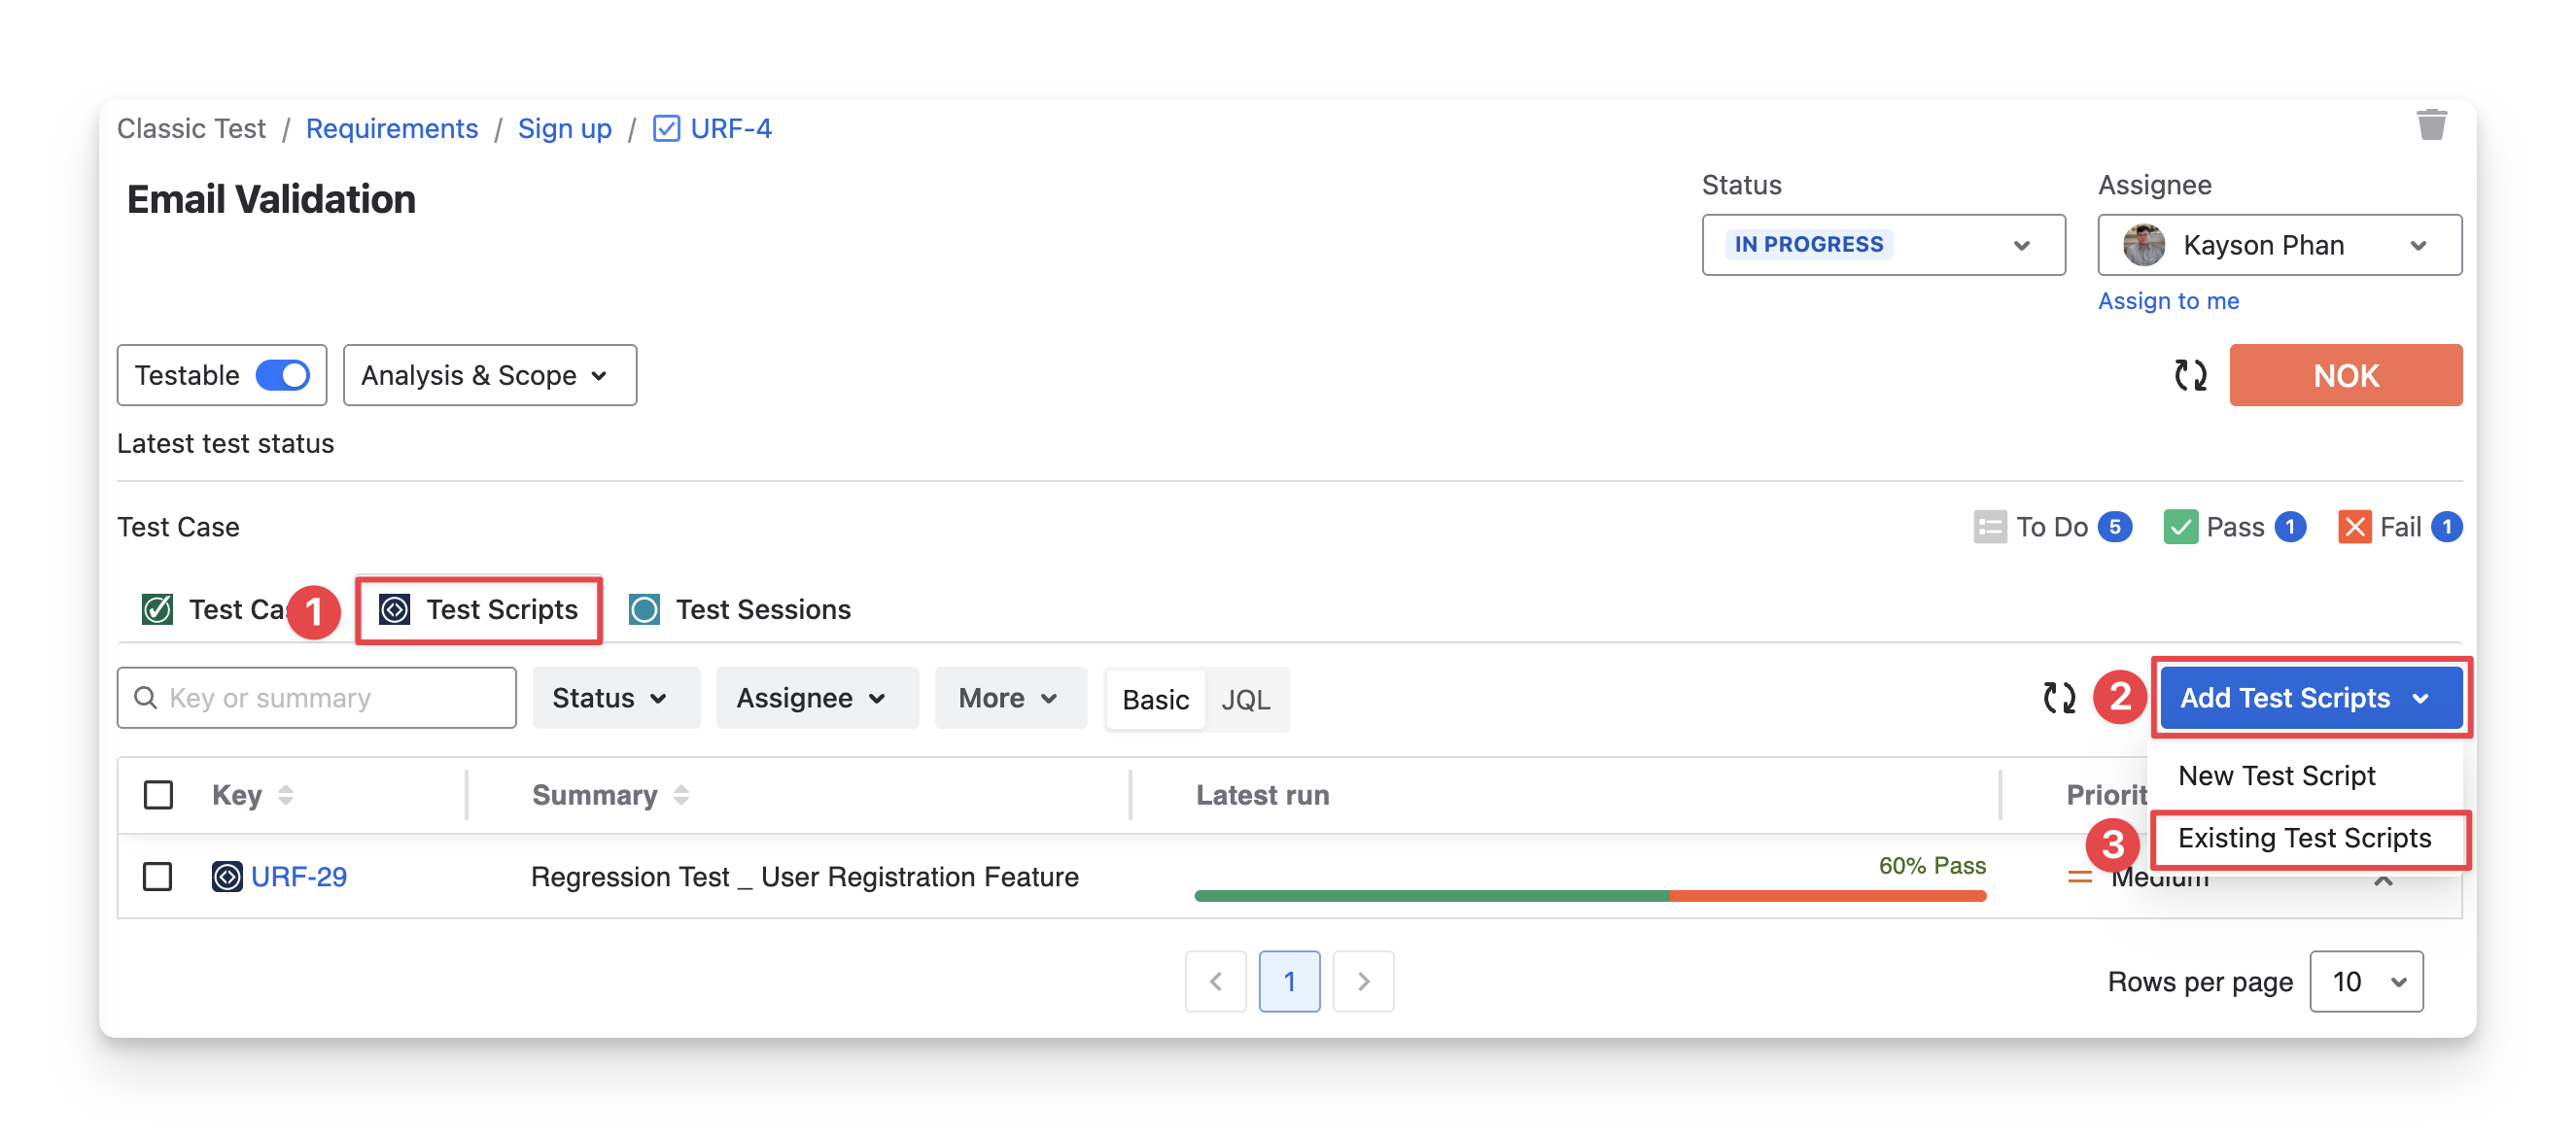
If you choose “New Test Scripts” you will manually create a new test script here.
Learn more about creating a test script indirectly in the Requirement.
-
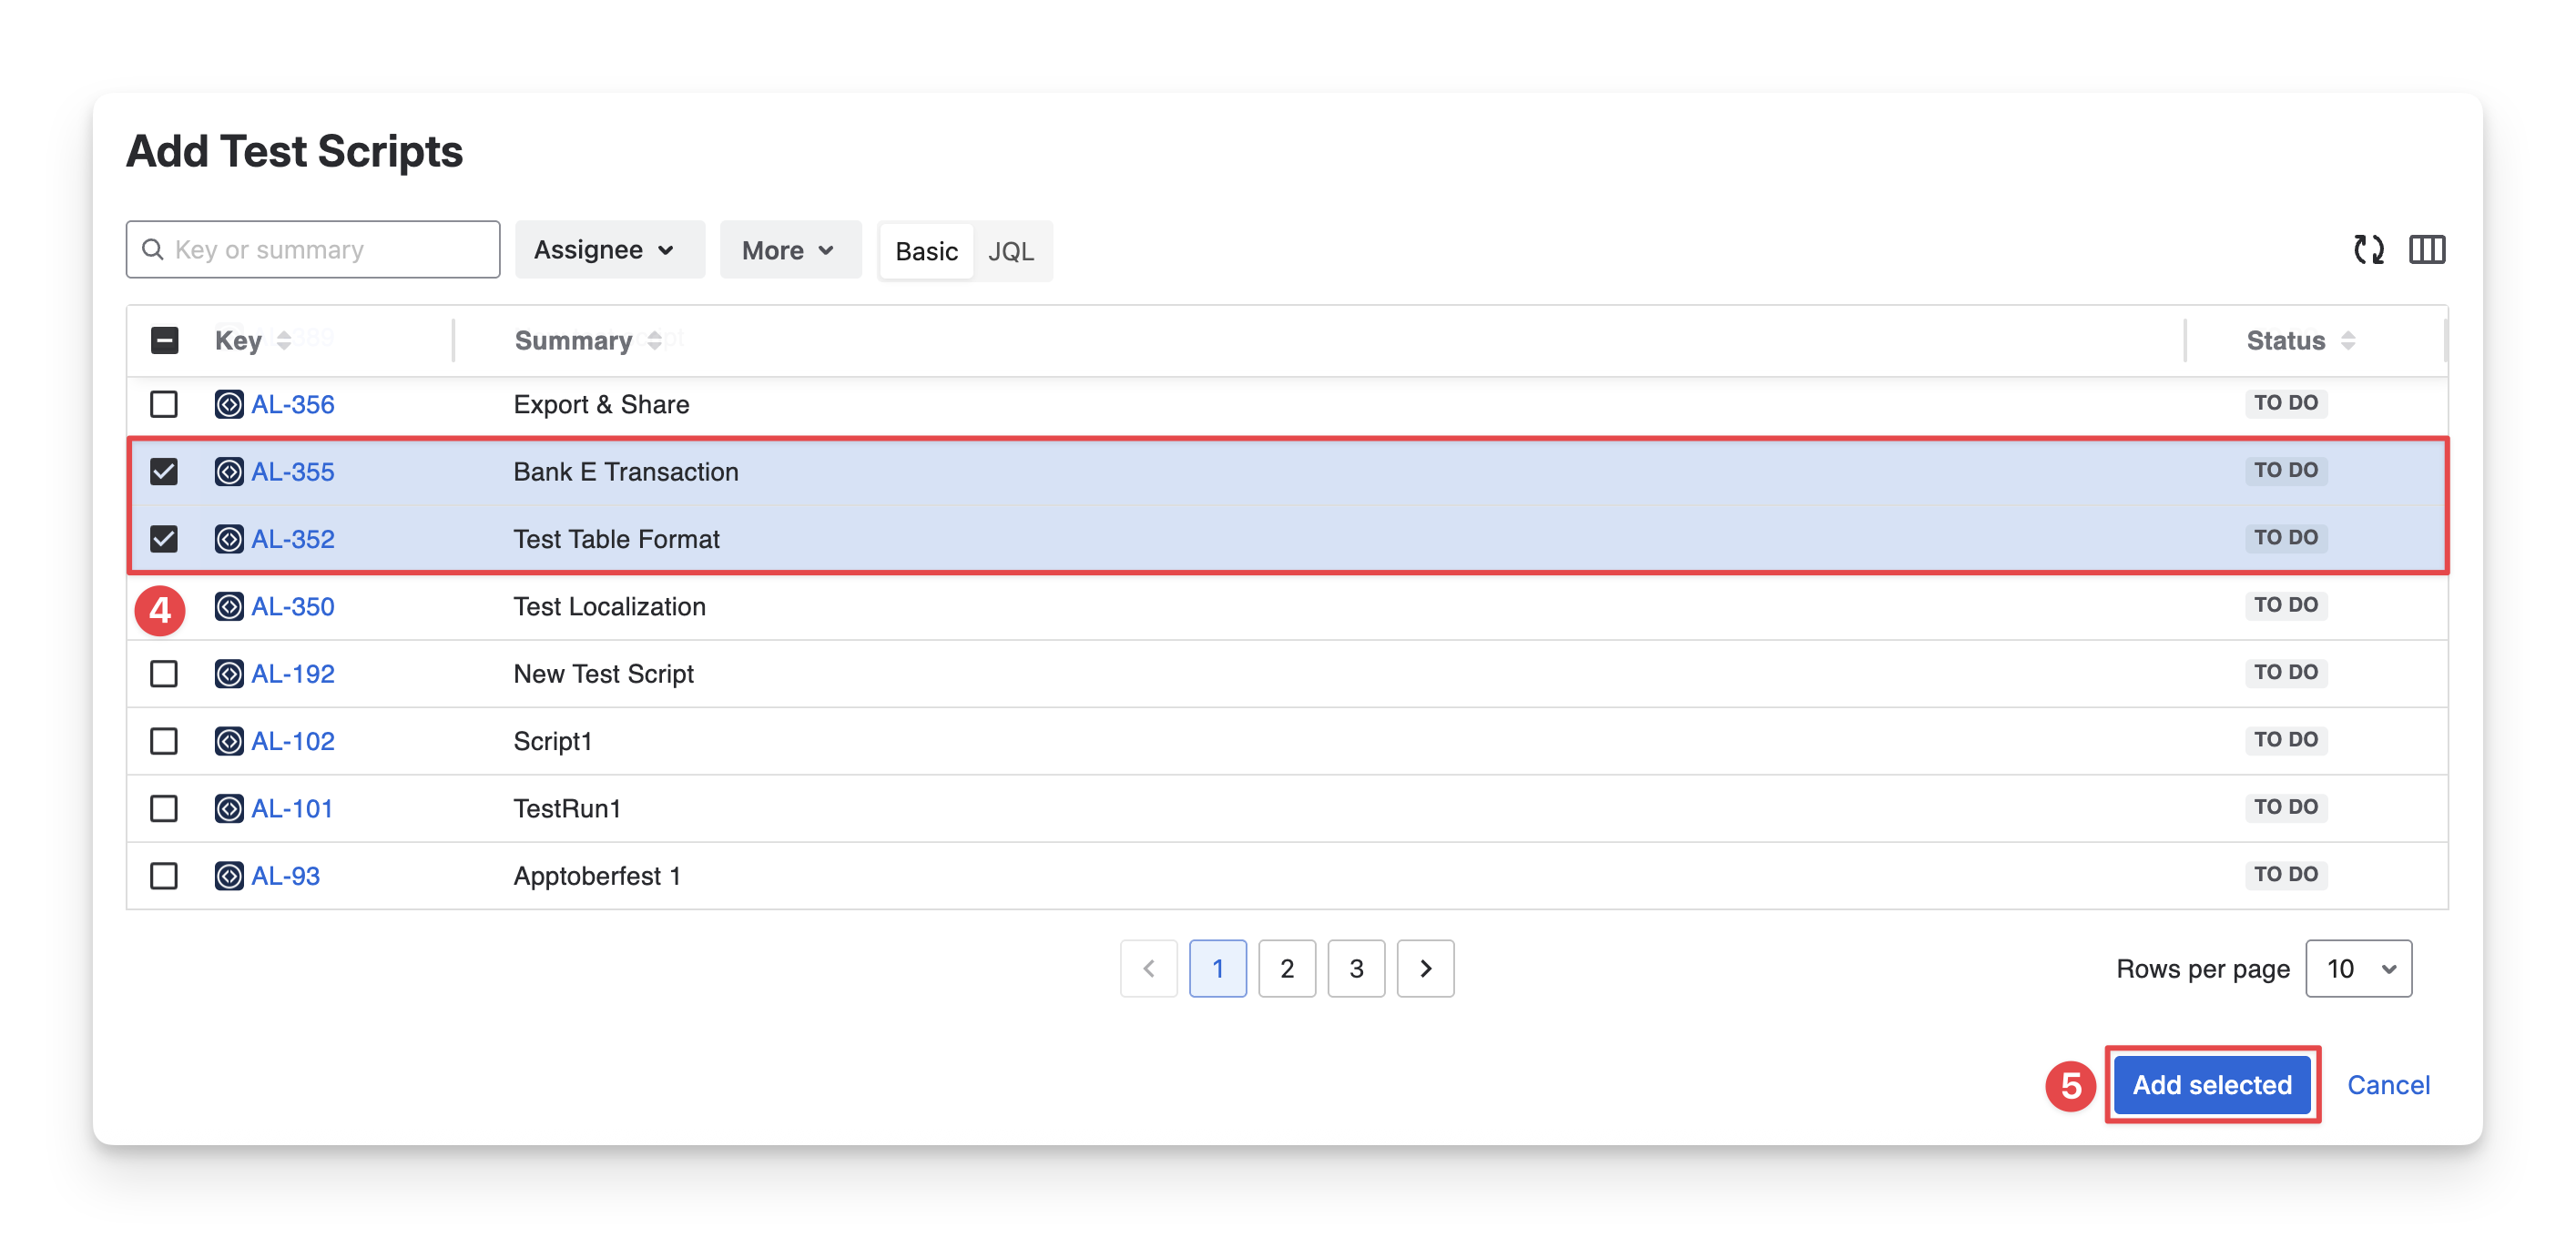
Select the test scripts you want to link with this requirement.
-
Choose “Add Selected” to finish.
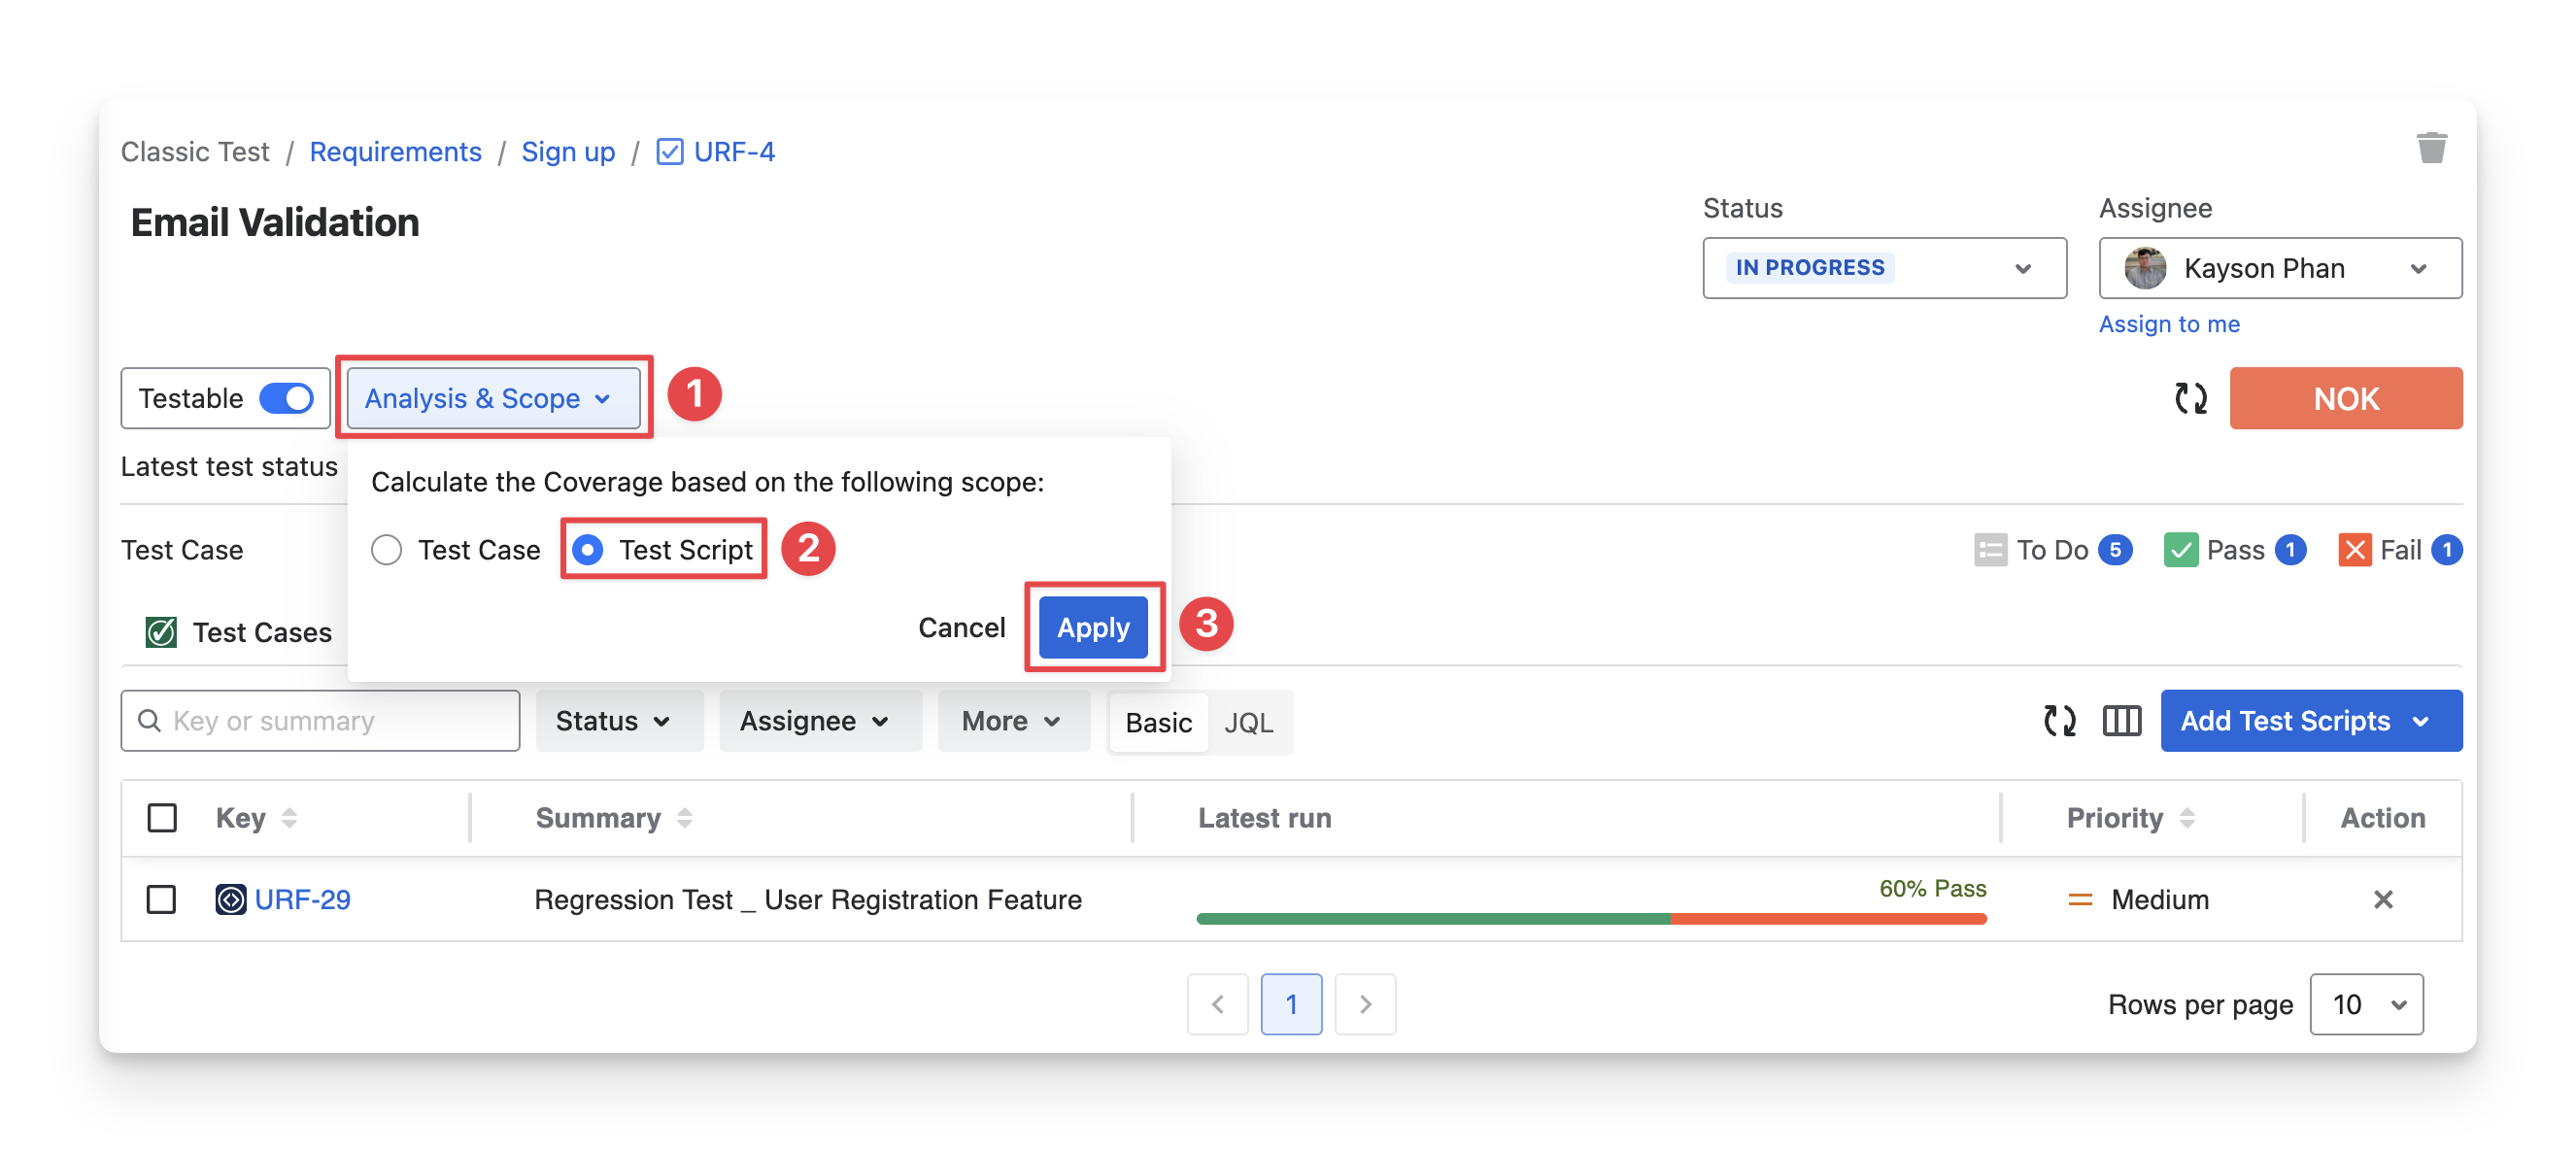
How to change the Analysis & Scope to calculate only the Requirement Latest Test Status from the Test Script Result?
You can change the analysis scope by:
-
Click on the “Analysis & Scope” box.
-
Choose “Test Script”.
-
Click the “Apply” button.
2.3 Test Sessions
Test Sessions in AgileTest represent an unstructured testing approach where testers act as end users. They may perform random clicks and user-behavior actions to validate a requirement.
Test Sessions appear in the Requirement linking section helps you understand how a requirement has been validated through real user exploration and provides additional insight into testing progress.
Read more about Test Sessions in Exploratory Tests.
By linking test sessions to a requirement, you can view how many test sessions are linked to the requirement, along with their test exploratory testing item run status ( Fail ; Pass ; todo ; query ; blocked ; skipped ).
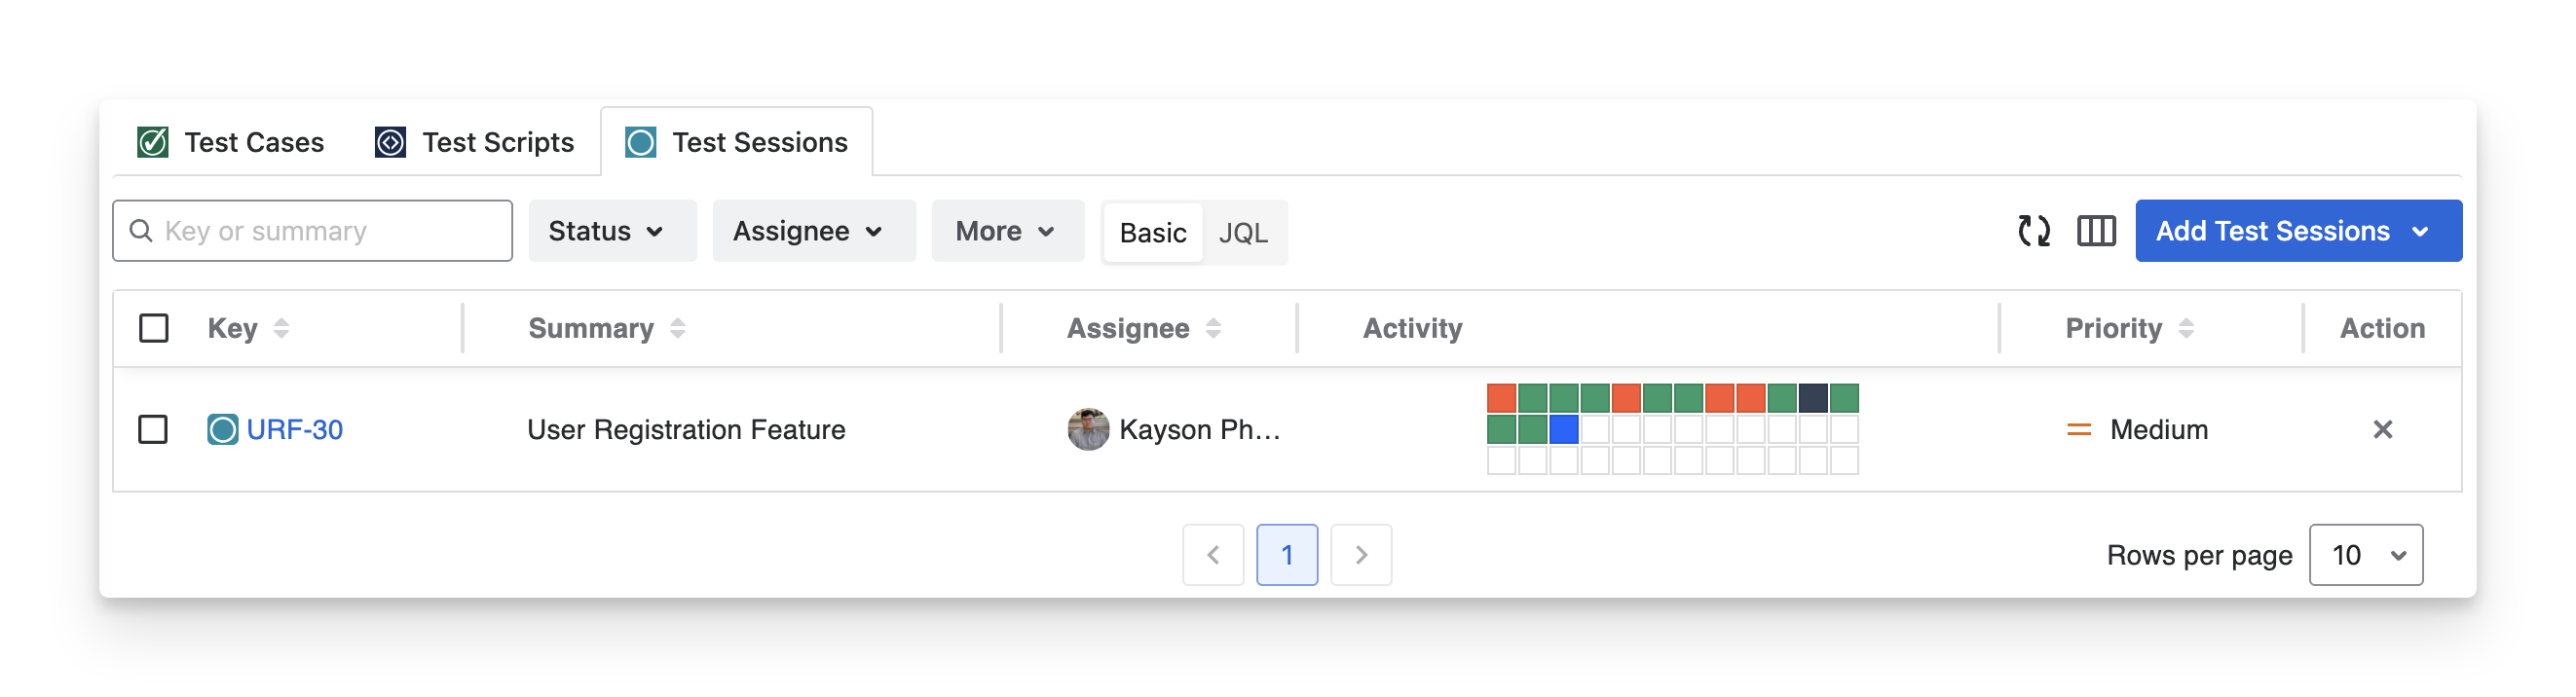
To link test runs to a requirement, follow these steps:
-
Choose the Test Sessions tab in the Requirement Detail screen.
-
Click the “Add Test Sessions” button.
-
Choose “Existing Test Sessions”.
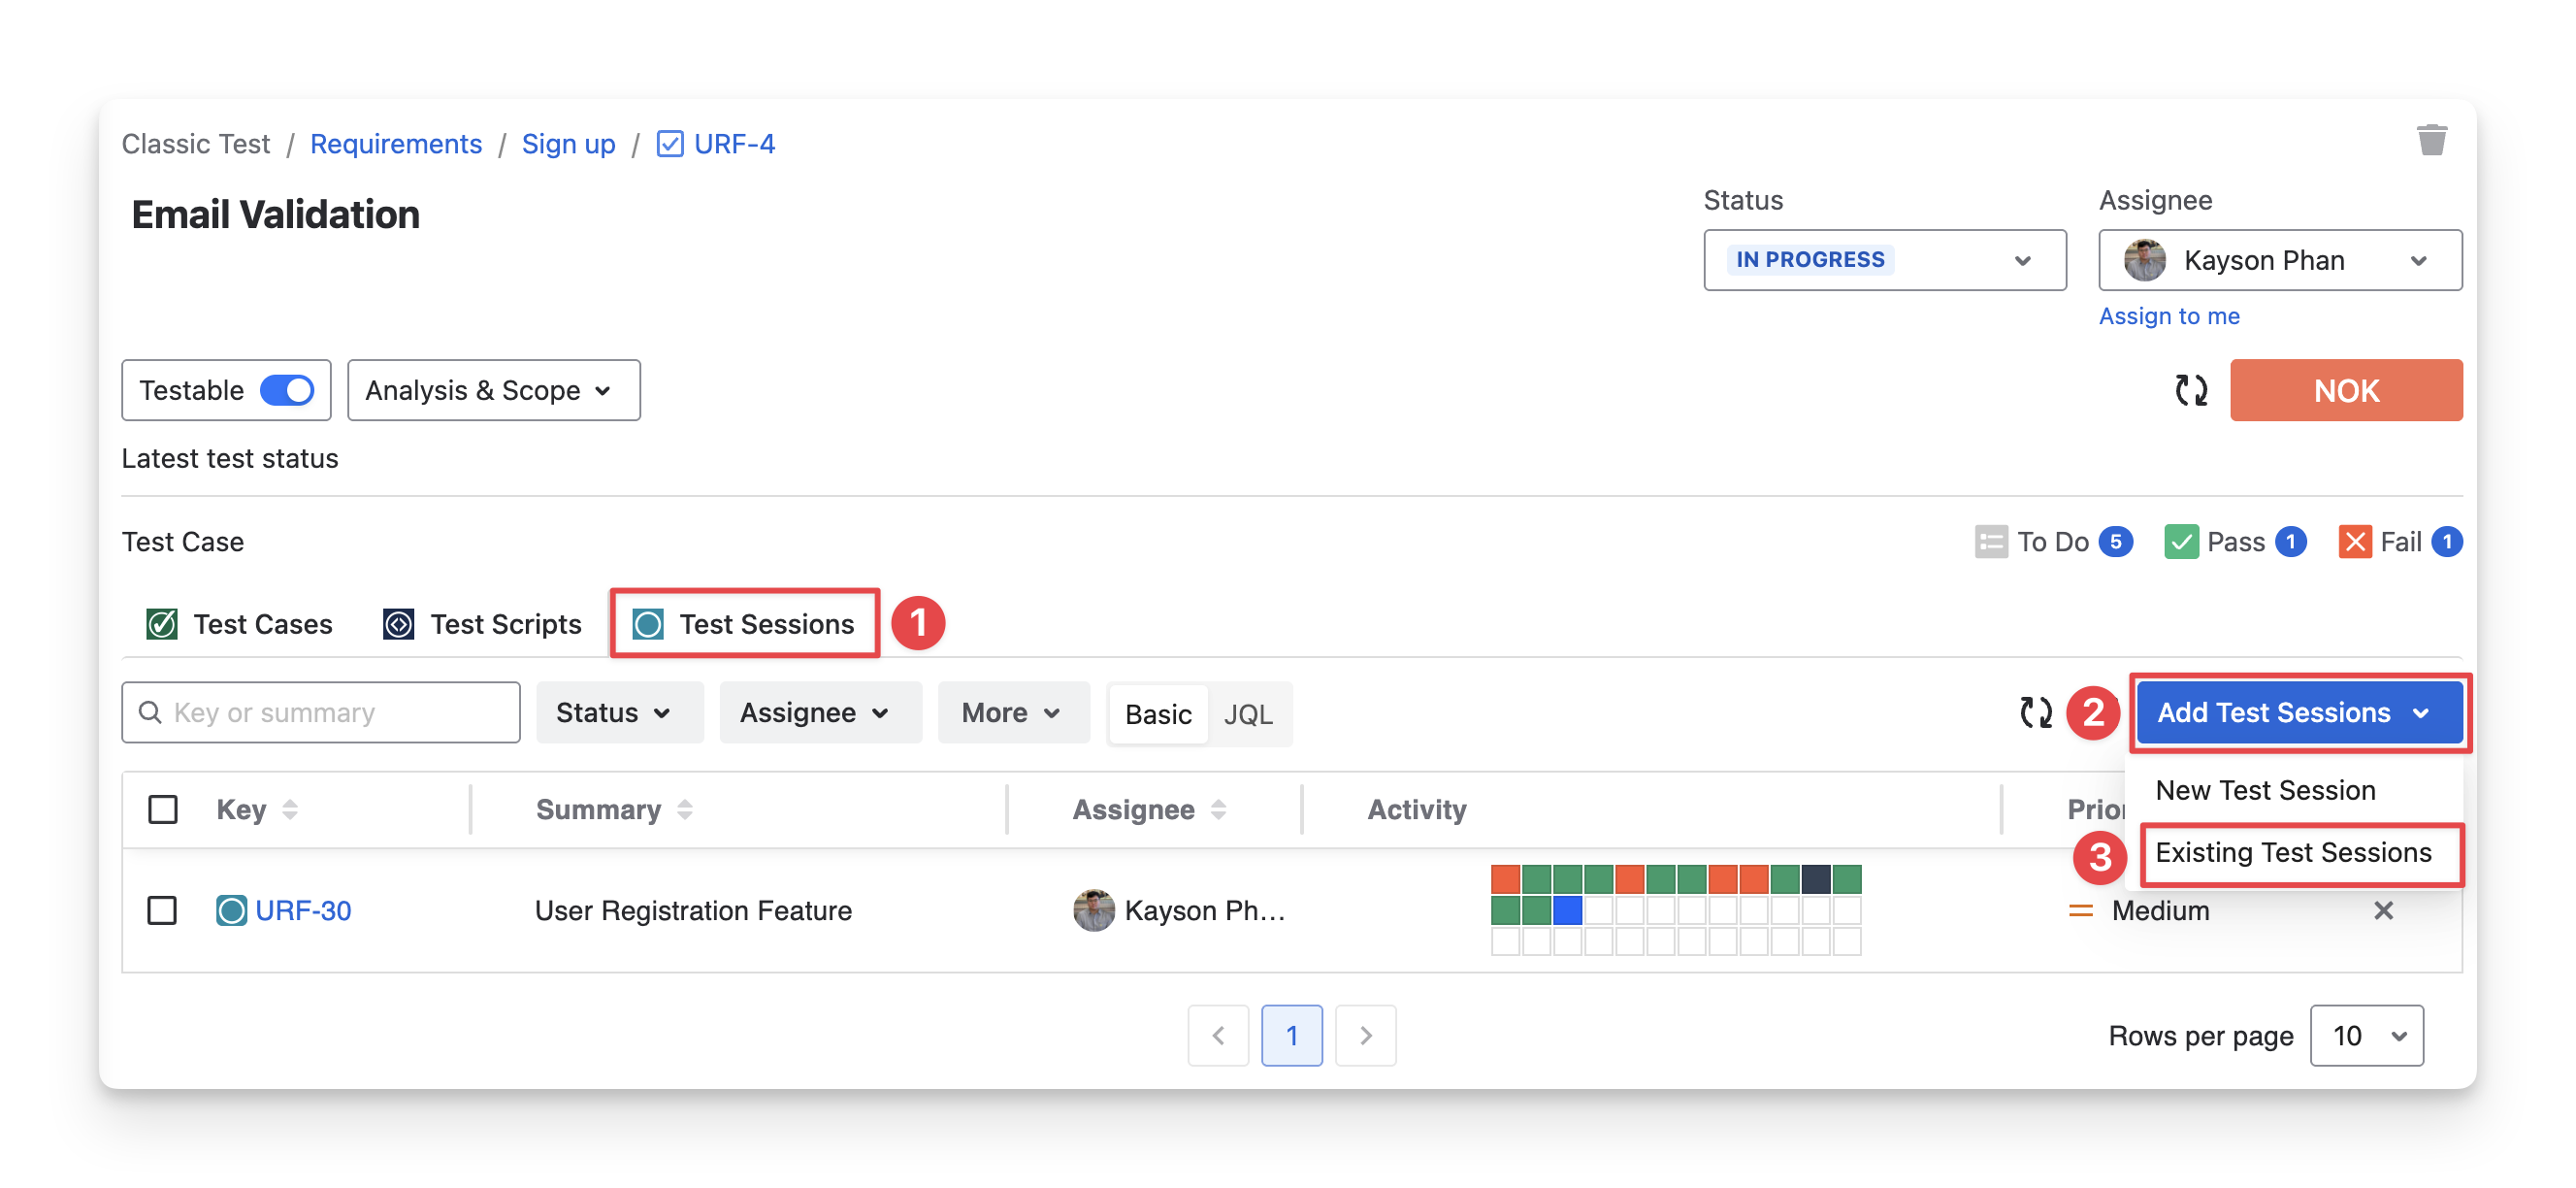
If you choose “New Test Sessions” you will manually create a new test session here.
Learn more about creating test sessions indirectly in the Requirement.
-
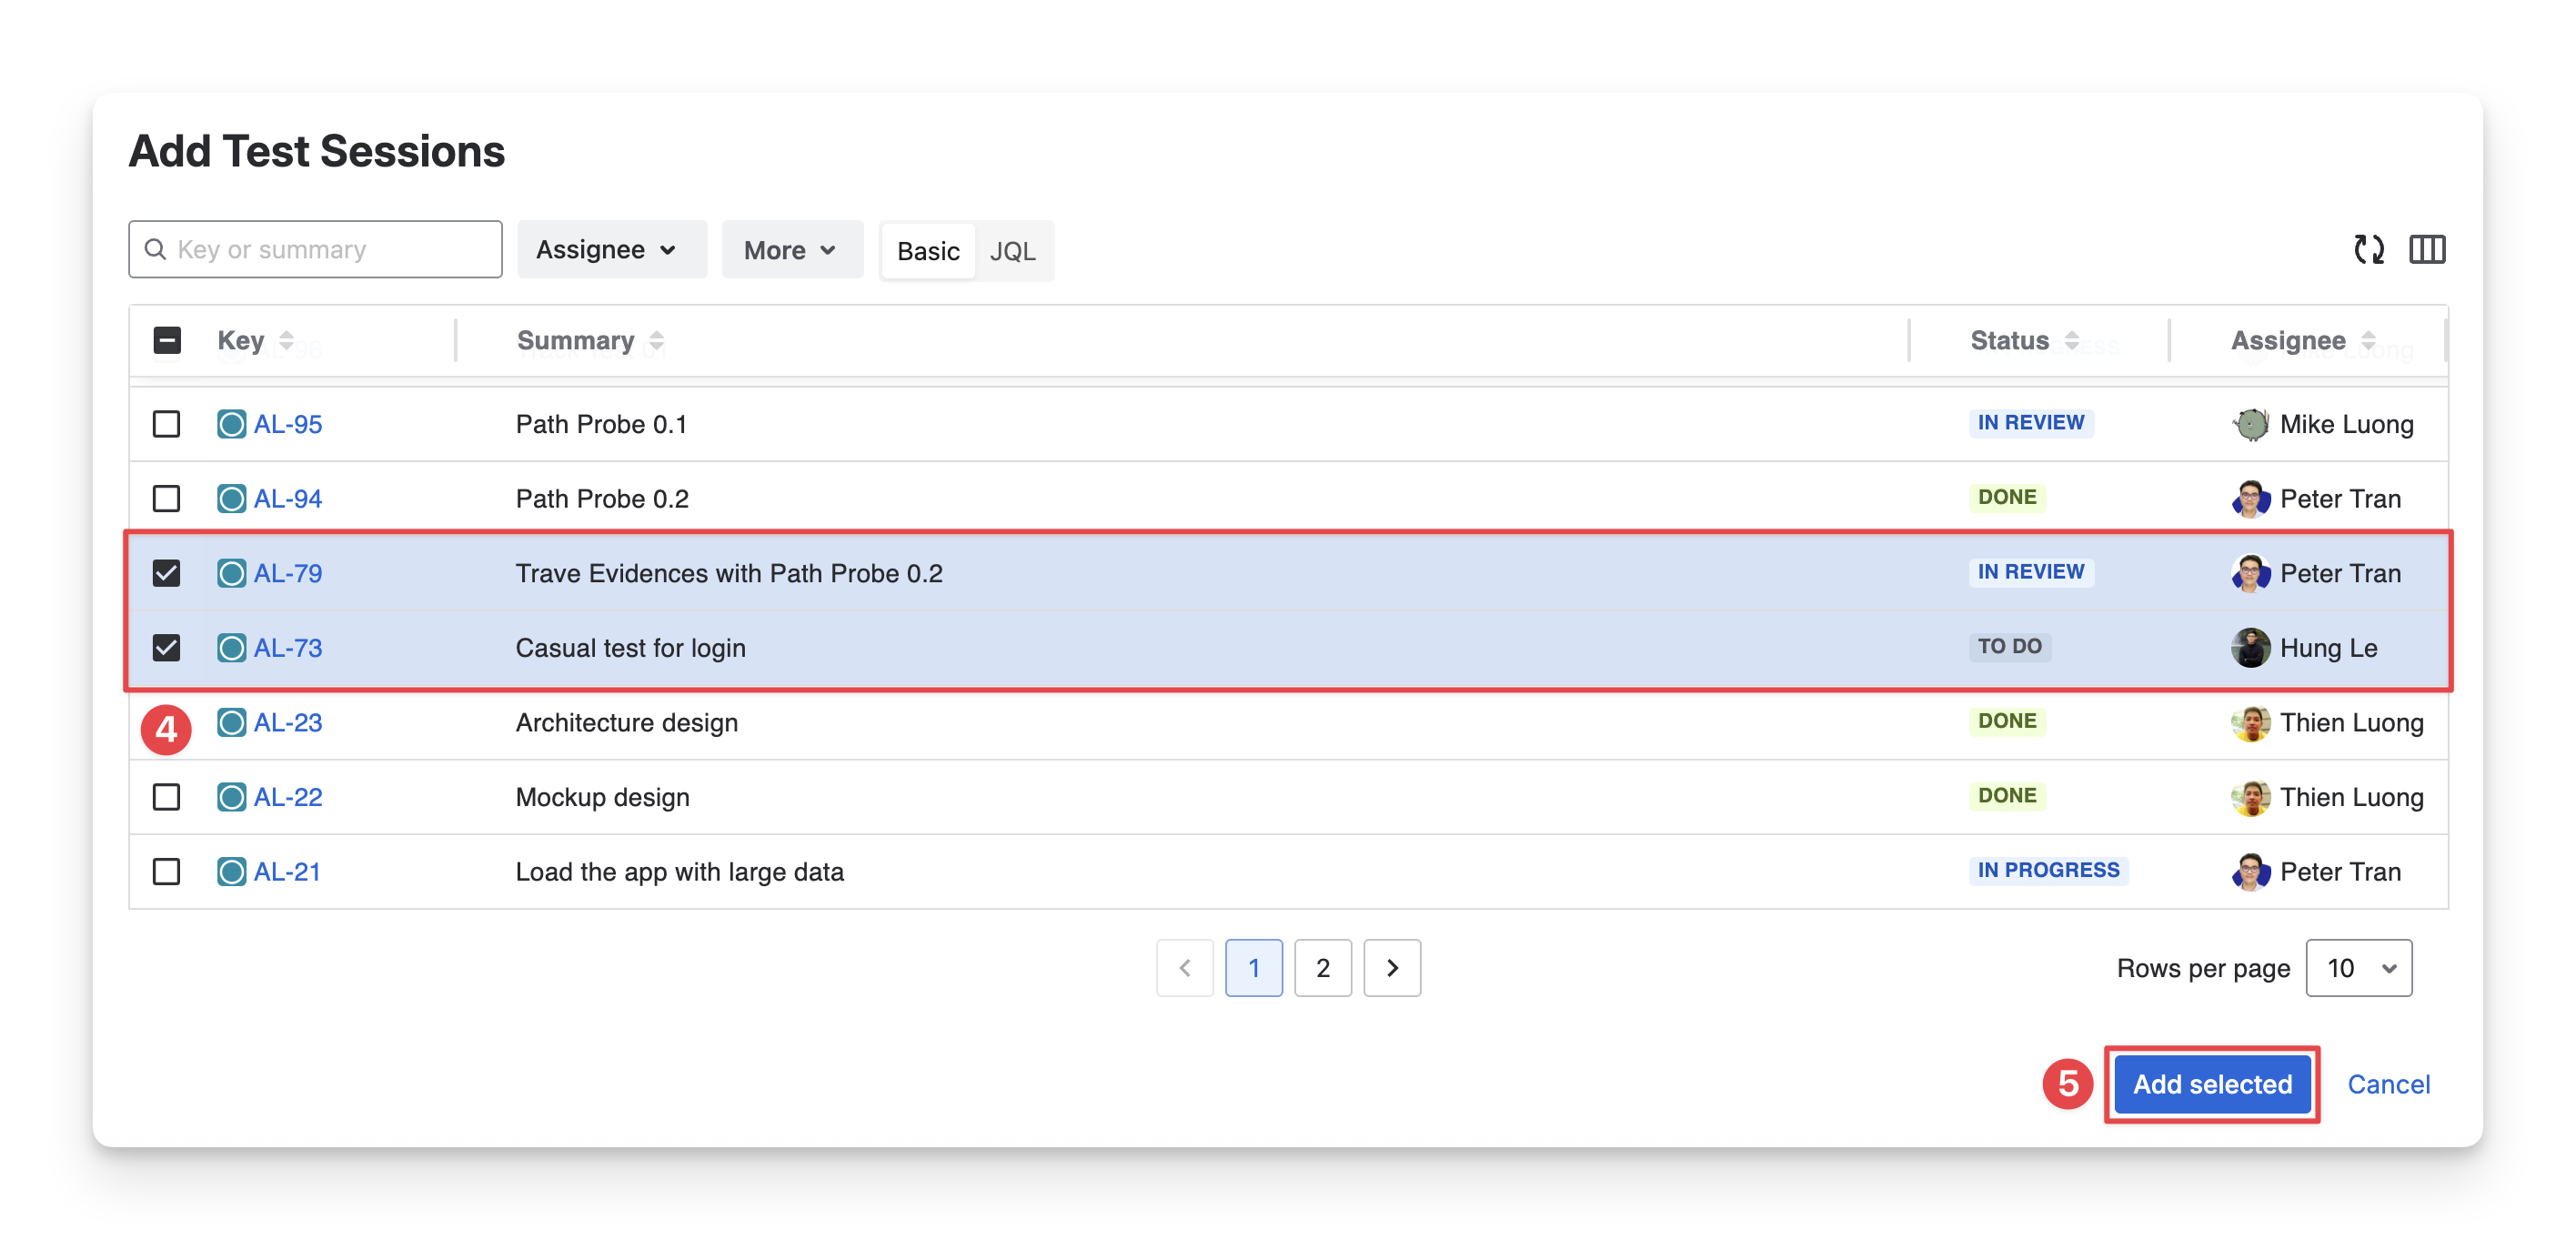
Select the test sessions you want to link with this requirement.
-
Choose “Add Selected” to finish.
Should you need any assistance or further AgileTest inquiries, contact our 24/7 Support Desk!