.png)
This guide walks you through the steps to migrate your Xray data into AgileTest, including preparation, backup export, data import, mapping, final review, and post-migration validation.
Before you begin, we recommend reviewing Concepts and Differences first. It covers what's included in this migration, how Xray concepts map to AgileTest, and a few structural differences worth knowing before you start.
1. Before You Migrate
Before importing your Xray data into AgileTest, review your current Xray projects and prepare the required backup files.
Preparation Checklist
We recommend that you:
-
Review the Migration Scope above, so you know what to expect once your data lands in AgileTest.
-
Prepare a testing instance or sandbox environment in AgileTest to validate the migration process before importing real data or projects.
-
Export your backup from Xray, and avoid changing your Xray project (folders, test cases, statuses) until the export finishes.
-
Review your custom fields in AgileTest ahead of time. See Tips for a Successful Migration below for the fields worth setting up in advance.
-
Use matching names where possible. AgileTest can automatically map values with the same name during the Data mapping step. Values with different names need to be mapped manually.
-
Allow enough time for the migration. Larger projects with more test cases and execution history may take longer to export and import.
Tips for a Successful Migration:
Some fields used in Xray may not exist in AgileTest by default. To make the migration process smoother, you can create the corresponding values in AgileTest before starting the import.
This is especially helpful for fields that need to be mapped during migration, including:
-
Test Run Status (Default fields and cannot be customized)
Before importing your Xray backup, compare these fields in Xray with the available values in AgileTest. If some values are missing, create the corresponding values in AgileTest first.
This ensures that the values are available in the dropdown list during the Data mapping step, making the migration process easier and reducing the need for manual adjustments later.
Prerequisites:
To start the migration, you need:
-
Jira admin or general admin access for both Xray and AgileTest.
-
An Xray backup file generated from Xray’s Backup settings.
-
An attachment backup file, ready for when attachment migration becomes available in Phase 2.
-
Access to AgileTest’s Backup and Restore in Jira admin settings.
-
A clear understanding of which Xray projects/spaces you want to migrate.
2. How to Import Data From Xray to AgileTest
2.1 Step 1: Export Your Data from Xray
The migration starts with an Xray backup. This backup contains the testing data that AgileTest will use during the import process.
To export your Xray data:
-
Go to Jira Settings > Marketplace apps > Xray Settings > Backup.
-
Turn on With attachments (optional).
-
Click Create Backup.
-
Download both files:
-
Generated backup: contains the main Xray testing data.
-
Attachment backup: contains attachment data.
-
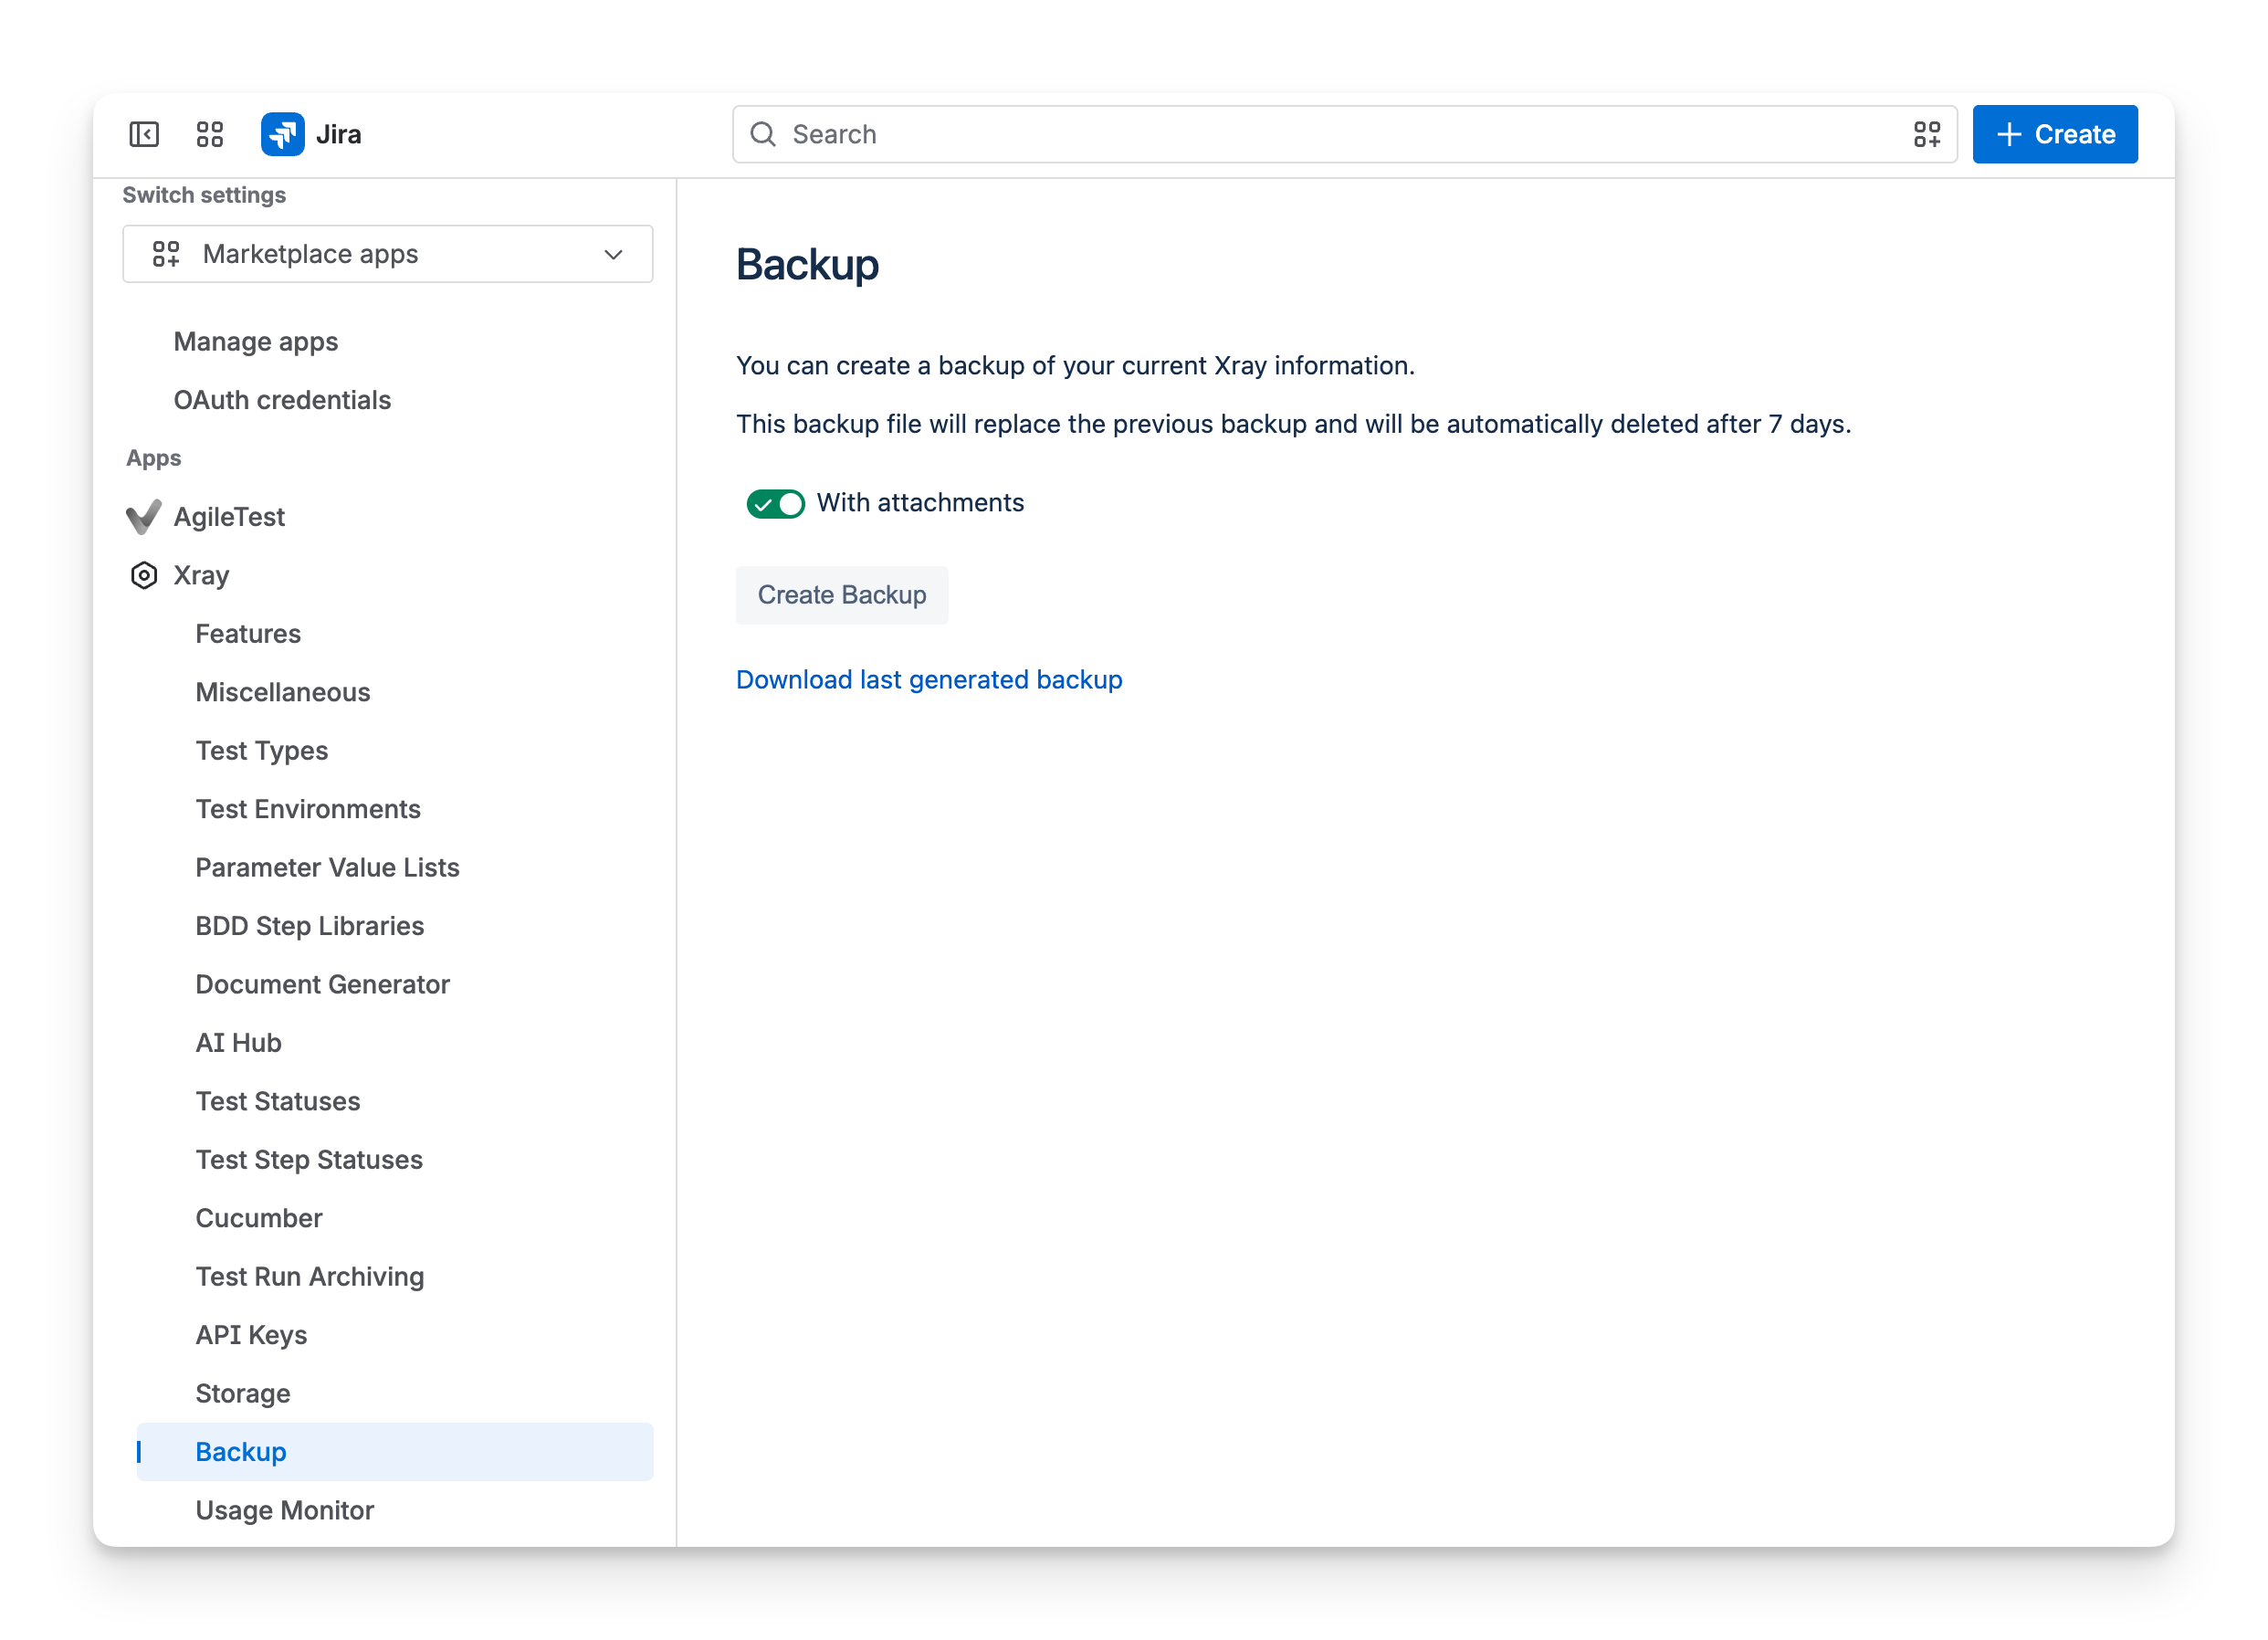
Although attachment migration is not available until Phase 2, we recommend downloading the attachment backup now. This helps ensure that the attachment data is ready once Phase 2 is available, without requiring another export from Xray.
Xray downloads these as ZIP files already, so you can store them as they are and upload them directly to AgileTest, no need to zip anything yourself.
For more information, see Xray’s Create Backup documentation.
2.2 Step 2: Import Your Data into AgileTest
After exporting your Xray backup, you can import the data into AgileTest.
2.2.1 Upload Backup Data
To start the import:
-
Go to Jira Settings > Marketplace apps.
-
On the left-side panel, select AgileTest > Backup and Restore > Xray Migration
-
Upload the Xray backup file exported from Xray.
The Upload backup data screen includes two main areas:
-
Upload panel: Upload or drag and drop your zipped Xray backup file.
-
Summary panel: Shows the detected data from your backup, such as project settings, test case files, test execution files, preconditions, test plans, test runs, test repository, and work item history.
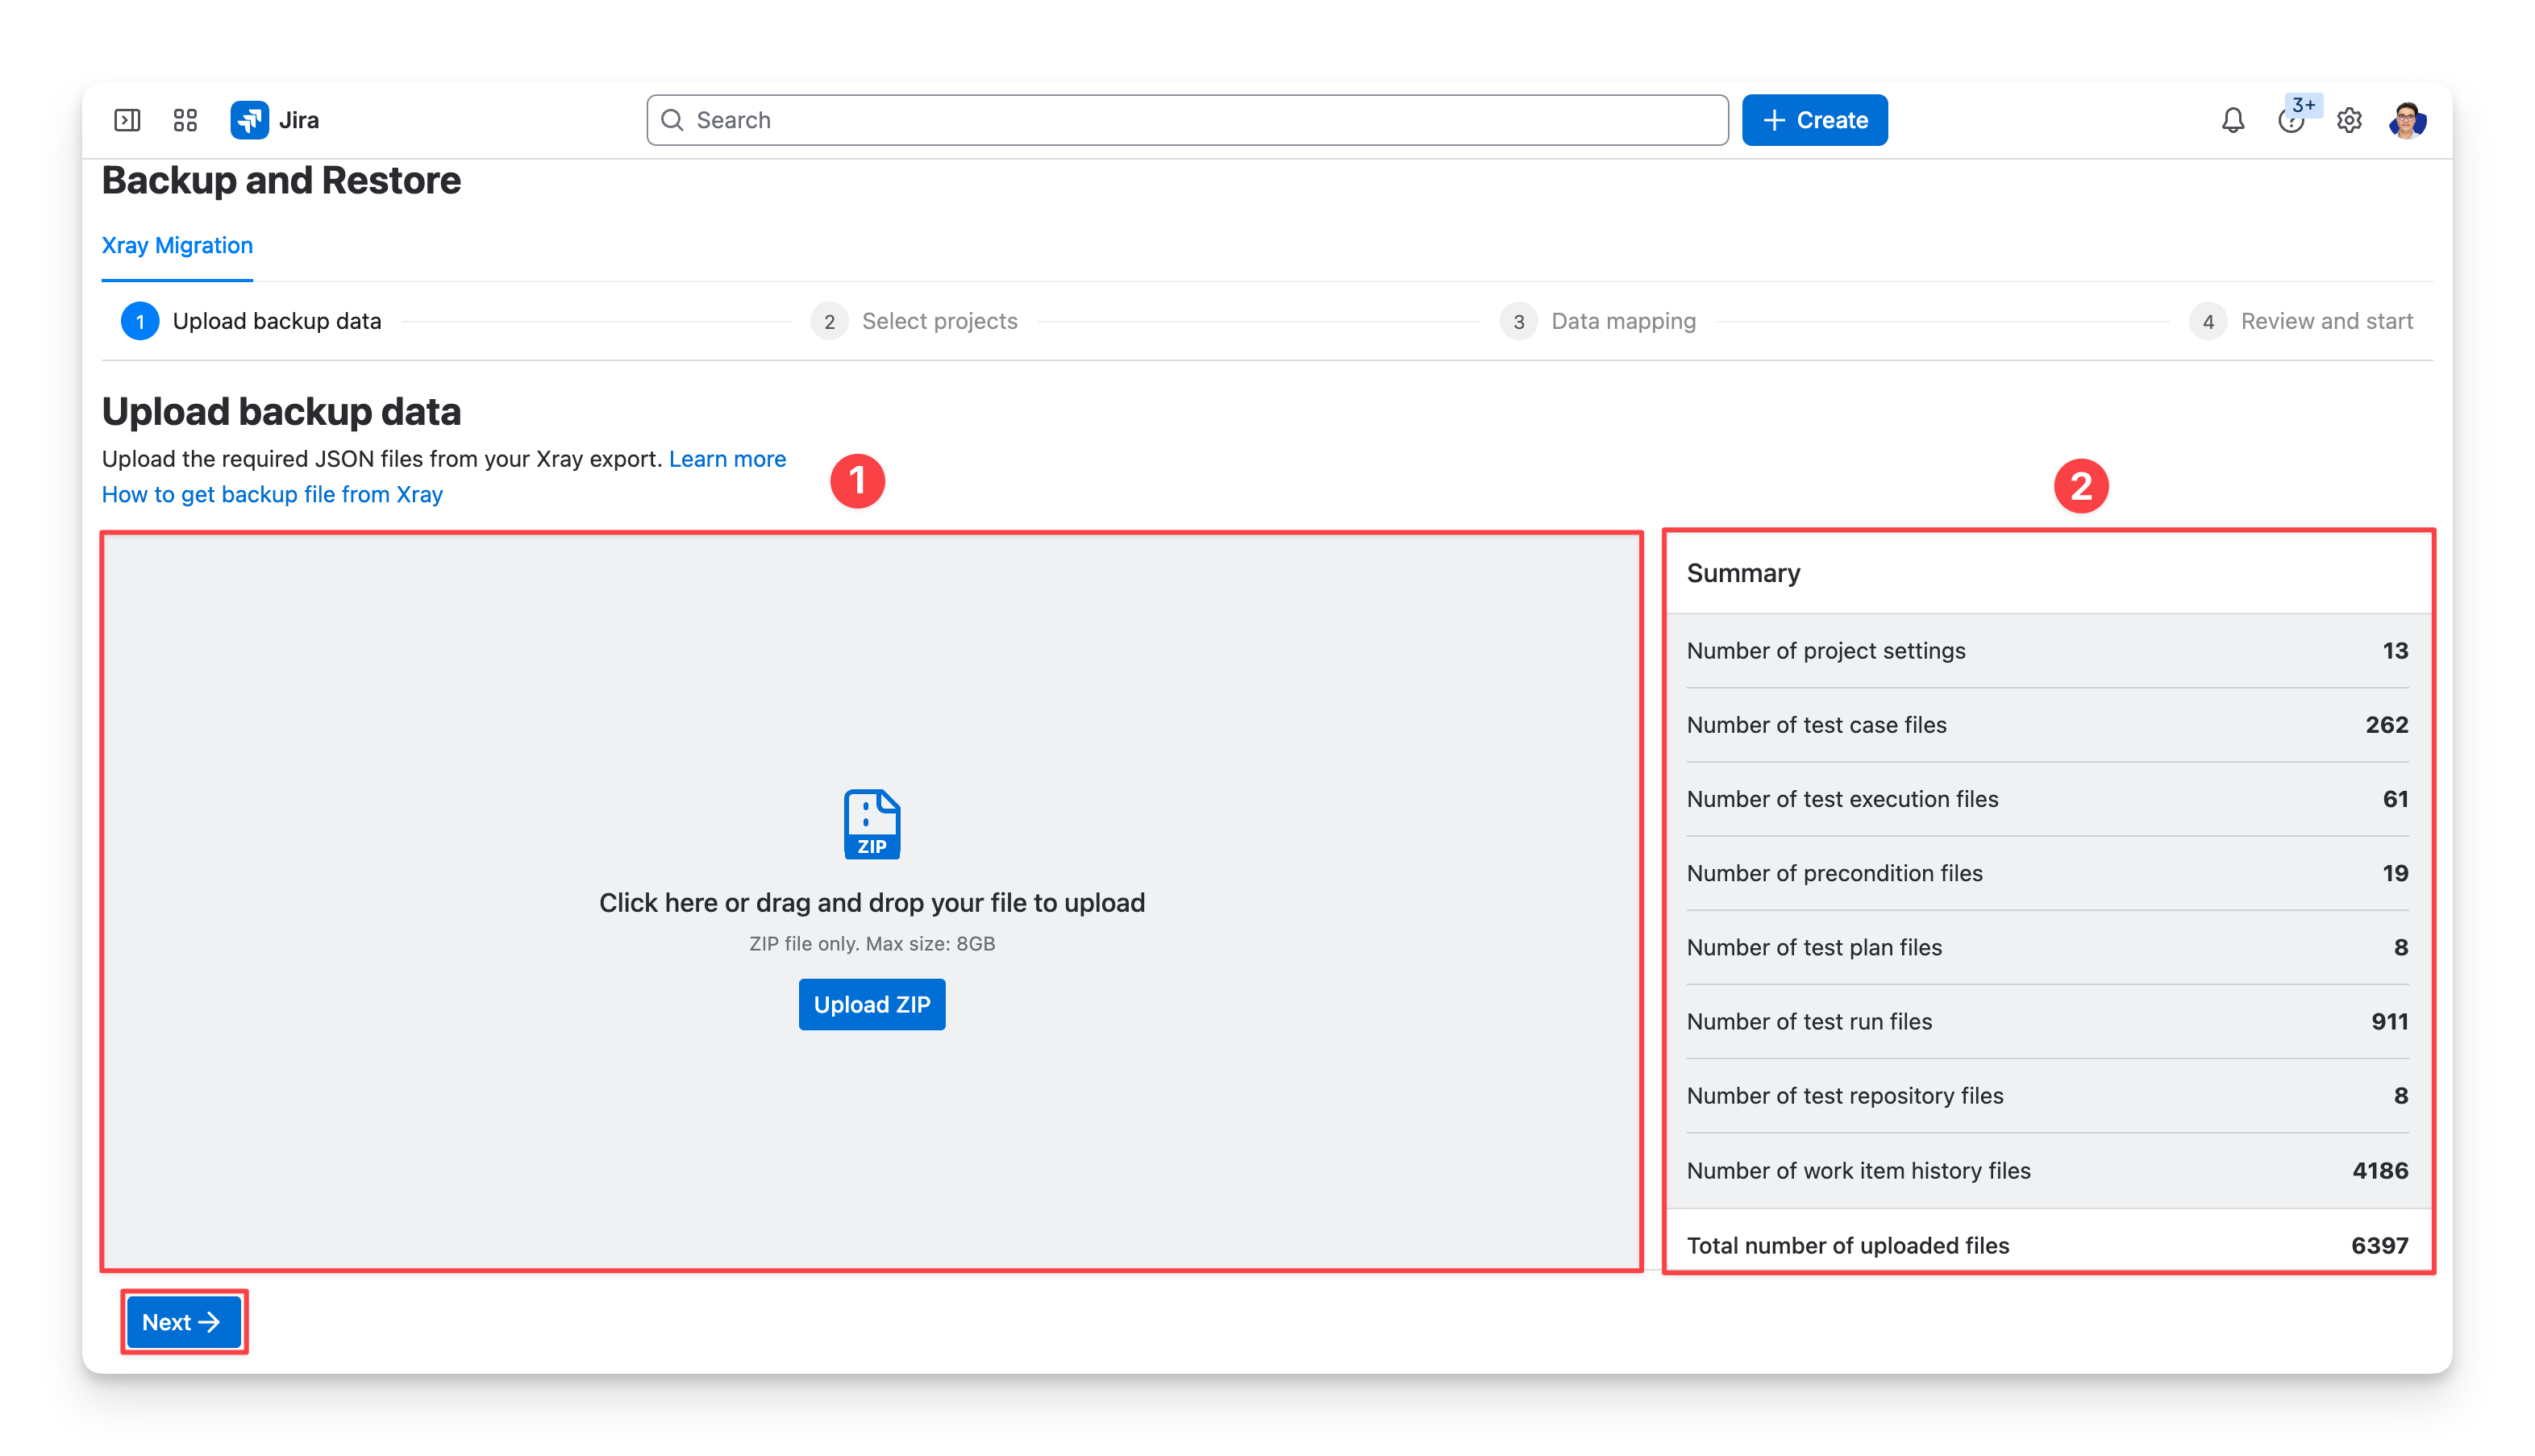
Review the summary to confirm that AgileTest detects the expected data from your Xray backup.
Tips for uploading files successfully:
-
For best performance, use a zipped backup file under 8GB.
-
If your file is larger than 8GB, make sure you have:
-
A stable internet connection.
-
A device with enough performance to handle large files.
-
-
Note: Larger files may take longer to upload and interrupt the process, especially on slower devices or unstable networks.
After the backup file is uploaded and the summary looks correct, click Next to continue to Select projects.
2.2.2 Select Projects
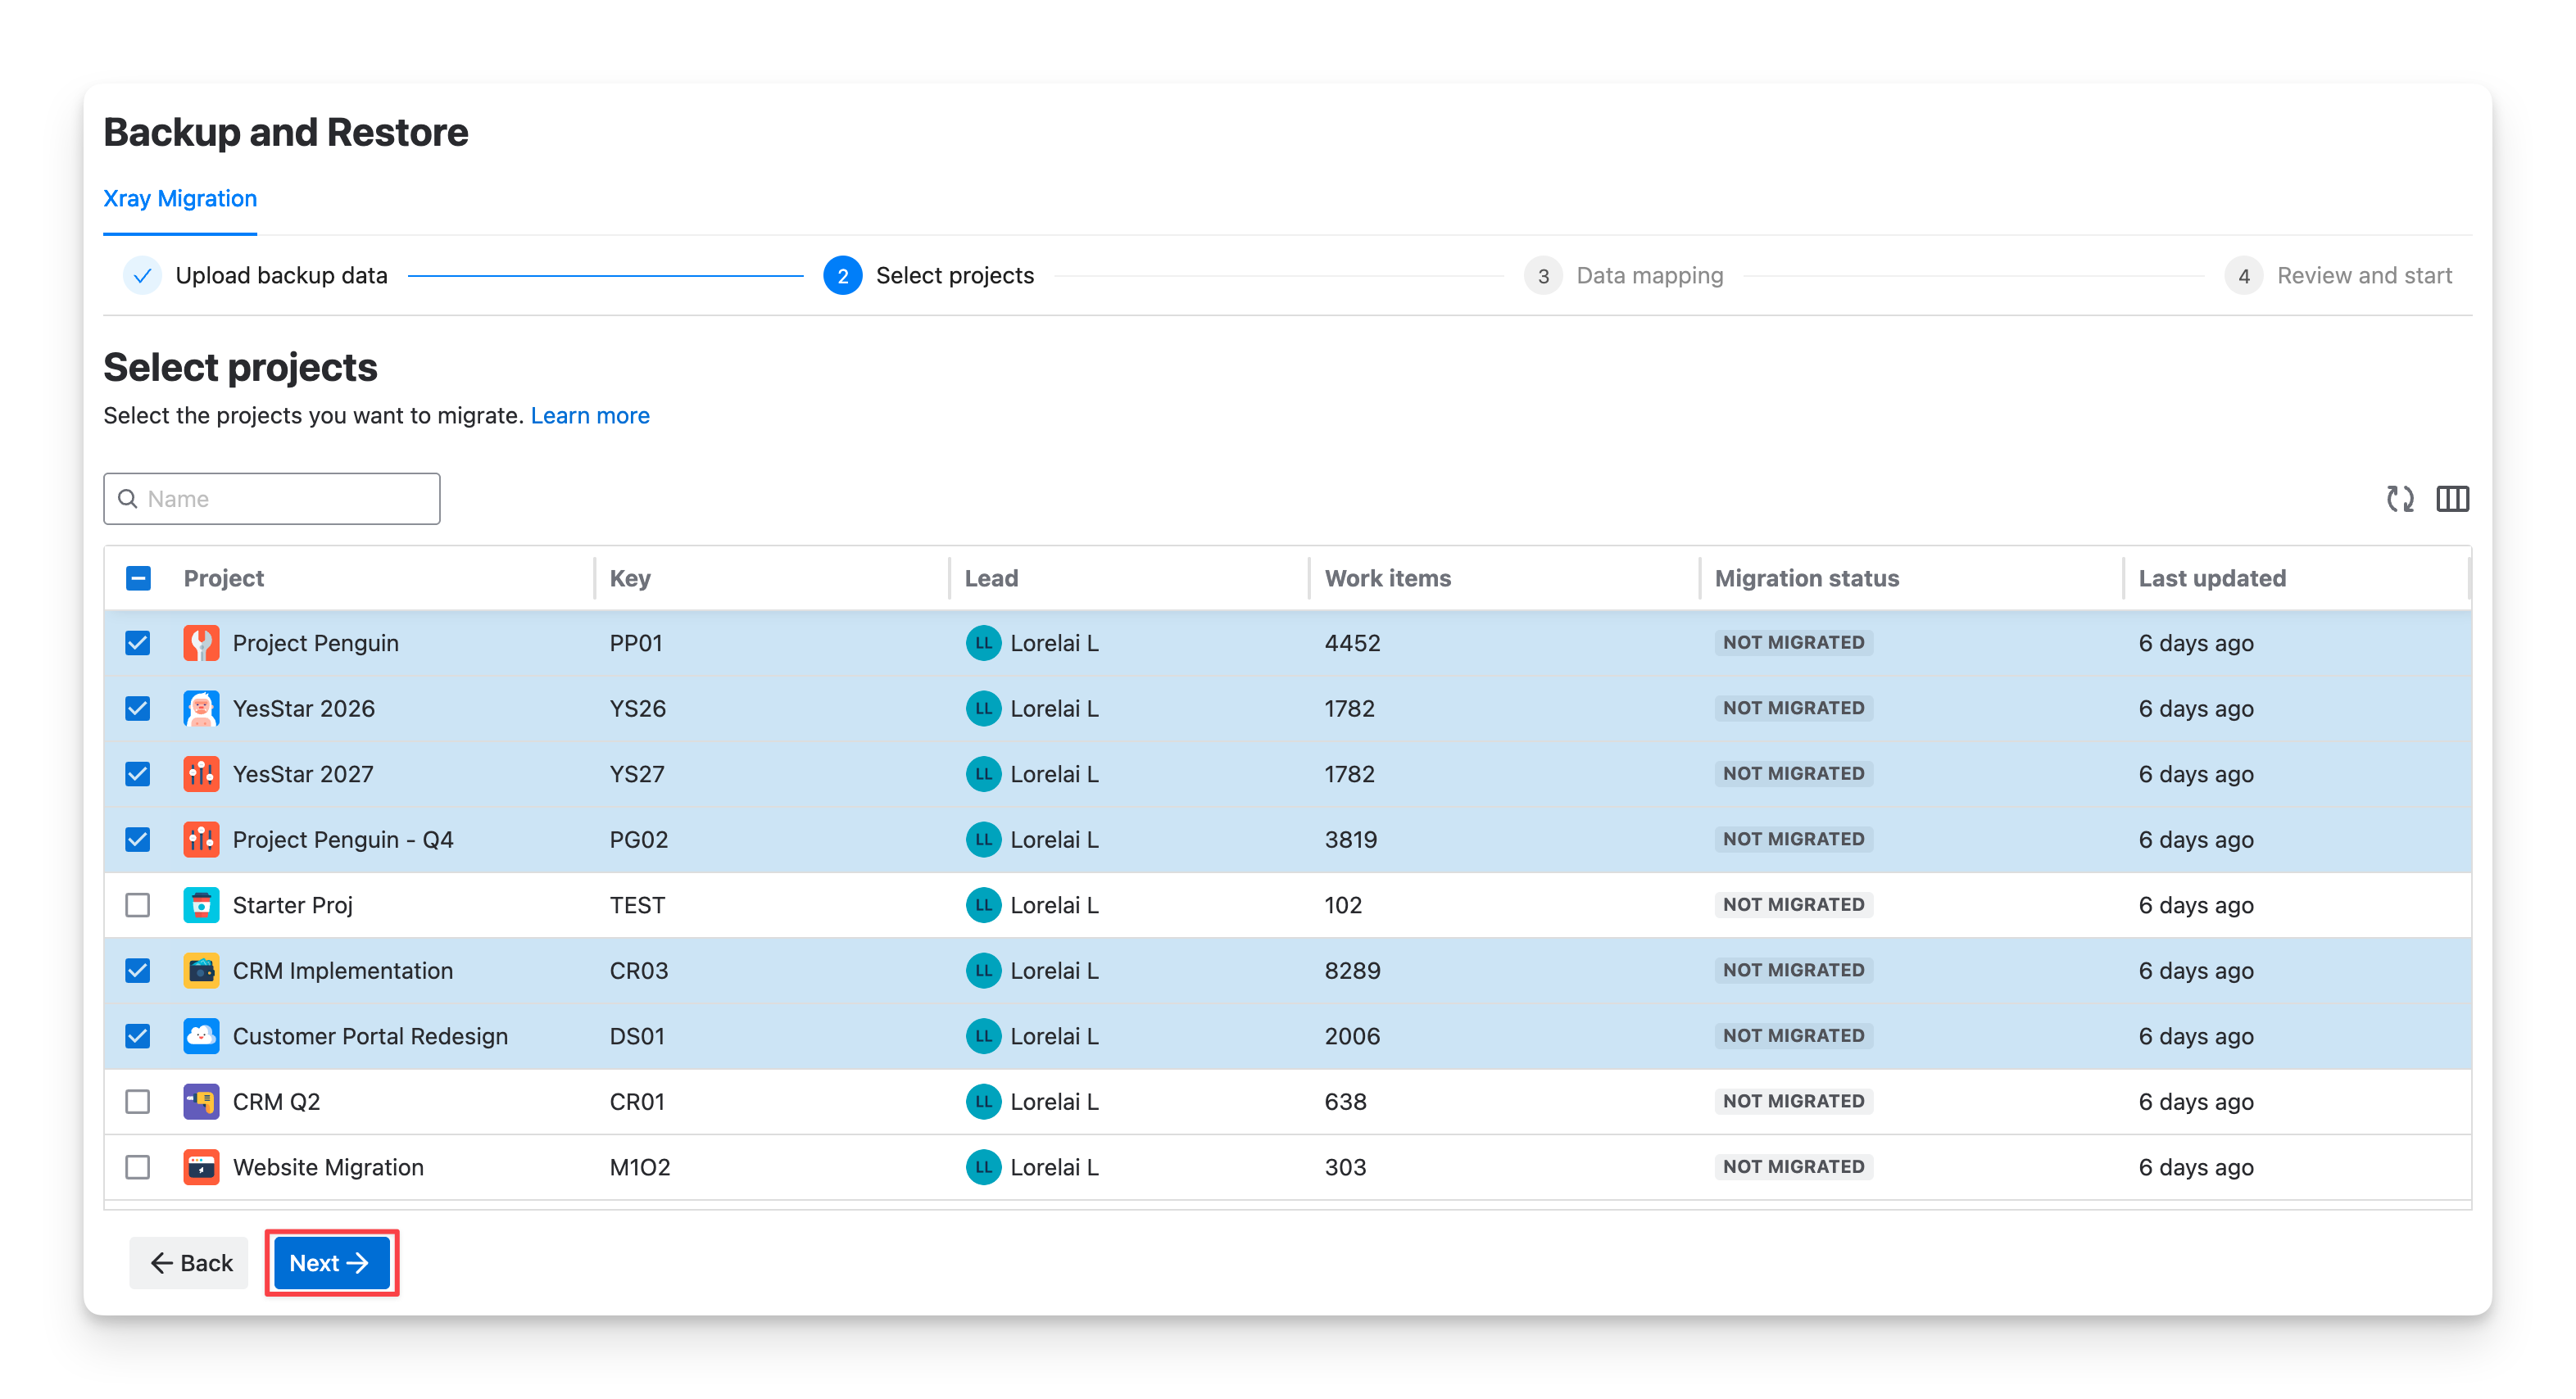
Choose which Xray projects you want to migrate into AgileTest. You cPan migrate one project, several projects, or all available projects at once.
2.2.3 Data Mapping
Map your Xray test statuses, test step fields, test environments, and test types to their corresponding entities in AgileTest.
Note: Create missing AgileTest data before you migrate. This ensures every mapped item has a matching entity in AgileTest.
→ Learn more: Tips for a Successful Migration
-
Entities Panel:
-
The left panel lists each entity type: Test Status, Test Step Status, Test Step Fields, Test Environments, and Test Types.
-
Each entity shows how many values are mapped so far, for example "4 of 4 mapped."
-
Xray Mapping:
-
Select an entity to view and map its values on the right.
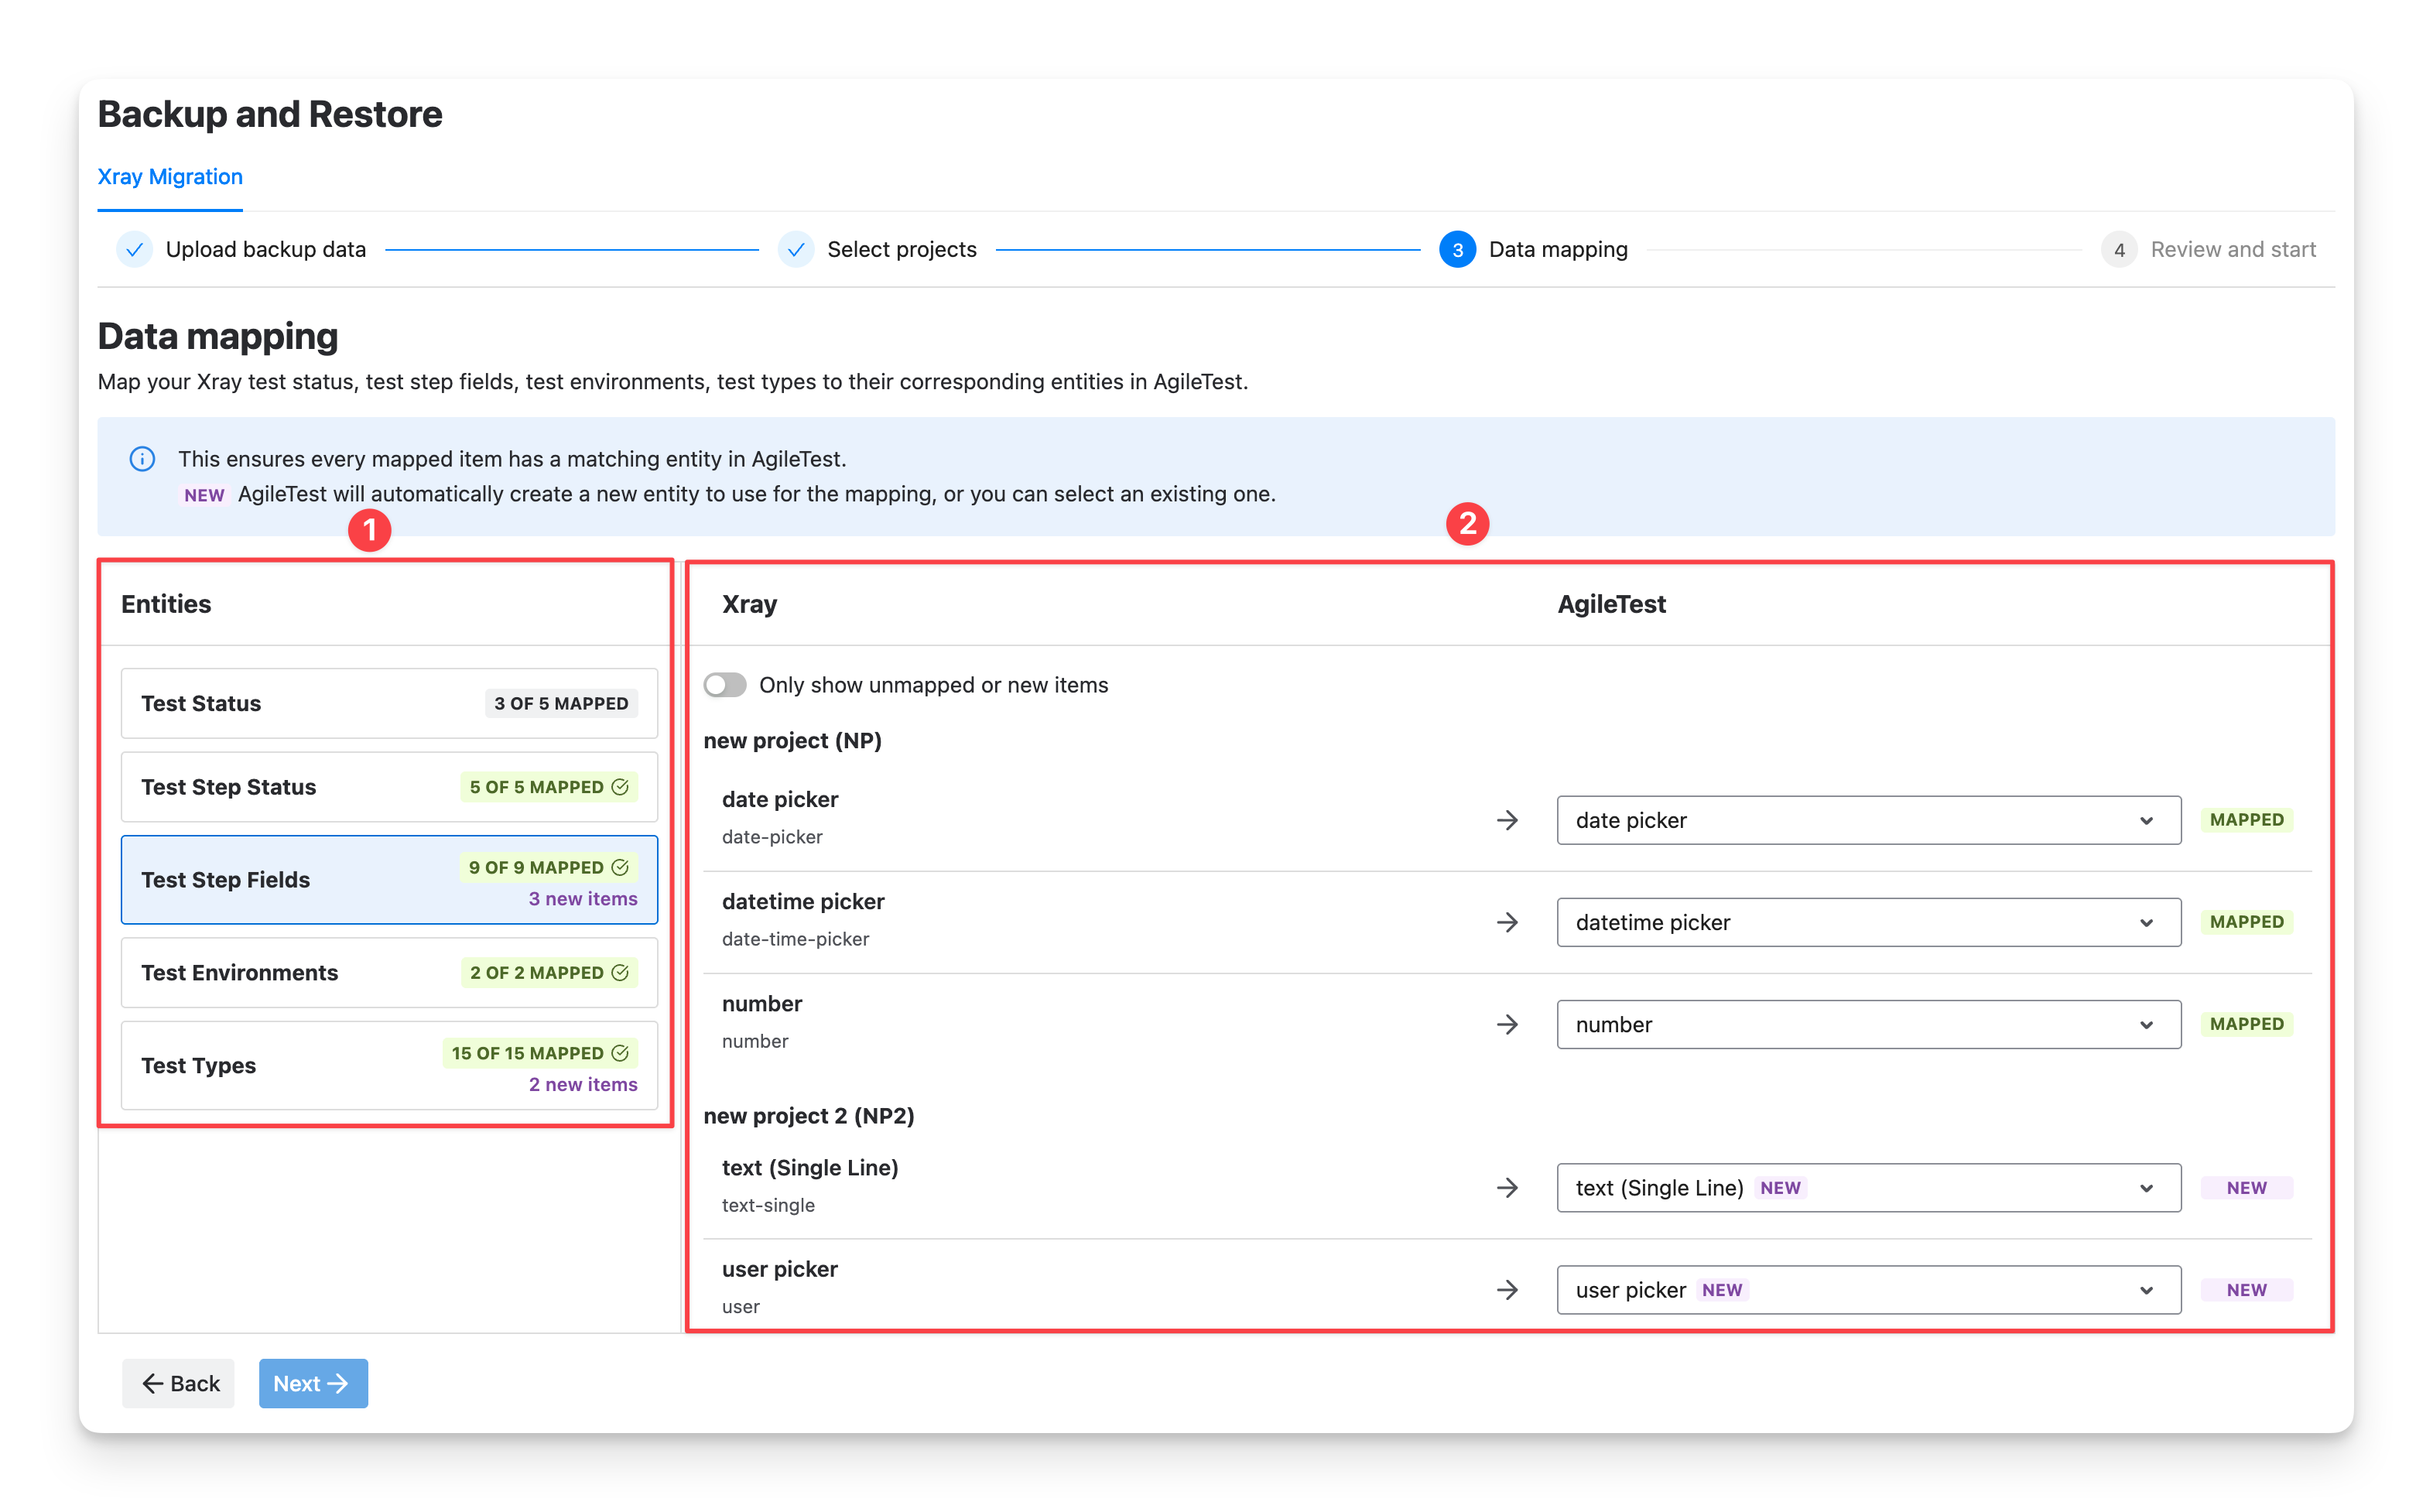
Each section and value shows a status so you know what is left to map:
-
X of Y Mapped : The section is partially mapped; only X out of Y values have been matched so far.
-
mapped : The Xray value is matched to a corresponding AgileTest value.
-
new : For supported customizable fields, if an Xray value does not already exist in AgileTest, AgileTest creates it automatically and marks it as New in the dropdown list. You can then select it during mapping.
-
review : The Xray value still needs a corresponding AgileTest value selected. Select one from the dropdown list to complete it.
Use the Only show unmapped items toggle to filter the list down to values still marked Review, so you can work through them without scrolling past values that are already mapped.
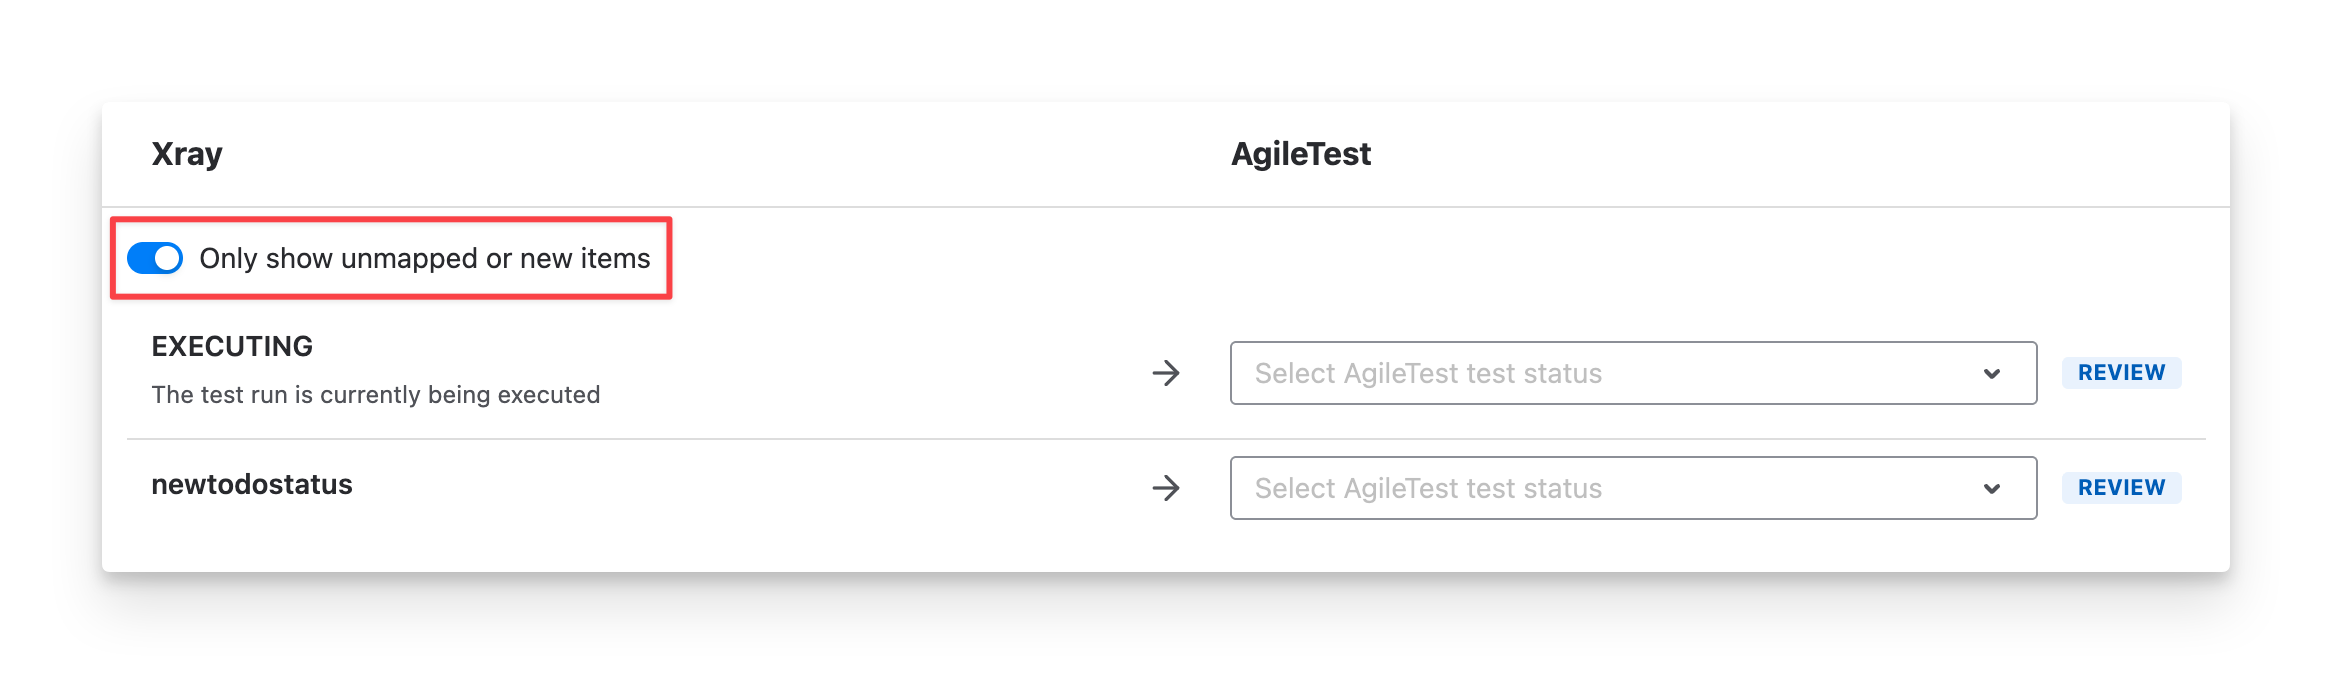
Open each mapping section and review all fields marked as review . These are unmapped entities from Xray that need to be mapped to an available AgileTest value.
For each unmapped entity:
-
Check the value in the Xray column.
-
Select the corresponding AgileTest value from the dropdown list.
-
Once the field is mapped , move on to the next field marked as review .
After mapping all required values, the fields show as complete .
Note:
-
If a field is left unmapped, the related data will not be imported.
-
Values with matching names are mapped automatically. Values with different names need to be reviewed and mapped manually.
2.2.4 Review and start
Before starting the migration, review the migration scope, backup files, and mapping selections.
This page summarizes:
-
Selected Projects: The Jira projects included in the migration scope.
-
Entities: A breakdown of each mapping group from Data mapping, showing how many values are mapped in each.
-
Work type changes: A summary of how Xray work item types will map to AgileTest work types during migration.
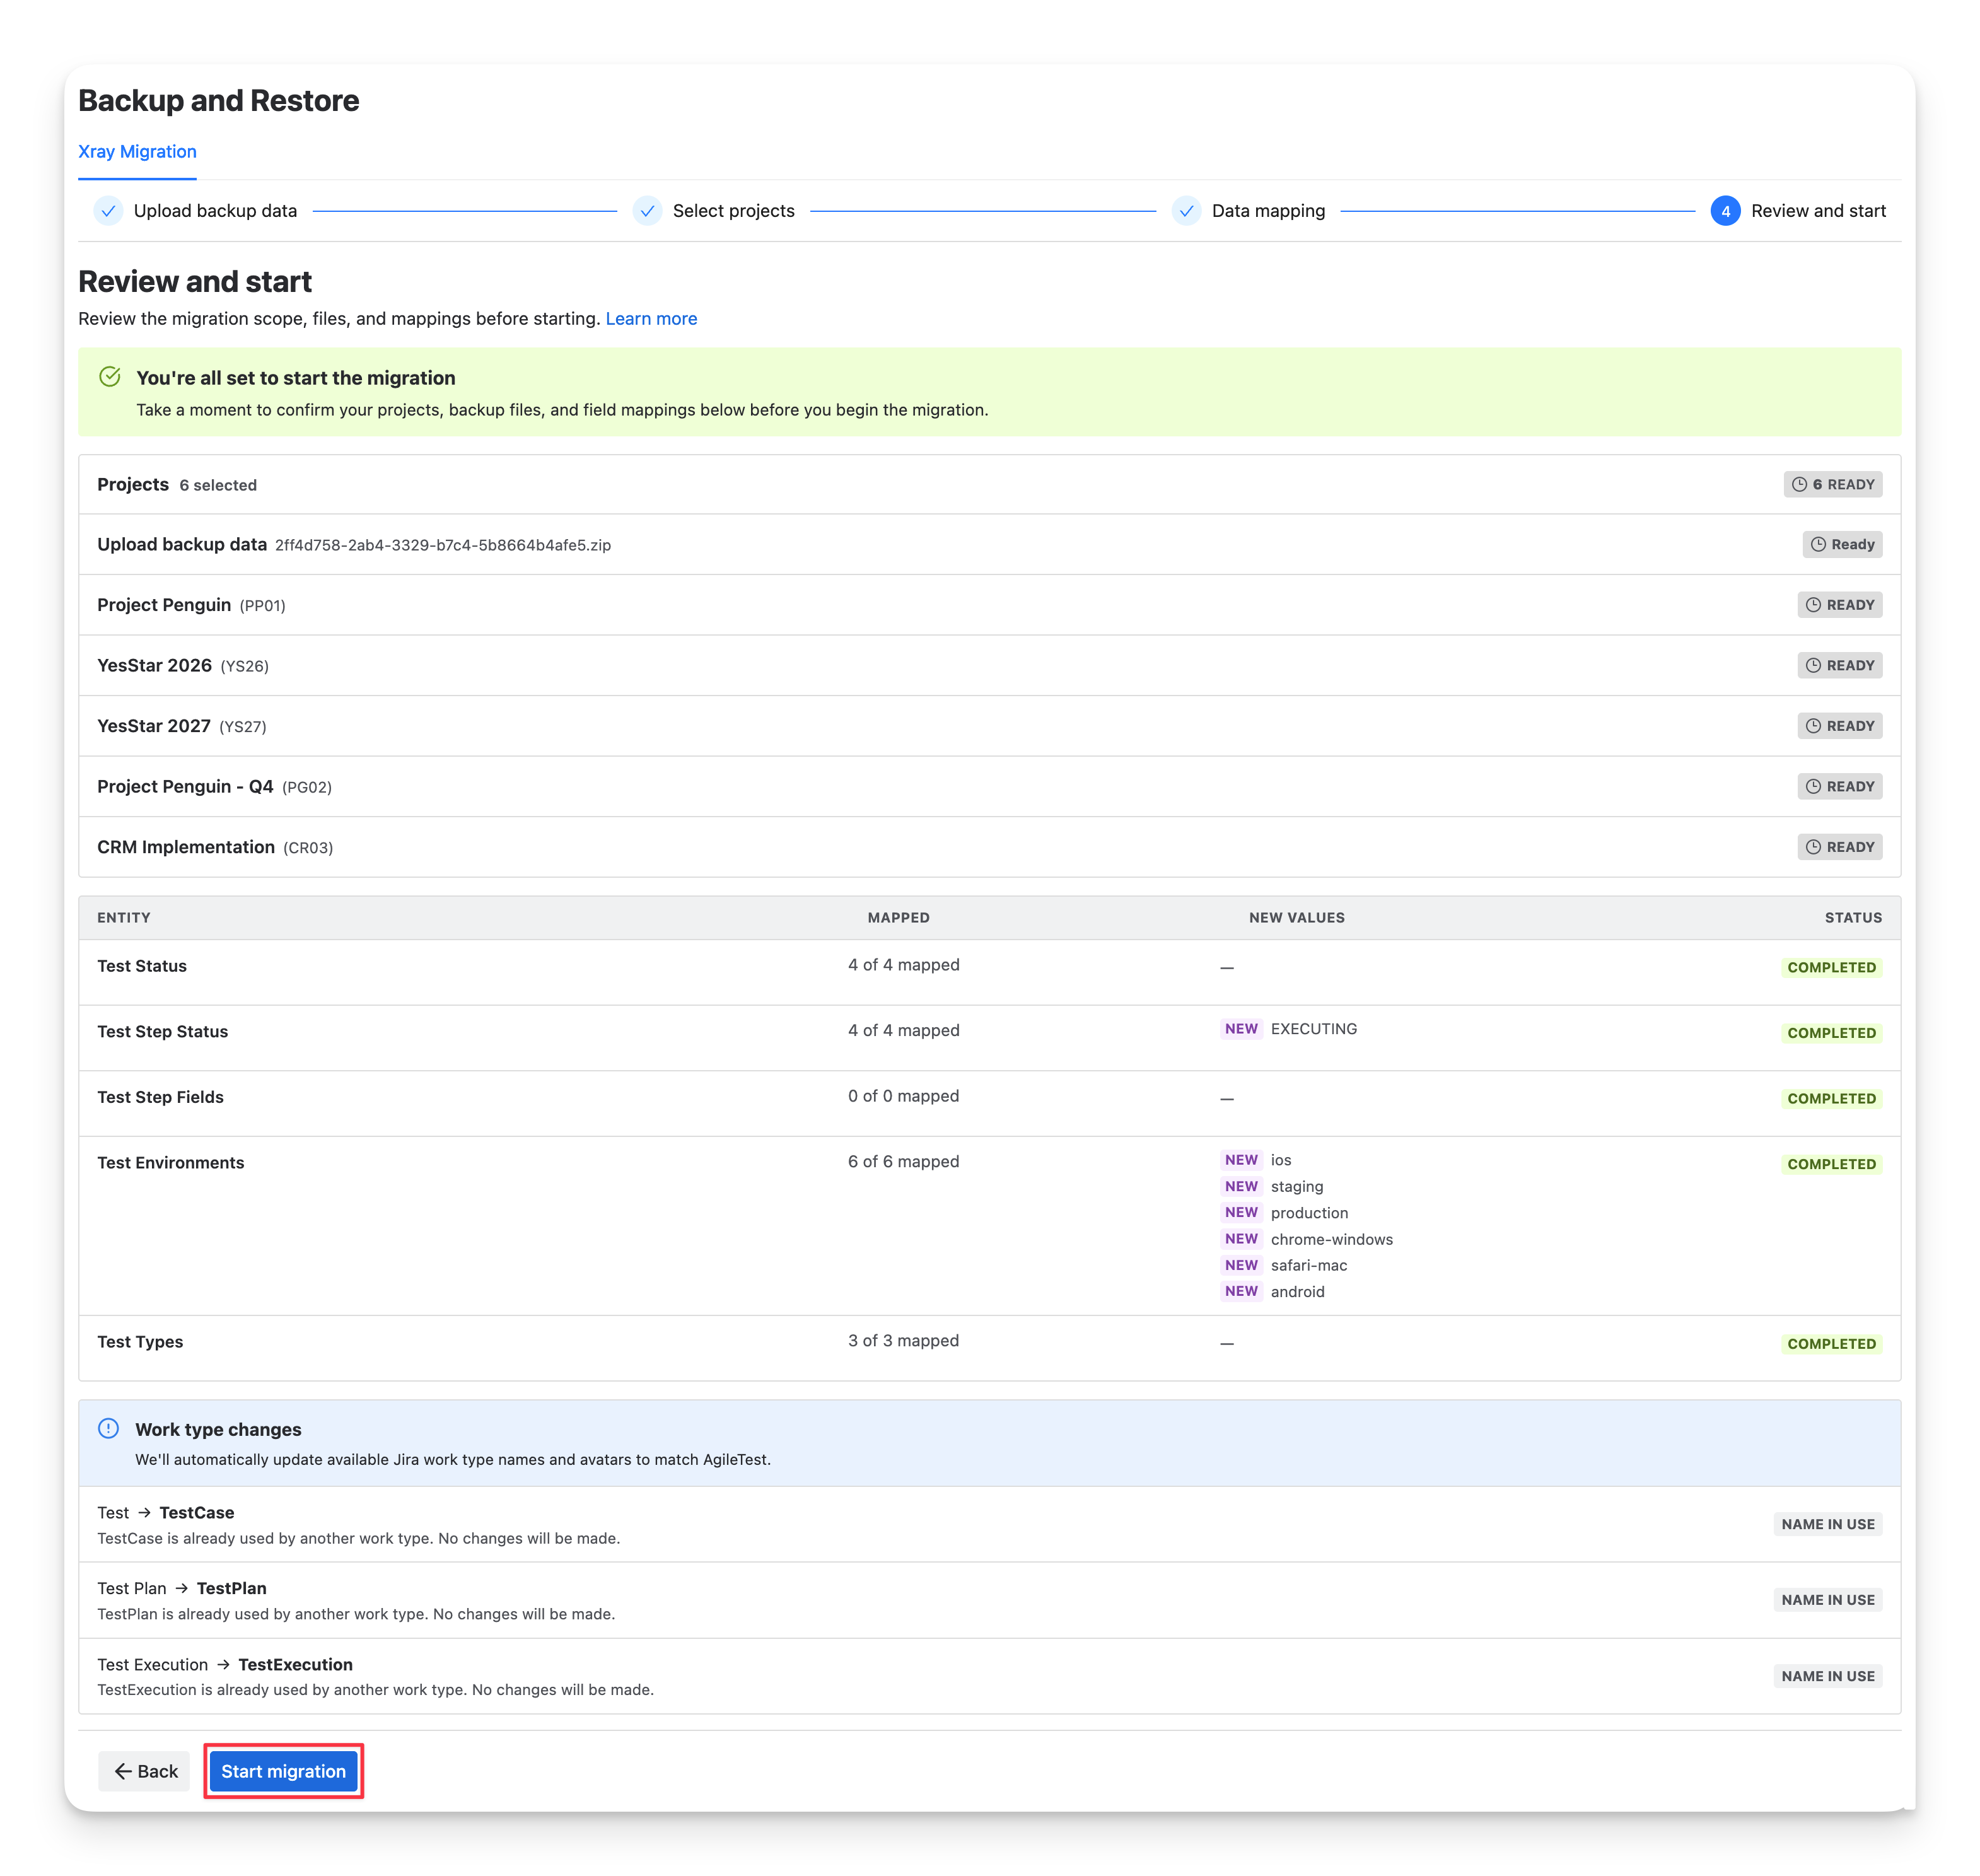
Click Start migration to begin the import, until every Project/entity shows as COMPLETED .
Note:
-
If any projects fail to migrate during the first attempt, we recommend running the migration again and selecting only the projects that failed in the previous attempt.
3. After the Migration
Once the import finishes, open the migrated AgileTest project and validate the imported data before your team continues its regular testing workflow.
We recommend checking:
-
A few migrated Test Cases, including their test steps.
-
A migrated Precondition and its linked Test Cases.
-
A Test Plan.
-
A Test Execution and its execution results.
-
Folder hierarchy under Test Folders.
-
Custom statuses, environments, test types, and test step fields.
-
Reports and traceability views.
This review helps confirm that the imported data matches your original Xray project and that your team can continue working in AgileTest with confidence.
Should you need any assistance or further AgileTest inquiries, contact our 24/7 Support Desk!