.png)
This guide walks you through migrating asset data from JSM Assets to AssetIT using a CSV file.
Please note that attachments cannot be migrated via CSV. They must be re-uploaded manually after the import is complete. See Step 5: Handling Attachments for details.
Step 1: AssetIT fields and reference data overview
Before you begin, familiarize yourself with the types of data in AssetIT. Understanding the available fields and reference data will help you make better mapping decisions.
Only custom fields need to be created before the import. Almost all reference data is auto-created during the process (via Generate Data), though you can also create them in advance.
|
Reference data |
Details |
Documents |
|---|---|---|
|
required Custom Fields |
Default fields cover custom fields for attribute notes. Supports multiple data types: Text, Number, Date, User, List, etc. |
|
|
Inventory |
Group assets by unit or department – equivalent to Object Schema in JSM Assets. |
|
|
Asset Model |
Asset type or model – equivalent to Object Type in JSM Assets |
|
|
Status Label |
Asset status. Determines whether an asset can be checked out |
|
|
Others |
For other available fields (Department, Location, Supplier, etc.), please refer to the documentation for the full list. |
Below is the concept mapping between the two systems:
|
JSM Assets |
AssetIT |
Notes |
|---|---|---|
|
Object Schema |
Inventory |
e.g Developer, HR |
|
Object Type |
Asset Model |
e.g MacBook Pro, iPhone |
|
Object (individual asset) |
Asset |
Each row in CSV = 1 asset |
|
Attribute (text, number, date, reference, etc.) |
Matching default fields or Custom fields |
More details in Step 3.2 |
|
Attribute reference → User |
Assigned To or User-type Custom field |
More details in Step 3.3 |
|
Attachment |
Attachment |
Cannot be migrated via CSV; must be uploaded manually |
Step 2: Exporting data from JSM Assets
-
Go to JSM and select Assets from the navigation bar.
-
Select the Object Schema you want to migrate.
-
Choose the Object Type you want to export, such as Laptops or iPhones.
-
Click the Bulk actions icon in the top-right corner, then select Export objects.
-
Click Export to download the CSV file.
-
Repeat these steps for each Object Type if you have multiple asset types to export.
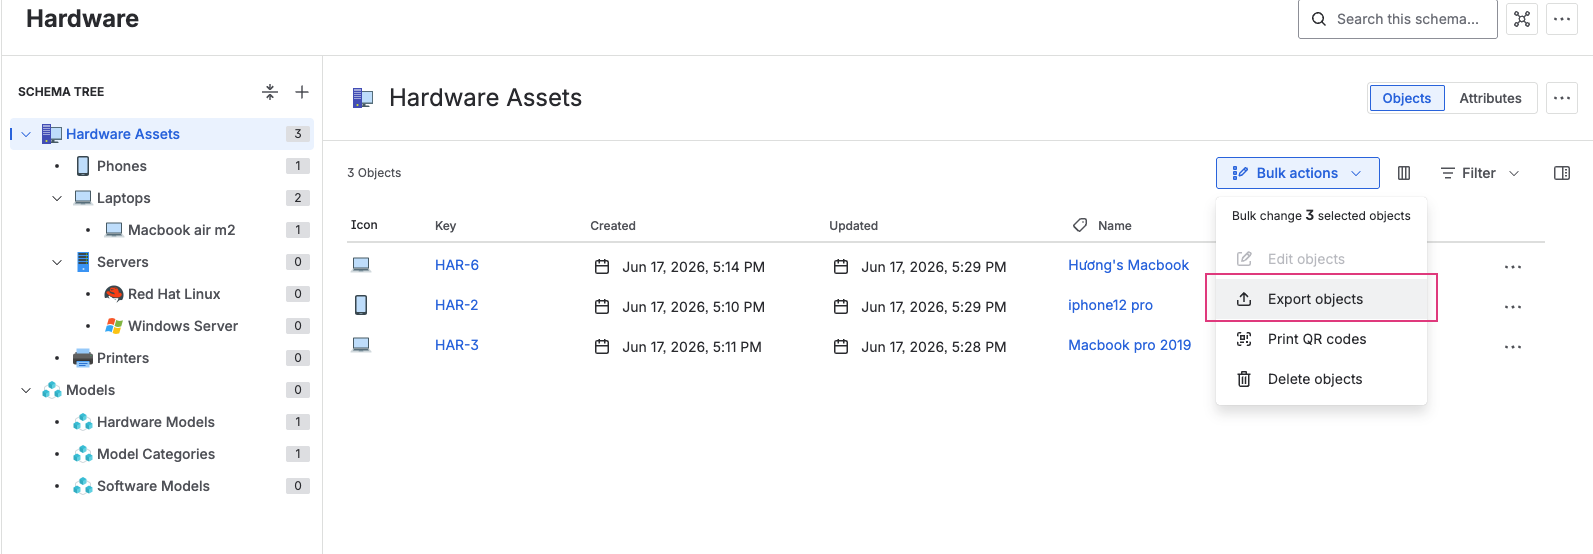
If you have multiple Object Types, you can combine them into a single CSV file. Just make sure the model column correctly identifies each object type.
Step 3: Preparing the CSV file for AssetIT
3.1 Download the Sample CSV
In AssetIT, go to Asset → Import → Import New Access → Download sample CSV. More details here: Import Assets
Use this file as your template, since the headers are already in the correct format sample-assets.csv
3.2 Field mapping table: JSM Assets → AssetIT
|
JSM Assets fields |
AssetIT fields |
Type |
Notes |
|---|---|---|---|
|
|
|
required |
Max 100 characters |
|
|
|
required |
Must be unique. Leave bank to auto-generate (requires auto-tag enabled in Asset Tag in Reference Data) |
|
|
|
required |
e.g In Stock, In Use,… can be auto-created via Generate Data while importing |
|
|
|
required |
If not available, use Can be auto-created via Generate Data while importing |
|
|
|
optional |
Max 255 characters |
|
|
|
optional |
|
|
|
|
optional |
Convert format: 14/Jun/26 → |
|
|
|
optional |
Can be auto-created via Generate Data while importing |
|
Attribute reference → |
|
optional |
Use Use a |
|
Other attributes |
Matching default fields or Custom fields |
optional |
Review AssetITs default fields first (Serial, Department, Location, Supplier, etc.) For attributes with no suitable default field, please follow Custom Fields & FieldSets |
|
|
– |
SKip |
Internal |
|
|
– |
SKip |
AssetIT automatically records these on import |
Model, Status, Inventory, Department, Location, and Supplier do not need to be created beforehand. AssetIT can automatically generate them during import by selecting Generate Data in the Data Preview step.
3.3 Attribute reference → User
The Assigned To field in AssetIT behaves differently depending on the Checkout Type:
-
Checkout Type= user →Assigned Tois the person currently holding or using the asset. Accepts user’s display name -
Checkout Type= location →Assigned Tois the name of the location. -
Checkout Type= asset →Assigned Tois the parent asset, entered in the format: Asset Name - (Asset Tag). For example: MacBook Pro 2025 - (DS002025).
If an attribute in JSM Assets is only used as supplementary reference information (e.g., approver or administrative owner) and does not represent the current user of the asset, use a User-type custom field instead. You can also create multiple User-type custom fields if needed.
Assigned To field can only be filled when the Status is set to a Deployable type
3.4 Data format notes
The following guidelines ensure data is imported correctly and consistently:
-
Purchase Date: Convert to MMM D, YYYY format - e.g . JSM Assets exports typically use 14/Jun/26.
-
Purchase Cost: Include the currency code (e.g., 321.34 USD). If omitted, USD will be used by default.
-
Assigned To: Can only be filled when the Status is set to a Deployable type. Accepts the user’s display name.
-
Checkout Type: Enter
user,asset, orlocation(lowercase). Defaults touserif left blank. -
Requestable: Enter
1( can be requested) or0( cannot). Defaults to0if left blank. -
Asset Tag: Leave bank to auto-generate (requires auto-tag to be enabled in Settings)
Step 4: Importing into AssetIT
Following this dedicated guide: Import Assets
-
Go to Asset → Import dropdown → Import New Assets.
-
Upload your prepared CSV file.
-
In the Data Preview step, AssetIT will highlight any errors. Click Edit to fix them directly on screen.
-
Click Generate Data to automatically create any missing values (Model, Status, Inventory, Department, Location, Supplier).
-
Click Submit once the data is correct.
-
In the Result step, review the import outcome. If there are errors, download the error file, fix it, and re-import.
It is recommended to first import a small sample (3–5 rows) to verify the format before uploading the full dataset.
Step 5: Handling attachments
Attachments (e.g., handover forms, delivery receipts) cannot be migrated automatically via CSV and must be added manually after the import is complete.
-
Go to JSM Assets and open the object that contains the attachment.
-
Download the required file.
-
In AssetIT, find the corresponding asset that was just imported.
-
Open the asset and navigate to the Attachments tab.
-
Upload the file.
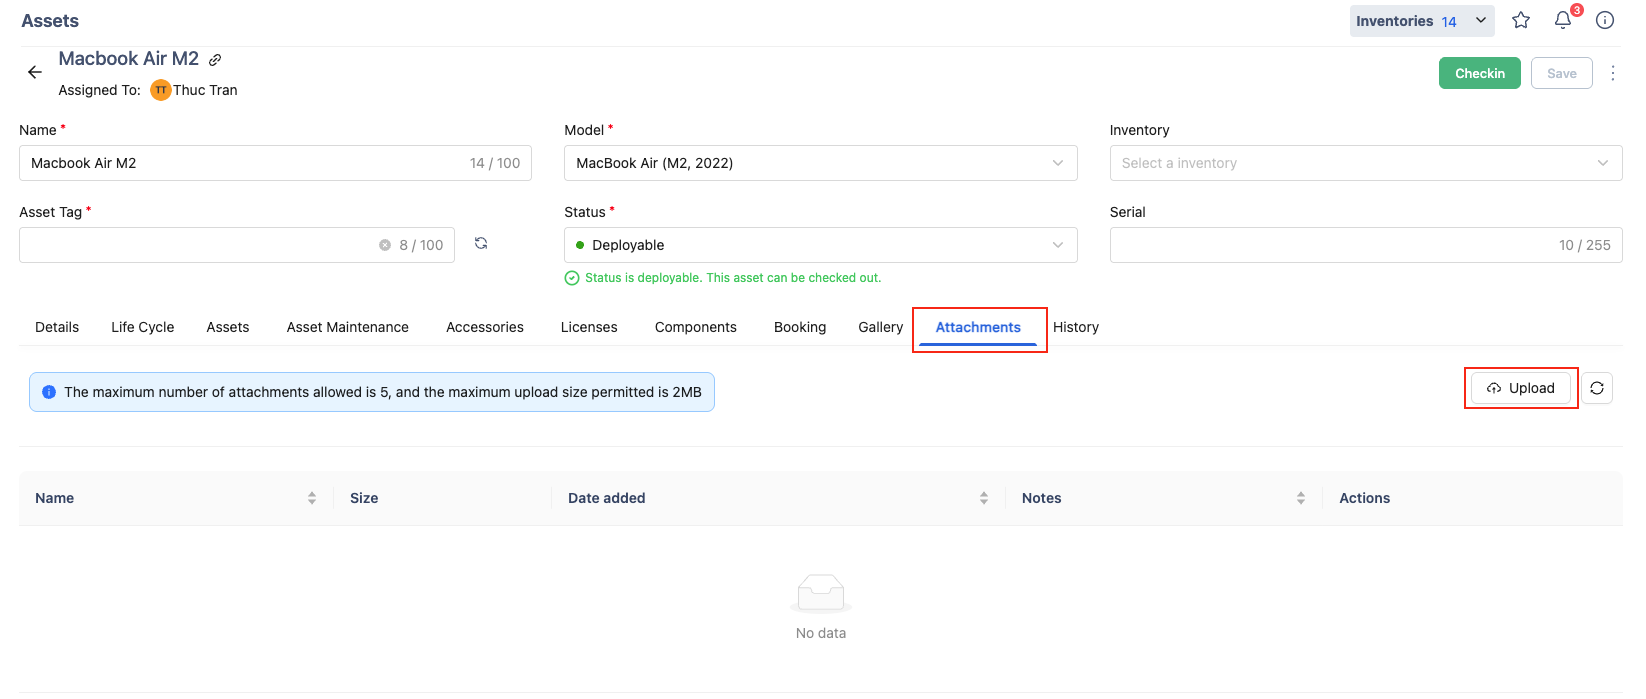
Asset attachments support the following file types: .doc, .docx, .pdf, .xlsx, .txt, .xml, .zip, .rtf, and .rar. Each file has a maximum size limit of 2 MB, and you can upload up to 5 files per asset.
Step 6: Summary checklist
Before you start:
- Create the necessary Custom fields in Reference Data
- Download the sample CSV from AssetIT
- Export data from JSM Assets by Object Type
Preparing the CSV:
- Required columns are filled in: Name, Asset Tag, Model, Status
- Purchase Date is converted to the correct format (e.g., Jun 24, 2026)
- Purchase Cost includes currency code (e.g., 321.32 USD)
- Assigned To is only filled in when Status is Deployable
- Checkout Type is correctly set: user / asset / location
- Custom Field columns are added to the CSV
- File is saved as CSV UTF-8
Importing:
- Test with a small sample of rows first
- Use Generate Data to auto-create missing values if needed
- Review results and resolve any errors
After import:
- Manually upload important attachments
Need assistance? Please reach out to us at our Support Desk.